I’m not going to start this article pretending that anyone actually comes to my blog for their Alliance Tournament planning. Hell, even if you did it’s a bit too late in the feeders for most of you. I would have shared something like this earlier; it just so happens I can do so now after being knocked out. Don’t need to keep my plans secret if I no longer have any plans eh 😀
All that said, there still may be some value here for semi-experienced teams. Whether you need a quick fit to throw into a practice scrim or if you need inspiration for a style of flying. Sometimes just seeing another fit can change the way you think about your comp and give you new, fresh ideas. I hope to demonstrate that a bit here.
There’s a term I will use from time to time in this article which is “threats”. It’s a somewhat loose term which is often only really heard in tournament play. It refers to a ship which is going to cause significant damage and is typically reserved for the main DPS portion of tournament comp. Killing all of your opponents’ threats without losing yours is pretty much a win as it then becomes your strongest DPS ships vs the low-end support.
This also isn’t a promise that I’ll be writing loads of articles again. Working for CCP wiped out my passion for the game so I am trying to claw that back where I can.
Theorycrafting for ATXVIII
There exists a particular kind of theorycrafting for tournaments in EVE Online. See, if you haven’t looked much at the rules before, EVE tournaments typically utilise a points system for ships. A battleship may cost you 20/100 points, for example, whereas a heavy assault cruiser could be used for 12 points. This brings about a few more things to be aware of when adding ships to your ten-man team.
Point Efficiency
It should be obvious that the efficiency of your points is paramount. You want as much DPS, EHP, and utility as possible out of every single point. In ATXVIII there are a few standout ships or ship classes that offer a lot of value for their points.
- Cruiser, Navy Faction (7 Points) – Excellent value for points when you consider DPS and tank offered by ships such as the Omen Navy issue or Augoror Navy Issue.
- Stabber and Scythe Fleet Issue (6 points) – Lots of damage or tackle here that you can’t really ignore nor do you want to waste time shooting.
- Skybreaker (2 points) – Just two points gets you a ship with lots of slots as solid tackle or EWAR plus a niche use as a drone killer.
- HACs and HICs (12 points) – Many ships in these categories have incredible resist profiles and good DPS, letting you get a lot more from your logistics ship(s).
- Typhoon Fleet Issue (20 points) – Discounted in this tournament, the TyFI has insane DPS application across grid in armour or even shield. It’s almost ban or use.
- Maulus (3 points) – And to a lesser extent, the Celestis/Keres. These damping ships are stupidly good in the current meta where scripts are allowed. You can shut down almost any ship you want with ease.
Maximising Resist Bonuses
It might feel obvious, but getting lots of ships with strong resists into your comp can take you a good way towards winning. If you can get your opponent to shoot a ship that they physically do not have the DPS to break under reps then you’ve nearly got a free win right there. No FC wants to waste the 30 seconds they have spent shooting a ship to switch targets but they have to.

The commentators didn’t notice it, but I utilised this in a winning match with max-tank no-prop shield bombers. Everything the hostile team was prepared to throw at them could barely scratch the tank. This left them to apply damage forever while hostile ships were just wasting time!
Other great examples of this are resist-boosted ships such as the Moa and Maller for just 4 points. You might also opt for a passive tanked shield battleship as bait. Theoretically a Rattlesnake or Scorp Navy could tank nearly 5,000 EHP/s which is just about the max DPS that anyone can apply consistently in a tournament setting. In a general, though, my advice here is to pick the ships which have good resists where possible. You’ve got limited logistics and every rep counts!
Preparing for Threats
Before any tournament match, you need to be aware of the meta and what you can expect to face up against. There is no point in designing a slow, long-range comp if you aren’t going to consider what to do once someone kites you with sensor damps, giving you nothing to shoot at.
Unfortunately, this is something you can only really get through experience playing scrims and it’s one of the reasons why practicing against other teams is so important. That said, you should be looking to know how to deal with a few main archetypes of tournament comp:
- Rush – These guys are going to throw a lot of stuff at you straight away. There will likely be many tackle ships and lots of fast threats to deal with. Rush doesn’t like running into a tanky control setup unless it can power through its main threats quickly. To properly defeat a rush you may need to split them up with warp scramblers, long webs, and efficient piloting.
- Control – Often slow and utilising strong neuting, long webs, or other EWAR. This style of comp will win by disabling your threats and picking you off one by one. Try to keep your squishy ships safe and don’t be too reliant on your capacitor to win the match. This is the difference between having a cap booster or just that bit more speed to stay away from their sphere of control.
- Kite – It’s as simple as it sounds. You want to keep away from your opponents and apply damage while keeping them from applying their damage through range. Rush can win against kite setups if it manages to disable the defensive screening ships (scramming/webbing ships that hold you in place).
- Drone – In a category of their own, drone comps can sometimes not have logi and be the ultimate kiting setup. Fighting well against one of these is a matter of execution and using jump beacons around the arena to escape the drone blob.
- Tinker – Some teams may go all in as a tinker or may have a tinker component. This term, tinker, comes from the Dota 2 character, where a team would feed Tinker to make him super powerful. In EVE Online, this translates to the use of remote cap boosters on battleships and local XLASB’s. This is done in tournaments since remote reps are only allowed on your single logi cruiser or two logi frigates. It allows a small battleship team to stay alive together for a very very long time. They may also feed a local-tanked Basilisk and make use of remote repair drones.
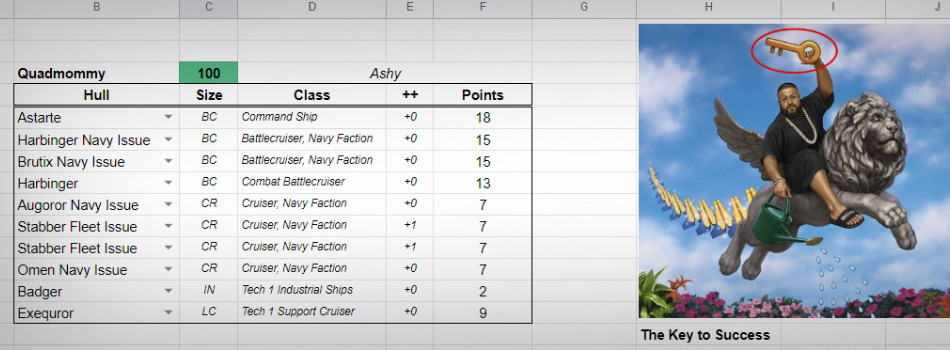
Comp 1: QuadMommy
This comp’s name is a homage to the old Octodad comps of several years back. Back then you could bring as many battlecruisers as you wanted, leading to the use of eight battlecruisers as strong medium weapon platforms. This comp recreates that in the modern age by using four cruisers and four battlecruisers with good application and long-range weapons.
- Astarte
- Harbinger Navy Issue
- Brutix Navy Issue
- Harbinger
- Augoror Navy Issue
- Stabber Fleet Issue
- Stabber Fleet Issue
- Omen Navy Issue
- Badger
- Exequror
I am personally a huge fan of this. We won at least 15-20 of our practice scrims with it and I only ever lost 3-4 practices myself when flying Quadmommy. I even have four variations that make use of different types of battlecruiser, cruiser, or even the Confessor. You might be wondering what the point of the Badger is here, though. Simply put, it is propless and holds five pieces of EWAR to help the fleet; four of which are remote sensor boosters to serve as anti-jam and anti-damp for our fleet!
The rest of the ships in the fleet should kite around either individually or as a group, aiming to take out long-range threats, EWAR, and tackle ships immediately. It’s important when flying this to not get held down. If you are then you must signal it to your fleet and quickly switch to the frigate that is scramming you. Also note that the Stabber Fleet Issues here are autocannon. They are your main tackle and screen while doing a hell of a lot of damage to frigates on their own.
A shield version is also possible which we called ShieldMommy, though it doesn’t have such nice tracking as the beam ships here. If you want to get really cool, you can even use the damping setup which we called DampMommy, or perhaps you could call it MoistMommy? Here are the fits for the comp anyway. There are plenty more, but these are the main ones.
Astarte
[Astarte, ATXVIII Quad]

Magnetic Field Stabilizer II
Magnetic Field Stabilizer II
Damage Control II
Multispectrum Energized Membrane II
Overdrive Injector System II
Medium Ancillary Armor Repairer

50MN Quad LiF Restrained Microwarpdrive
Medium Capacitor Booster II
Tracking Computer II
Optical Compact Tracking Computer

Skirmish Command Burst II
Skirmish Command Burst II
250mm Railgun II
250mm Railgun II
250mm Railgun II
250mm Railgun II
250mm Railgun II

Medium Explosive Armor Reinforcer I
Medium Explosive Armor Reinforcer I


Berserker SW-900 x1
Federation Navy Hobgoblin x4
Imperial Navy Infiltrator x3


Eifyr and Co. 'Rogue' Navigation NN-603
Eifyr and Co. 'Gunslinger' Motion Prediction MR-703
Zainou 'Deadeye' Medium Hybrid Turret MH-803
Eifyr and Co. 'Gunslinger' Surgical Strike SS-903
Skirmish Command Mindlink


Javelin M x1000
Spike M x1000
Navy Cap Booster 800 x8
Federation Navy Antimatter Charge M x1500
Federation Navy Iron Charge M x1000
Federation Navy Lead Charge M x1000
Nanite Repair Paste x250
ECCM Script x1
Scan Resolution Script x1
Targeting Range Script x1
Scan Resolution Dampening Script x2
Targeting Range Dampening Script x2
Evasive Maneuvers Charge x300
Interdiction Maneuvers Charge x300
Rapid Deployment Charge x300
Optimal Range Script x2
Tracking Speed Script x2
Kapteyn Compact Sensor Dampener x1
Phased Muon Scoped Sensor Dampener x1
Nanite Repair Paste x200
Harb Navy
[Harbinger Navy Issue, ATXVIII Quad]

Damage Control II
Compact Multispectrum Energized Membrane
Multispectrum Energized Membrane II
Overdrive Injector System II
Heat Sink II
Heat Sink II

50MN Quad LiF Restrained Microwarpdrive
Medium F-RX Compact Capacitor Booster
Sensor Booster II
Tracking Computer II
Tracking Computer II

Heavy Beam Laser II
Heavy Beam Laser II
Heavy Beam Laser II
Heavy Beam Laser II
Heavy Beam Laser II
Heavy Beam Laser II
Armor Command Burst II

Medium Polycarbon Engine Housing I
Medium Kinetic Armor Reinforcer I
Medium Explosive Armor Reinforcer I


Berserker SW-900 x1
Caldari Navy Vespa x3
Federation Navy Hobgoblin x4


Zainou 'Gypsy' CPU Management EE-603
Eifyr and Co. 'Gunslinger' Motion Prediction MR-703
Inherent Implants 'Lancer' Medium Energy Turret ME-803
Eifyr and Co. 'Gunslinger' Surgical Strike SS-903
Armored Command Mindlink


Aurora M x6
Gleam M x6
Armor Energizing Charge x300
Armor Reinforcement Charge x300
Rapid Repair Charge x300
Navy Cap Booster 400 x18
Imperial Navy Microwave M x6
Imperial Navy Multifrequency M x6
Imperial Navy Radio M x6
Imperial Navy Standard M x6
Imperial Navy Ultraviolet M x6
Electronic Hardening Charge x300
Electronic Superiority Charge x300
Sensor Optimization Charge x300
Nanite Repair Paste x100
ECCM Script x1
Scan Resolution Script x1
Targeting Range Script x1
Evasive Maneuvers Charge x300
Interdiction Maneuvers Charge x300
Rapid Deployment Charge x300
Optimal Range Script x2
Tracking Speed Script x2
Tracking Speed Script x2
Brutix Navy
[Brutix Navy Issue, ATXVIII Quad]

Damage Control II
Multispectrum Energized Membrane II
Multispectrum Energized Membrane II
Reactive Armor Hardener
Explosive Armor Hardener II
Magnetic Field Stabilizer II
Magnetic Field Stabilizer II

50MN Quad LiF Restrained Microwarpdrive
Medium F-RX Compact Capacitor Booster
Tracking Computer II
Alumel-Wired Enduring Sensor Booster

250mm Railgun II
250mm Railgun II
250mm Railgun II
250mm Railgun II
250mm Railgun II
250mm Railgun II
Information Command Burst II

Medium Transverse Bulkhead I
Medium Transverse Bulkhead I
Medium Transverse Bulkhead I


Berserker SW-900 x1
Federation Navy Hobgoblin x4
Imperial Navy Infiltrator x3


Zainou 'Gypsy' CPU Management EE-603
Zainou 'Deadeye' Medium Hybrid Turret MH-803
Eifyr and Co. 'Gunslinger' Surgical Strike SS-903
Information Command Mindlink


Javelin M x2500
Spike M x2500
Armor Energizing Charge x300
Armor Reinforcement Charge x300
Rapid Repair Charge x300
Navy Cap Booster 800 x10
Federation Navy Antimatter Charge M x1000
Federation Navy Iron Charge M x1000
Federation Navy Lead Charge M x1000
Electronic Hardening Charge x301
Electronic Superiority Charge x300
Sensor Optimization Charge x300
ECCM Script x1
Scan Resolution Script x1
Targeting Range Script x1
Optimal Range Script x1
Tracking Speed Script x1
Harbinger
[Harbinger, ATXVIII Quad]

1600mm Steel Plates II
Multispectrum Energized Membrane II
Reactive Armor Hardener
Overdrive Injector System II
Heat Sink II
Heat Sink II

F-90 Compact Sensor Booster
Optical Compact Tracking Computer
50MN Quad LiF Restrained Microwarpdrive
Medium Capacitor Booster II

Focused Medium Beam Laser II
Focused Medium Beam Laser II
Focused Medium Beam Laser II
Focused Medium Beam Laser II
Focused Medium Beam Laser II
Focused Medium Beam Laser II
Armor Command Burst II

Medium Explosive Armor Reinforcer I
Medium Trimark Armor Pump I
Medium Polycarbon Engine Housing I


Berserker SW-900 x1
Caldari Navy Vespa x3
Federation Navy Hobgoblin x4


Eifyr and Co. 'Rogue' Navigation NN-603
Eifyr and Co. 'Gunslinger' Motion Prediction MR-703
Inherent Implants 'Lancer' Medium Energy Turret ME-803
Eifyr and Co. 'Gunslinger' Surgical Strike SS-903
Armored Command Mindlink


Aurora M x6
Gleam M x6
Armor Energizing Charge x300
Armor Reinforcement Charge x300
Rapid Repair Charge x300
Navy Cap Booster 800 x9
Imperial Navy Infrared M x6
Imperial Navy Multifrequency M x6
Imperial Navy Radio M x6
Imperial Navy Standard M x6
Imperial Navy Xray M x6
Scan Resolution Script x1
Targeting Range Script x1
Optimal Range Script x1
Tracking Speed Script x1
Targeting Range Script x1
ECCM Script x1
Aug Navy
[Augoror Navy Issue, ATXVIII Quad]

Tracking Enhancer II
Heat Sink II
Heat Sink II
1600mm Steel Plates II
Multispectrum Energized Membrane II
Multispectrum Energized Membrane II
Damage Control II

F-90 Compact Sensor Booster
50MN Quad LiF Restrained Microwarpdrive
Small F-RX Compact Capacitor Booster

Heavy Beam Laser II
Heavy Beam Laser II
Heavy Beam Laser II
Small Energy Neutralizer II
Medium Infectious Scoped Energy Neutralizer

Medium Ancillary Current Router I
Medium Polycarbon Engine Housing I
Medium Trimark Armor Pump I


Caldari Navy Hornet x3


Eifyr and Co. 'Rogue' Navigation NN-603
Eifyr and Co. 'Gunslinger' Motion Prediction MR-703
Inherent Implants 'Lancer' Medium Energy Turret ME-803
Eifyr and Co. 'Gunslinger' Surgical Strike SS-903


Aurora M x3
Gleam M x3
Navy Cap Booster 400 x37
Imperial Navy Infrared M x3
Imperial Navy Multifrequency M x3
Imperial Navy Standard M x3
Imperial Navy Xray M x3
Nanite Repair Paste x200
ECCM Script x1
Scan Resolution Script x1
Targeting Range Script x1
Imperial Navy Ultraviolet M x3
Stabber Fleet
[Stabber Fleet Issue, ATXVIII Quad]

1600mm Steel Plates II
Damage Control II
Gyrostabilizer II
Reactive Armor Hardener
Multispectrum Energized Membrane II
Multispectrum Energized Membrane II

Small Capacitor Booster II
Fleeting Compact Stasis Webifier
Initiated Compact Warp Scrambler
50MN Quad LiF Restrained Microwarpdrive

220mm Vulcan AutoCannon II
220mm Vulcan AutoCannon II
220mm Vulcan AutoCannon II
220mm Vulcan AutoCannon II
220mm Vulcan AutoCannon II

Medium Explosive Armor Reinforcer I
Medium Trimark Armor Pump I
Medium Trimark Armor Pump I


Berserker SW-900 x1
Federation Navy Hobgoblin x3


Inherent Implants 'Squire' Power Grid Management EG-603
Eifyr and Co. 'Gunslinger' Motion Prediction MR-703
Eifyr and Co. 'Gunslinger' Medium Projectile Turret MP-803
Eifyr and Co. 'Gunslinger' Surgical Strike SS-903
Inherent Implants 'Noble' Hull Upgrades HG-1003


Barrage M x2000
Hail M x2000
Navy Cap Booster 400 x24
Nanite Repair Paste x200
Republic Fleet Depleted Uranium M x1000
Republic Fleet EMP M x2000
Republic Fleet Fusion M x2000
Republic Fleet Phased Plasma M x2100
Tracking Speed Script x2
Exequror
[Exequror, ATXVIII Quad]

800mm Steel Plates II
Damage Control II
Medium Ancillary Armor Repairer
Explosive Armor Hardener II
Multispectrum Energized Membrane II
Kinetic Coating II

Small Capacitor Booster II
Small Capacitor Booster II
50MN Quad LiF Restrained Microwarpdrive
Sensor Booster II

Medium Remote Armor Repairer II
Medium Remote Armor Repairer II
Medium Remote Armor Repairer II

Medium Ancillary Current Router I
Medium Ancillary Current Router I
Medium Remote Repair Augmentor I


Medium Armor Maintenance Bot I x5


Inherent Implants 'Noble' Repair Systems RS-603
Inherent Implants 'Noble' Remote Armor Repair Systems RA-703
Inherent Implants 'Noble' Mechanic MC-803
Inherent Implants 'Noble' Repair Proficiency RP-903
Inherent Implants 'Noble' Hull Upgrades HG-1003


Navy Cap Booster 400 x40
Nanite Repair Paste x200
ECCM Script x1
Scan Resolution Script x1
Targeting Range Script x1
Omen Navy
[Omen Navy Issue, ATXVIII Quad]

1600mm Crystalline Carbonide Restrained Plates
Damage Control II
Heat Sink II
Heat Sink II
Tracking Enhancer II
Multispectrum Energized Membrane II
Reactor Control Unit II

50MN Quad LiF Restrained Microwarpdrive
Small Capacitor Booster II
Tracking Computer II

Auto Targeting System I
Heavy Pulse Laser II
Heavy Pulse Laser II
Heavy Pulse Laser II
Heavy Pulse Laser II

Medium Explosive Armor Reinforcer I
Medium Kinetic Armor Reinforcer I
Medium Trimark Armor Pump I


Berserker SW-900 x1
Federation Navy Hobgoblin x1
Imperial Navy Infiltrator x2


Inherent Implants 'Squire' Power Grid Management EG-603
Zainou 'Deadeye' Trajectory Analysis TA-703
Inherent Implants 'Lancer' Medium Energy Turret ME-803
Eifyr and Co. 'Gunslinger' Surgical Strike SS-903


Conflagration M x4
Scorch M x4
Navy Cap Booster 400 x30
Imperial Navy Gamma M x4
Imperial Navy Radio M x4
Imperial Navy Standard M x4
Nanite Repair Paste x200
Optimal Range Script x1
Tracking Speed Script x1
Badger
[Badger, ATXVIII Quad]

Damage Control II
800mm Rolled Tungsten Compact Plates
Multispectrum Energized Membrane II
Signal Amplifier II

Remote Sensor Booster II
Remote Sensor Booster II
Remote Sensor Booster II
Remote Sensor Booster II
Target Painter II
Sensor Booster II

Auto Targeting System II
Auto Targeting System II

Medium Explosive Armor Reinforcer I
Medium Kinetic Armor Reinforcer I
Medium Ionic Field Projector I


ECCM Script x5
Scan Resolution Script x5
Targeting Range Script x5
Comp 2: MMM
The name here doesn’t make much sense to many people other than myself. It comes from the “Mach Moa Meta” coined by the AT host Apothne back in AT14. I lead Villore Accords to top 16 using a rush comp containing Machariels and Moas. The key element to this comp, however, is not necessarily the Mach itself. The idea is that your battleships should be fast and not require as much tackle support. You then can set up your other main threats as tackle killers.
- Barghest
- Typhoon Fleet Issue
- Cerberus
- Orthrus
- Nemesis
- Manticore
- Maulus
- Hyena
- Stork
- Scimitar
You will fly this comp with two targets at almost all times. A main DPS target and an anti-tackle target. There are also two “flex” slots in the Maulus and Hyena. You can easily swap these two out for other flavours of EWAR ships if needed, but I do recommend having a bonused paint ship in the fleet to enable your bombers, they’ll be sticking around 😉
See, one of the other key parts of this comp is the use of tanky bombers. For just 6 points you can get about 1,100 DPS applied to hostile battleships and battlecruisers for the entire match. You’ll see the fits further down the page, but it’s the bomber strategy that I described earlier. With your other threats either being tanky or kiting, they draw fire easily and will (usually) tank most of it with ease.
Is this the absolute best rush comp that exists? Certainly not. What it does bring to the table, however, is a good amount of balance. I was never as confident flying this as I was with QuadMommy, but I was pretty happy with most of the matchups it would fight against. The only thing which would always defeat this would be teams that could screen us well and keep those screening ships alive while they damped us out.
It’s good fun to use this, but it doesn’t often work more than once. As soon as they catch on to what your bombers do it becomes a lot more difficult to secure victory. Here are the fits! (Don’t mind fit names, some come from other teams and some are from my past tournament runs.)
Barghest
[Barghest, ATXVII Kingslayer RHML]

Damage Control II
Ballistic Control System II
Ballistic Control System II
Ballistic Control System II
Ballistic Control System II
Pro-Nav Compact Missile Guidance Enhancer

500MN Quad LiF Restrained Microwarpdrive
X-Large Ancillary Shield Booster
Multispectrum Shield Hardener II
Multispectrum Shield Hardener II
Heavy F-RX Compact Capacitor Booster
Warp Scrambler II

Rapid Heavy Missile Launcher II
Rapid Heavy Missile Launcher II
Rapid Heavy Missile Launcher II
Rapid Heavy Missile Launcher II
Rapid Heavy Missile Launcher II
Rapid Heavy Missile Launcher II
Heavy Energy Neutralizer II
Heavy Energy Neutralizer II

Large Processor Overclocking Unit I
Large EM Shield Reinforcer I
Large Core Defense Field Extender I


Berserker SW-900 x1
Caldari Navy Vespa x5


Inferno Fury Heavy Missile x600
Inferno Precision Heavy Missile x450
Mjolnir Fury Heavy Missile x600
Nova Fury Heavy Missile x600
Scourge Fury Heavy Missile x750
Navy Cap Booster 3200 x4
Navy Cap Booster 400 x18
Caldari Navy Inferno Heavy Missile x750
Caldari Navy Mjolnir Heavy Missile x750
Caldari Navy Nova Heavy Missile x750
Caldari Navy Scourge Heavy Missile x750
Missile Precision Script x2
Missile Range Script x1

Zainou 'Gypsy' CPU Management EE-603
Zainou 'Deadeye' Missile Projection MP-703
Zainou 'Deadeye' Guided Missile Precision GP-803
Zainou 'Deadeye' Target Navigation Prediction TN-903
Zainou 'Deadeye' Rapid Launch RL-1003
Typhoon Fleet
[Typhoon Fleet Issue, ATXVIII MMM 2]

Ballistic Control System II
Ballistic Control System II
Ballistic Control System II
Missile Guidance Enhancer II
Missile Guidance Enhancer II
Nanofiber Internal Structure II
Damage Control II

500MN Quad LiF Restrained Microwarpdrive
Multispectrum Shield Hardener II
Multispectrum Shield Hardener II
Large Shield Extender II
Large Shield Extender II

Rapid Heavy Missile Launcher II
Rapid Heavy Missile Launcher II
Rapid Heavy Missile Launcher II
Rapid Heavy Missile Launcher II
Rapid Heavy Missile Launcher II
Rapid Heavy Missile Launcher II
Heavy Energy Neutralizer II
Heavy Energy Nosferatu II

Large Core Defense Field Extender I
Large Core Defense Field Extender I
Large Core Defense Field Extender I


Berserker SW-900 x7
Republic Fleet Warrior x5


Zainou 'Gypsy' CPU Management EE-603
Zainou 'Deadeye' Missile Projection MP-703
Zainou 'Deadeye' Guided Missile Precision GP-803
Zainou 'Deadeye' Target Navigation Prediction TN-903
Zainou 'Deadeye' Rapid Launch RL-1003


Inferno Fury Heavy Missile x2000
Mjolnir Fury Heavy Missile x2000
Nova Fury Heavy Missile x2000
Scourge Fury Heavy Missile x2000
Navy Cap Booster 3200 x4
Caldari Navy Inferno Heavy Missile x1000
Caldari Navy Mjolnir Heavy Missile x1000
Caldari Navy Nova Heavy Missile x1000
Caldari Navy Scourge Heavy Missile x1000
Nanite Repair Paste x300
Cerberus
[Cerberus, AT 3% CPU]

Ballistic Control System II
Ballistic Control System II
Crosslink Compact Ballistic Control System
Assault Damage Control II

Multispectrum Shield Hardener II
Target Painter II
EM Shield Amplifier II
50MN Quad LiF Restrained Microwarpdrive
X-Large Ancillary Shield Booster

Rapid Light Missile Launcher II
Rapid Light Missile Launcher II
Rapid Light Missile Launcher II
Rapid Light Missile Launcher II
Rapid Light Missile Launcher II
Rapid Light Missile Launcher II

Medium EM Shield Reinforcer I
Medium Ancillary Current Router I


Republic Fleet Warrior x3


Zainou 'Gypsy' CPU Management EE-603
Zainou 'Deadeye' Missile Projection MP-703
Zainou 'Deadeye' Guided Missile Precision GP-803
Zainou 'Snapshot' Light Missiles LM-903
Zainou 'Deadeye' Rapid Launch RL-1003


Inferno Fury Light Missile x1000
Inferno Precision Light Missile x1000
Mjolnir Fury Light Missile x1000
Mjolnir Precision Light Missile x1000
Nova Fury Light Missile x1000
Nova Precision Light Missile x1000
Scourge Fury Light Missile x1000
Scourge Precision Light Missile x1000
Navy Cap Booster 400 x27
Caldari Navy Inferno Light Missile x1000
Caldari Navy Mjolnir Light Missile x1000
Caldari Navy Nova Light Missile x1000
Caldari Navy Scourge Light Missile x1120
Nanite Repair Paste x500
Orthrus
[Orthrus, AG5 Elden Ring]

Crosslink Compact Ballistic Control System
Ballistic Control System II
Ballistic Control System II
Damage Control II

X-Large Ancillary Shield Booster
Multispectrum Shield Hardener II
Warp Scrambler II
Small Capacitor Booster II
50MN Y-T8 Compact Microwarpdrive

Rapid Light Missile Launcher II
Rapid Light Missile Launcher II
Rapid Light Missile Launcher II
Rapid Light Missile Launcher II
Rapid Light Missile Launcher II
[Empty High slot]

Medium Processor Overclocking Unit I
Medium EM Shield Reinforcer I
Medium Rocket Fuel Cache Partition I


Republic Fleet Warrior x5


Zainou 'Gypsy' CPU Management EE-603
Zainou 'Deadeye' Missile Projection MP-703
Zainou 'Gypsy' Long Range Targeting LT-803
Zainou 'Snapshot' Light Missiles LM-903
Zainou 'Deadeye' Rapid Launch RL-1003


Inferno Fury Light Missile x500
Mjolnir Fury Light Missile x500
Nova Fury Light Missile x500
Scourge Fury Light Missile x500
Navy Cap Booster 400 x25
Caldari Navy Inferno Light Missile x500
Caldari Navy Mjolnir Light Missile x500
Caldari Navy Nova Light Missile x500
Caldari Navy Scourge Light Missile x500
Nanite Repair Paste x300
Nemesis
[Nemesis, ECMAT2018]

Micro Auxiliary Power Core II
Damage Control II

Multispectrum Shield Hardener II
Multispectrum Shield Hardener II
Medium Shield Extender II
Medium F-S9 Regolith Compact Shield Extender

Torpedo Launcher II
Torpedo Launcher II
Torpedo Launcher II
[Empty High slot]
[Empty High slot]

Small Core Defense Field Extender I
Small Core Defense Field Extender I


Inherent Implants 'Squire' Power Grid Management EG-603
Zainou 'Gnome' Shield Management SM-703
Zainou 'Deadeye' Guided Missile Precision GP-803
Zainou 'Deadeye' Target Navigation Prediction TN-903
Zainou 'Deadeye' Rapid Launch RL-1003


Inferno Javelin Torpedo x1000
Inferno Rage Torpedo x1000
Caldari Navy Inferno Torpedo x1000
Caldari Navy Mjolnir Torpedo x650
Caldari Navy Nova Torpedo x650
Caldari Navy Scourge Torpedo x650
Manticore
[Manticore, ATXVII Bait Gila]

Micro Auxiliary Power Core II
Damage Control II

Medium Shield Extender II
Medium Shield Extender II
Multispectrum Shield Hardener II
Multispectrum Shield Hardener II

Torpedo Launcher II
Torpedo Launcher II
Torpedo Launcher II
[Empty High slot]
[Empty High slot]

Small Core Defense Field Extender I
Small Core Defense Field Extender I


Inherent Implants 'Squire' Power Grid Management EG-603
Zainou 'Gnome' Shield Management SM-703
Zainou 'Deadeye' Guided Missile Precision GP-803
Zainou 'Deadeye' Target Navigation Prediction TN-903
Zainou 'Deadeye' Rapid Launch RL-1003


Mjolnir Rage Torpedo x650
Scourge Javelin Torpedo x1000
Scourge Rage Torpedo x1000
Nanite Repair Paste x200
Caldari Navy Mjolnir Torpedo x650
Caldari Navy Scourge Torpedo x1000
Maulus
[Maulus, ATXVIII Quad]

Damage Control II
Signal Amplifier II
200mm Steel Plates II

Phased Muon Scoped Sensor Dampener
Phased Muon Scoped Sensor Dampener
Phased Muon Scoped Sensor Dampener
5MN Cold-Gas Enduring Microwarpdrive

Auto Targeting System I
[Empty High slot]

Small Particle Dispersion Projector I
Small Particle Dispersion Projector I
Small Polycarbon Engine Housing I


Republic Fleet Warrior x6


Eifyr and Co. 'Rogue' Navigation NN-603
Zainou 'Gypsy' Signature Analysis SA-703
Zainou 'Gypsy' Long Range Targeting LT-803
Eifyr and Co. 'Rogue' High Speed Maneuvering HS-903
Inherent Implants 'Noble' Hull Upgrades HG-1003


Nanite Repair Paste x200
Scan Resolution Dampening Script x3
Targeting Range Dampening Script x3
Hyena
[Hyena, Stolen Hyena]

Damage Control II
Nanofiber Internal Structure II
Signal Amplifier II

5MN Quad LiF Restrained Microwarpdrive
Medium Shield Extender II
Stasis Webifier II
Target Painter II

125mm Gatling AutoCannon II
125mm Gatling AutoCannon II
[Empty High slot]

Small Kinetic Shield Reinforcer I
Small Thermal Shield Reinforcer I


Eifyr and Co. 'Rogue' Navigation NN-603
Eifyr and Co. 'Rogue' Evasive Maneuvering EM-703
Zainou 'Gypsy' Long Range Targeting LT-803


Barrage S x1000
Nanite Repair Paste x250
Stork
[Stork, HYDRA Stork]

Co-Processor II
Damage Control II

5MN Quad LiF Restrained Microwarpdrive
EM Shield Amplifier II
Medium Shield Extender II
Multispectrum Shield Hardener II
Stasis Webifier II
Target Painter II

Information Command Burst II
Skirmish Command Burst II
Small Ghoul Compact Energy Nosferatu
Shield Command Burst II
Shield Command Burst II
Shield Command Burst II

Small Command Processor I
Small Command Processor I


Zainou 'Gypsy' CPU Management EE-603
Eifyr and Co. 'Rogue' Evasive Maneuvering EM-703
Zainou 'Gypsy' Long Range Targeting LT-803
Caldari Navy Command Mindlink


Electronic Hardening Charge x300
Electronic Superiority Charge x300
Sensor Optimization Charge x300
Nanite Repair Paste x250
Active Shielding Charge x300
Shield Extension Charge x300
Shield Harmonizing Charge x300
Evasive Maneuvers Charge x300
Interdiction Maneuvers Charge x300
Rapid Deployment Charge x300
Scimitar
[Scimitar, zKill Guide to Scimi]

Damage Control II
Reactor Control Unit II
Reactor Control Unit II
Reactor Control Unit II

50MN Y-T8 Compact Microwarpdrive
Multispectrum Shield Hardener II
Multispectrum Shield Hardener II
Medium F-RX Compact Capacitor Booster
X-Large Ancillary Shield Booster

Large Murky Compact Remote Shield Booster
Large Murky Compact Remote Shield Booster
Large Murky Compact Remote Shield Booster
Large Murky Compact Remote Shield Booster

Medium Ancillary Current Router I
Medium Processor Overclocking Unit I


Light Shield Maintenance Bot I x1
Medium Armor Maintenance Bot I x4


Zainou 'Gypsy' CPU Management EE-603
Zainou 'Gnome' Shield Management SM-703
Zainou 'Gnome' Shield Emission Systems SE-803
Eifyr and Co. 'Rogue' High Speed Maneuvering HS-903


Navy Cap Booster 400 x18
Navy Cap Booster 800 x9
Nanite Repair Paste x100
Other Comps
It would take me forever to format this article with every single fit and comp that we practiced with, but I wanted to drop a few more down here to give some inspiration. Perhaps you might not fly exactly these ships, but maybe they will give you a great idea that takes you on to victory in ATXVIII. If you want any of the fits, by all means, reach out to me on Discord and I’ll help you out. Laura#1479
Light Missile Flykiller
- Typhoon Fleet Issue
- Drake Navy Issue
- Cerberus
- Orthrus
- Orthrus
- Caracal
- Jackdaw
- Flycatcher
- Hyena
- Scimitar
This is a comp that I dreamt up as a way of killing all tackle before kiting to victory. It performed ok in practice with the amount of light missile threats able to bully anything below a cruiser very easily. Your Drake Navy and Typhoon Fleet can also keep applying damage to bigger targets for a long time as they also kite around grid.
What ended up being problematic for this comp was range and specifically assault frigate pilots who knew how to pull back and not die. The one main thing that this comp actually lacks is any way of holding targets down other than potentially the Hyena. You kinda have to kill your opponent before they realise and get away from you.
Drone Damps
- Eos
- Eos
- Proteus
- Ishtar
- Ishtar
- Vexor
- Maulus
- Skybreaker
- Republic Fleet Firetail
- Exequror
This one does exactly what you expect it to do. The free mid-slots on these armour-based drone ships allow for many damps across the entire fleet. From the start of the match you spread out and simply put your drones on the target of your choice, often enemy logistics. From there, kite around towards MJD beacons and never let anyone scram you.
Damps in this comp should be focused on anything that can cause trouble at range. That is: long-range ships or other EWAR ships. I recommend using tags in the overview to organise damps more effectively. You might also choose to have one of your pilots such as the Maulus swap targets fast. This will let you quickly break any locks that the targets may have attained by dropping their range massively. This is an effective tactic since it takes a long time for people to reorient themselves after having all locks broken.
Very effective but very reliant on individual pilot skill. Don’t you dare fly something like this and anchor up on the FC because that’s just not cool. One of the last things to say about this comp is that it’s effective in closing out matches. During the late game you can often keep on kiting and always have a chance at winning using a drone setup.
I’ve got a lot more fits saved up in my spreadsheet. Each of our comps had something like 20 options so we could change it up in the event of a ban. Best of luck to everyone in the Alliance Tournament this year. I’m going to stop writing now before I get too salty about that trash last-minute “Rust Score” rule. Seeya!
Be First to Comment