
This is going to be a divisive article, I’ll tell you that right now. Black Ops battleships are very personal ships with extremely niche use-cases. If you already have a favourite fit that works well, this is not the right article for you. If, however, you’re curious about the new blops changes introduced in the Enter the Portal update then read on. I’m going to try and cover two or three common uses for each blops battleship minus the Marshal.
Most of the fits I’m going to present are aiming to cost about 500m ISK or less in fittings alone. You can always add bling on, but if a fit is already covered in blue modules then it can be hard to decide what needs to come off. Affordable fits mean they’re easier to risk, easier to lose, and easier to own in general. I will also be setting myself a fitting restriction here wherein I want every fit to have a Jump Portal with a refit in cargo to swap for more utility. That’s not strictly necessary if you know exactly what you want but again, we’re going for flexibility and accessibility here. Finally, each fit will need at least a heavy cap booster, allowing you to eat a 3200 charge to get back to jump cap faster.

- Panther – Hydrogen Isotopes
- Sin – Oxygen Isotopes
- Widow – Nitrogen Isotopes
- Redeemer – Helium Isotopes
- Marshal – Helium Isotopes
Now in my opinion there are three main kinds of Black Ops drops. They all start the same way – with a hunter finding something and lighting a cyno – but the way that you fight depends on your fleet composition and how you prepare:
- Fleet Ganks: This is the most common. You take a few Black Ops ships and a smattering of bombers and go delete some lone ratter in about 12 seconds. It’s not particularly satisfying and uses simple, often armour buffer, battleships, and whichever bombers you like. Such fleets tend to scatter to the wind after their gank as they cannot survive against even a prepared gang. In larger numbers, this style of drop might also be used to counter-drop someone.
- Solo Drops: Flying solo Black Ops with a multiboxed hunter is the thing that people aspire to thanks to Youtube videos. It’s also the unfortunate reason why everyone seems to think that Black Ops ships need to be blinged to the teeth. The reality is that, yes, solo players do need a certain level of bling to compete but you can be tasteful about it. Dropping 300 EHP/s of tank to save a billion ISK might not make a difference in 90% of fights, but you’re going to take more fights knowing that you aren’t risking as much.
- Fleet Fighting Blops: I hardly ever see people doing this, but I think it’s something that will become more common with Conduit Jumps becoming a thing. The idea is that you tank your Black Ops enough and give them more mobility to actually move about on grid to fight rather than gank. Bonus points if you bring T3C logi and tank your bombers. I’ve done this successfully and tanked some really crazy stuff in just the last month.
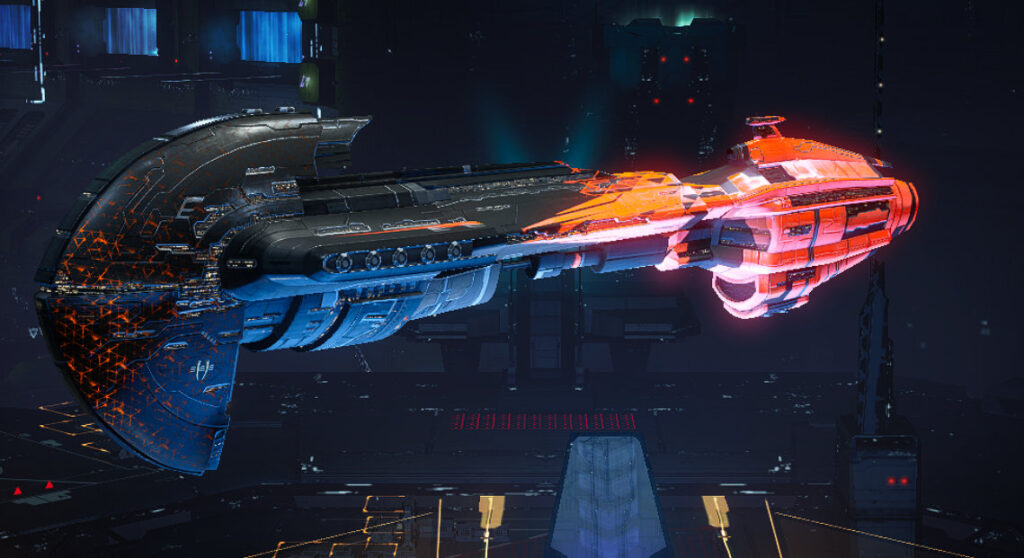
Redeemer
The Redeemer is amazing and, in my opinion, outshines the newly resist buffed Widow through sheer damage potential with turrets (rather than missiles). This Amarrian battleship can put out some of the best DPS in class, even more so if you polarise the guns. In the first fit below we’re going to do exactly that with a hot dropper that brings a bonused neut, 42k EHP, and about 3,000 DPS with 3% implants and some cheap Pyro. The Jump Portal will even fit if you compact the tracking computer. Run this with mid-grade Amulets and a links T3C in fleet for a 61k EHP and same insane DPS.
Moving back to more standard fits, we have another one that I’m a huge fan of. The dual rep Redeemer below has the potential to tank about 1,100 EHP/s on some cheap implants while still dealing over 1,700 itself with scram and web for tackle. This fit is actually fairly flexible. You can swap the damage rig for a Nano Pump to a big tank boost, or you can drop the Damage Control for another Heat Sink. Either option works really well with mid grade Asklepians for a further amour rep bonus. For only 750m ISK of fittings, this fit is monstrously good. The only thing you have to watch out for is that it requires good rigging skills, though that can be avoided with a compact neut or Damage Control.
Keeping to the same solo fit idea for now – I also noticed that you can remove two (or more) guns and fit an extra couple of Heavy Neuts just fine. With the massive neut bonus, this sin of removing a third of your guns can be overlooked. What you get is a ship that, while damage locked, can do 50% more damage than a drone Sin, with roughly equivalent neuting power. Such a fit looks like this and is a very good way of landing powerful neuts on grid. You should also be able to make the fit cheaper by going with a simple T2+Ancil rep format, it will just mean using more more compact and meta modules.
Polarised DPS Redeemer
[Redeemer, 2021 Polarised]

Imperial Navy 1600mm Steel Plates
Imperial Navy 1600mm Steel Plates
Imperial Navy 1600mm Steel Plates
Imperial Navy Heat Sink
Imperial Navy Heat Sink
Imperial Navy Heat Sink
Imperial Navy Heat Sink

Large Micro Jump Drive
F-90 Compact Sensor Booster
Tracking Computer II
Heavy F-RX Compact Capacitor Booster

Polarized Mega Pulse Laser
Polarized Mega Pulse Laser
Polarized Mega Pulse Laser
Polarized Mega Pulse Laser
Polarized Mega Pulse Laser
Polarized Mega Pulse Laser
Dread Guristas Cloaking Device
Heavy Energy Neutralizer II

Large Trimark Armor Pump I
Large Energy Collision Accelerator II


'Augmented' Berserker x5


Eifyr and Co. 'Gunslinger' Motion Prediction MR-703
Eifyr and Co. 'Gunslinger' Surgical Strike SS-903
Inherent Implants 'Lancer' Large Energy Turret LE-1003

Agency 'Pyrolancea' DB5 Dose II


Conflagration L x6
Scorch L x6
Navy Cap Booster 3200 x8
Imperial Navy Multifrequency M x6
Imperial Navy Standard M x6
Nanite Repair Paste x100
Agency 'Pyrolancea' DB5 Dose II x1
Standard Drop Booster x1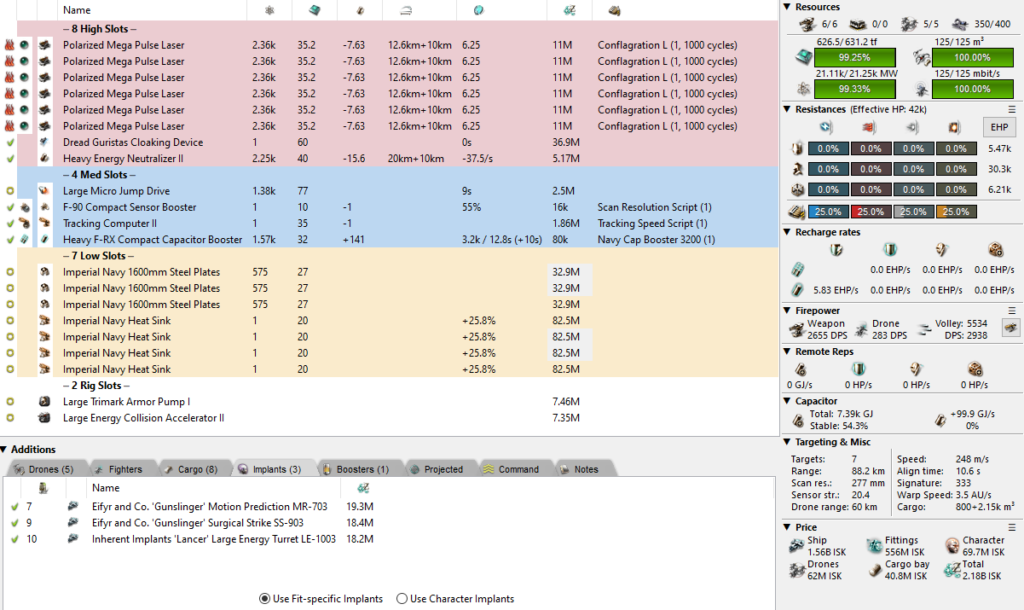
Solo Dual Rep Redeemer
[Redeemer, 2021 Dual Rep]

Core C-Type Large Armor Repairer
Core C-Type Large Armor Repairer
Coreli A-Type Multispectrum Coating
Coreli A-Type Multispectrum Coating
Imperial Navy Heat Sink
Dark Blood Reactor Control Unit
Damage Control II

Heavy F-RX Compact Capacitor Booster
500MN Y-T8 Compact Microwarpdrive
Caldari Navy Warp Scrambler
Caldari Navy Stasis Webifier

Mega Pulse Laser II
Mega Pulse Laser II
Mega Pulse Laser II
Mega Pulse Laser II
Mega Pulse Laser II
Mega Pulse Laser II
Heavy Energy Neutralizer II
Caldari Navy Cloaking Device

Large Thermal Armor Reinforcer I
Large Energy Collision Accelerator II


Berserker II x5


Eifyr and Co. 'Gunslinger' Surgical Strike SS-903
Inherent Implants 'Lancer' Large Energy Turret LE-1003

Standard Exile Booster
Agency 'Hardshell' TB5 Dose II


Conflagration L x6
Scorch L x6
Navy Cap Booster 3200 x8
Imperial Navy Multifrequency M x6
Imperial Navy Standard M x6
Nanite Repair Paste x100
Agency 'Hardshell' TB5 Dose II x1
Agency 'Pyrolancea' DB5 Dose II x1
Standard Drop Booster x1
Standard Exile Booster x1
But wait, there’s more! I have a couple more fits for the redeemer and the first of those is really quite a standard fit. Double plated with a sebo and scram. Of course stick to the Jump Portal instead of a neut if you’re the only Black Ops in your fleet, but the bonused neut is super nice. It needs a bit more CPU to fit, but you can easily get that if you compact the Damage Control or set one Heat Sink to be Imperial Navy. This is a common theme across a lot of the fits here, both standard and the crazy ones. Bling or storyline modules need to be used for the purpose of fitting rather than strictly to make the ship better. This is fine, but it makes Black Ops battleships a little frustrating to fit.
Finally, we can turn our attention to neuts. It should be no surprise that with a neut bonus the Redeemer opens up a new potential fit as a mini jumping Bhaalgorn. It does this role well thanks to a new 50% bonus to neut amount and a full rack of heavy neuts, neuting as much three Astrahus subcap neuts on its own! The problem with this is that you need a reason to use it really. There aren’t that many situations where a full neut boat with no damage is going to be that much more valuable than more damage in a fast drop. The best use I can think is in a fleet scenario, though you could likely also bring three of these on grid with a Rorqual to help neut it out. If you’re going for the long game, consider dropping the portal for another heavy nos to stay capped up.
Fleet Buffer DPS Redeemer
[Redeemer, 2021 Buffer Redeemer]

Heat Sink II
Heat Sink II
Imperial Navy 1600mm Steel Plates
Imperial Navy 1600mm Steel Plates
Coreli A-Type Multispectrum Coating
Coreli A-Type Multispectrum Coating
Damage Control II

Large Micro Jump Drive
Heavy F-RX Compact Capacitor Booster
Sensor Booster II
Caldari Navy Warp Scrambler

Mega Pulse Laser II
Mega Pulse Laser II
Mega Pulse Laser II
Mega Pulse Laser II
Mega Pulse Laser II
Mega Pulse Laser II
Dread Guristas Cloaking Device
Heavy Energy Neutralizer II

Large Trimark Armor Pump I
Large Thermal Armor Reinforcer I


Ogre II x5


Conflagration L x6
Scorch L x6
Navy Cap Booster 3200 x8
Imperial Navy Multifrequency M x6
Imperial Navy Standard M x6
Nanite Repair Paste x100
ECCM Script x1
Scan Resolution Script x1
Targeting Range Script x1
Agency 'Pyrolancea' DB5 Dose II x1
Standard Drop Booster x1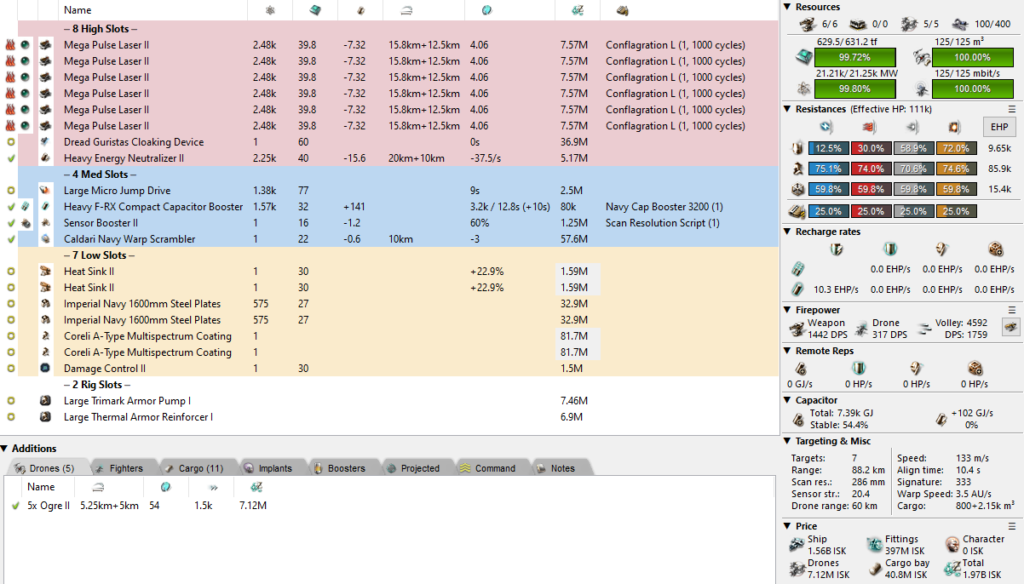
“Mini Bhaalgorn” Redeemer
[Redeemer, 2021 Mini Bhaalgorn]

Damage Control II
Imperial Navy 1600mm Steel Plates
Imperial Navy 1600mm Steel Plates
Corpii A-Type Multispectrum Coating
Corpii A-Type Multispectrum Coating
Corpii A-Type Thermal Coating
Corpii A-Type Kinetic Coating

True Sansha Heavy Capacitor Booster
Republic Fleet Large Cap Battery
Ship Scanner II
Large Micro Jump Drive

Heavy Energy Nosferatu II
Heavy Energy Neutralizer II
Heavy Energy Neutralizer II
Heavy Energy Neutralizer II
Heavy Energy Neutralizer II
Heavy Energy Neutralizer II
Covert Jump Portal Generator I
Dread Guristas Cloaking Device

Large Trimark Armor Pump I
Large Trimark Armor Pump I


Ogre II x5


Mid-grade Talisman Alpha
Mid-grade Talisman Beta
Mid-grade Talisman Gamma
Mid-grade Talisman Delta
Mid-grade Talisman Epsilon
Mid-grade Talisman Omega


Navy Cap Booster 3200 x8
Nanite Repair Paste x100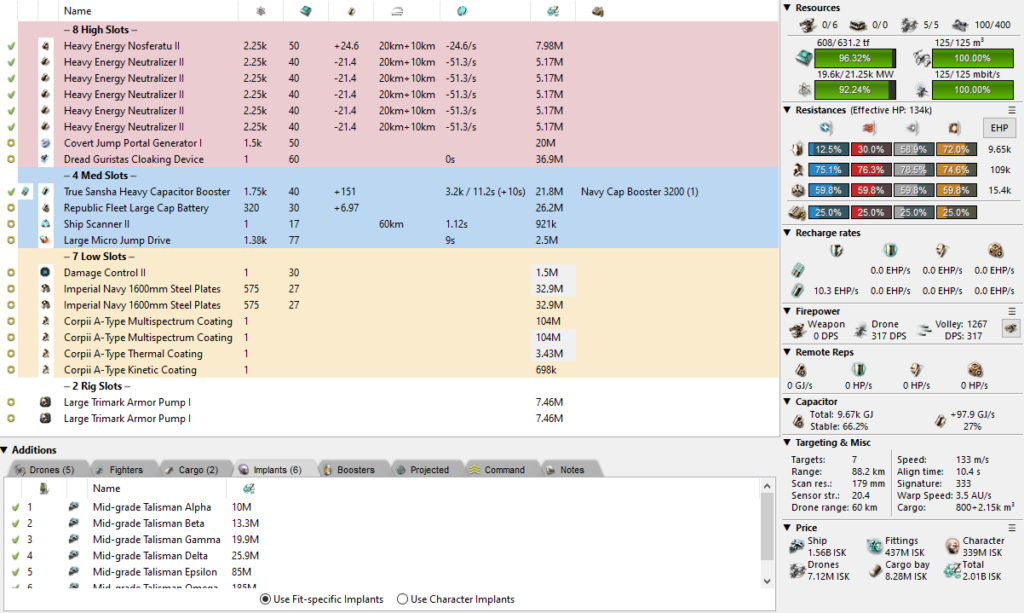
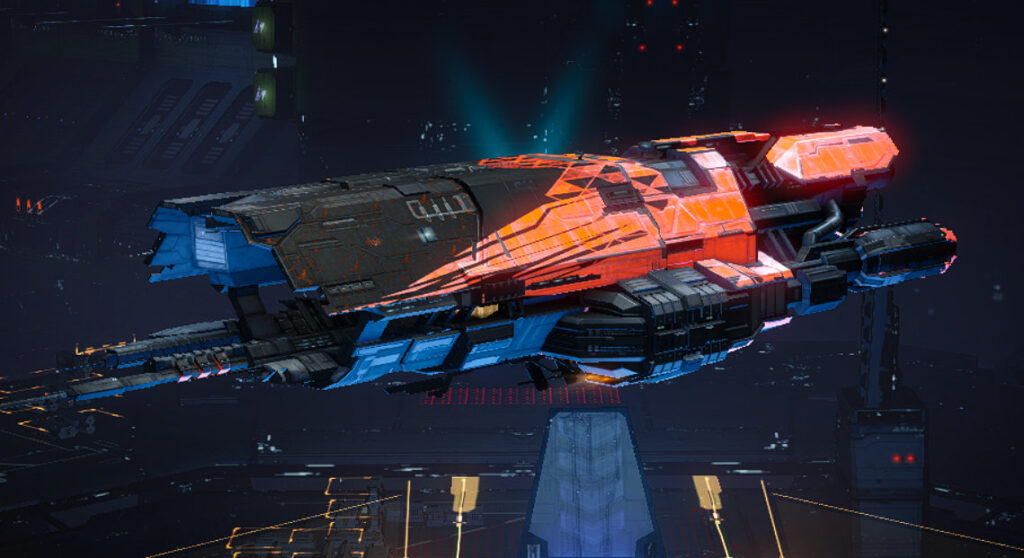
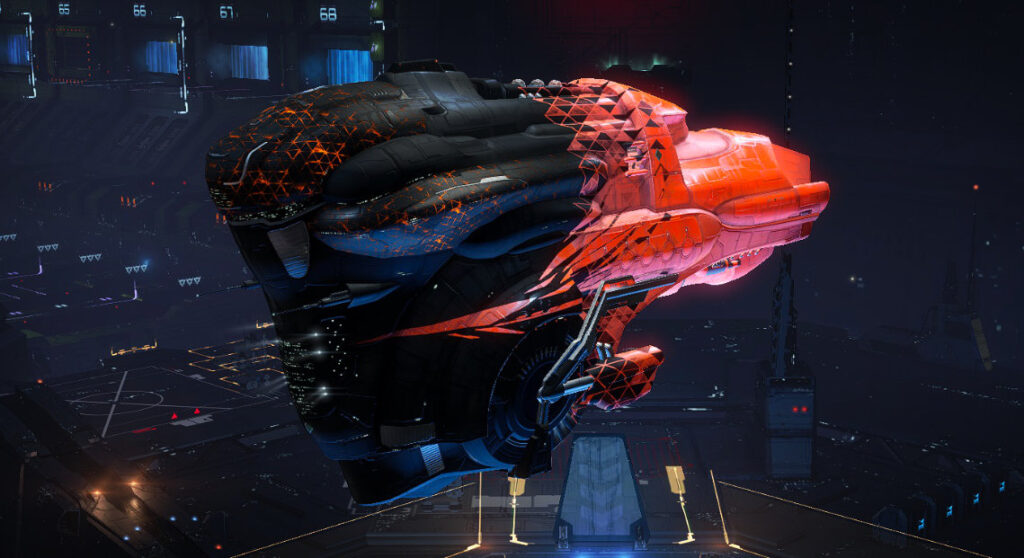
Panther
While I am a huge Minmatar fangirl and I love powerful autocannons more than almost any other weapon system, it’s hard to place that love on the Panther. It’s an awkward ship to fit and it kind of does anything you need. Shield, armour, autos, neuting, drone DPS, tackle, kiting, brawling. It does all of those, but just not quite as well as a more specialised ship (except the kiting, that speed bonus is great). Note that you always need to use 650mm autocannons on this instead of 800mm if you want heavy neuts – and you do want heavy neuts.
Moving on to the actual fits anyway, the easiest and most obvious way to run a Panther is to use a basic dual neut armour buffer setup. My version below has the portal fitted, but you can simply swap to double scoped/compact neuts or use some Dark Blood versions instead. This is a really simple setup used to gank and isn’t really special. You can tweak the fit to drop damage for tank easily with another resist mod. Alternatively, it can be cheaper or more expensive depending on how much bling you want to throw at this one. There is also a microwarp + microjump variant that people like to use, here is a fit for that one.
A more interesting way of using the Panther is in a spider tank, where each of your ships has remote reps. This usually requires a specialised fleet to make itself useful and often that fleet will be composed of other Panthers. Everyone jumps in and reps whoever is taking damage. With the right group and clear comms you can pull off some really magical plays using spider tanks. It would possibly be worth running these Panthers with some Sins, too, but more on that later.
Simple Armour Buffer Panther
[Panther, 2021 Armour Buffer]

Coreli A-Type Multispectrum Coating
Damage Control II
Gyrostabilizer II
Gyrostabilizer II
Imperial Navy 1600mm Steel Plates
Imperial Navy 1600mm Steel Plates

500MN Quad LiF Restrained Microwarpdrive
Heavy Stasis Grappler II
Warp Scrambler II
Sensor Booster II
Heavy F-RX Compact Capacitor Booster

Dual 650mm Repeating Cannon II
Dual 650mm Repeating Cannon II
Dual 650mm Repeating Cannon II
Dual 650mm Repeating Cannon II
Dual 650mm Repeating Cannon II
Dread Guristas Cloaking Device
Covert Jump Portal Generator I
Heavy Energy Neutralizer II

Large Trimark Armor Pump I
Large Explosive Armor Reinforcer I


Ogre II x5
Vespa EC-600 x5


Barrage L x800
Hail L x2000
Navy Cap Booster 3200 x7
Nanite Repair Paste x100
Republic Fleet EMP L x800
Republic Fleet Phased Plasma L x800
Republic Fleet Titanium Sabot L x800
ECCM Script x1
Scan Resolution Script x1
Targeting Range Script x1
Agency 'Pyrolancea' DB5 Dose II x1
Standard Drop Booster x1
Standard Sooth Sayer Booster x1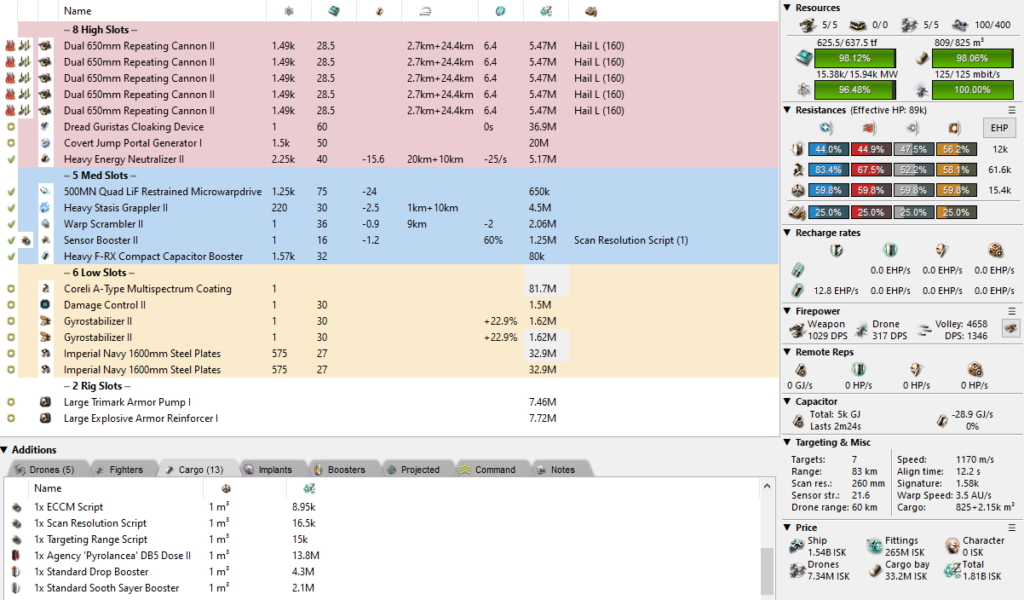
Spider Tank Panther
[Panther, 2021 Spider Panther]

Imperial Navy 1600mm Steel Plates
Reactive Armor Hardener
Imperial Navy Multispectrum Energized Membrane
Corpii A-Type Multispectrum Coating
Gyrostabilizer II
Republic Fleet Gyrostabilizer

Large Micro Jump Drive
Caldari Navy Warp Scrambler
Heavy Capacitor Booster II
Republic Fleet Large Cap Battery
Republic Fleet Large Cap Battery

800mm Repeating Cannon II
800mm Repeating Cannon II
800mm Repeating Cannon II
800mm Repeating Cannon II
800mm Repeating Cannon II
Large Remote Armor Repairer II
Large Ancillary Remote Armor Repairer
Dread Guristas Cloaking Device

Large Trimark Armor Pump I
Large Explosive Armor Reinforcer I


Hornet EC-300 x5
Ogre II x5
Warrior II x5


Barrage L x800
Hail L x2000
Navy Cap Booster 3200 x7
Nanite Repair Paste x300
Republic Fleet EMP L x800
Republic Fleet Phased Plasma L x800
Republic Fleet Titanium Sabot L x800
Agency 'Pyrolancea' DB5 Dose II x1
Standard Drop Booster x1
Standard Sooth Sayer Booster x1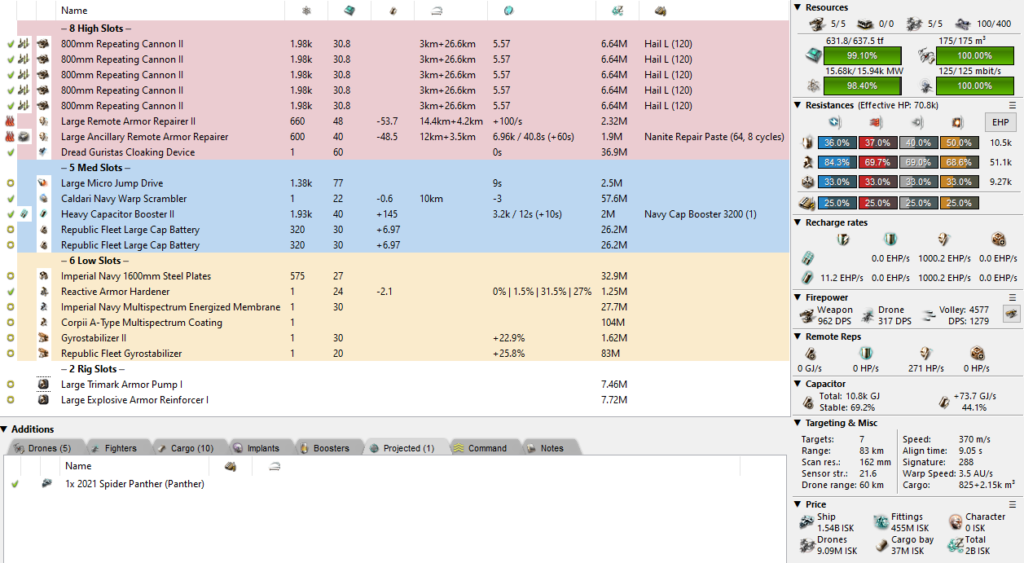
Now, how about that speed bonus? Part of the Enter the Portal update saw the 25% velocity bonus on the Panther worked into its hull. This can be used very effectively, especially if you’re prepared to invest a little in some reps to make the tank work while preserving mid-slots. That’s exactly what the fit on the left below does. It’s dual rep with scram, web, and just enough tank+DPS. You’re on a time limit when solo thanks to the ancil, but if you’re prepared to risk it, it doesn’t cost too much at the time of writing.
This same fit can turn into a true kiting Panther by swapping scram to point and possibly dropping some tank for a nanofiber. Your neut can then be used defensively and the Burst Jam can change to whatever else you’d like a mid slot to do for you.
Another way of kiting with a Panther is to really just go for that DPS role. Autocannons have great tracking and falloff range is fine so it’s quite possible to boost the tracking and DPS further to make a Panther that can easily clean up cruisers and below that try to pull range. Your Phased Plasma will do just over 1k DPS with a 53km falloff and 10.5 tracking which great for a battleship. Note that this fit has no defensive web, and as such it’s hard to recommend using it solo (with a point instead of the Tracking Computer). You don’t want to end up on the killboard with tracking ammo loaded because you died to a single frigate that you couldn’t kill fast enough.
Dual Rep Fast Panther
[Panther, 2021 Armour Reps]

Core C-Type Large Armor Repairer
Gyrostabilizer II
Gyrostabilizer II
Damage Control II
Coreli A-Type Multispectrum Coating
Large Ancillary Armor Repairer

500MN Y-T8 Compact Microwarpdrive
Sentient Burst Jammer
Caldari Navy Warp Scrambler
Federation Navy Stasis Webifier
Heavy F-RX Compact Capacitor Booster

Dread Guristas Cloaking Device
Covert Jump Portal Generator I
Heavy Gremlin Compact Energy Neutralizer
Dual 650mm Repeating Cannon II
Dual 650mm Repeating Cannon II
Dual 650mm Repeating Cannon II
Dual 650mm Repeating Cannon II
Dual 650mm Repeating Cannon II

Large Ancillary Current Router I
Large Auxiliary Nano Pump II


'Augmented' Berserker x5
Hornet EC-300 x5
Republic Fleet Warrior x5


Standard Exile Booster
Agency 'Hardshell' TB5 Dose II


Barrage L x800
Hail L x2000
Navy Cap Booster 3200 x7
Nanite Repair Paste x100
Republic Fleet EMP L x800
Republic Fleet Phased Plasma L x800
Republic Fleet Titanium Sabot L x800
ECCM Script x1
Scan Resolution Script x1
Targeting Range Script x1
Agency 'Hardshell' TB5 Dose II x1
Agency 'Pyrolancea' DB5 Dose II x1
Standard Drop Booster x1
Standard Exile Booster x1
Standard Sooth Sayer Booster x1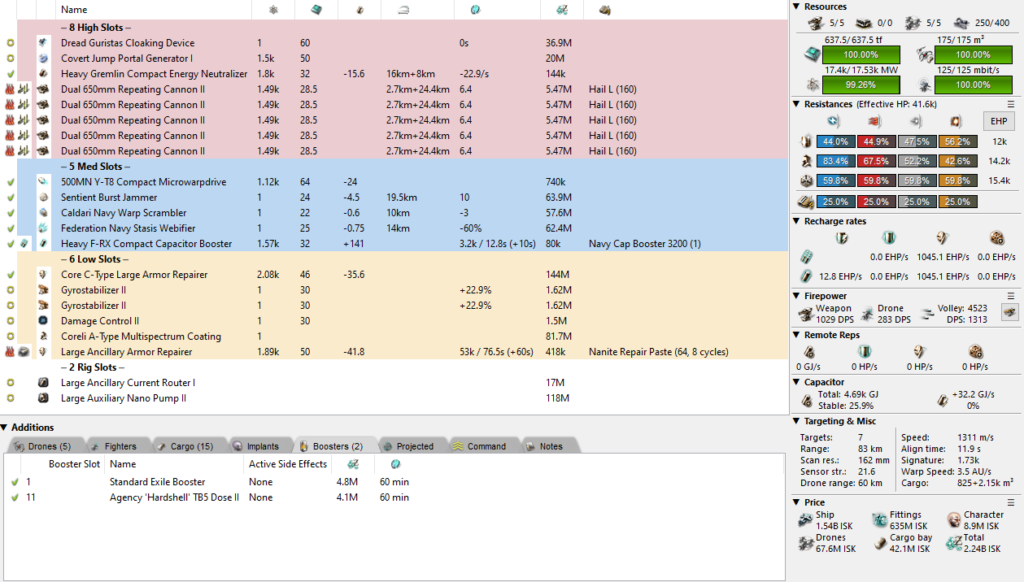
Shield DPS Panther
[Panther, 2021 Fast Shield Panther]

IFFA Compact Damage Control
Nanofiber Internal Structure II
Dread Guristas Co-Processor
Republic Fleet Gyrostabilizer
Republic Fleet Gyrostabilizer
Fourier Compact Tracking Enhancer

Shadow Serpentis 500MN Microwarpdrive
'Marketeer' Tracking Computer
Pithum C-Type Multispectrum Shield Hardener
Pith C-Type X-Large Shield Booster
Heavy Capacitor Booster II

Dual 650mm Repeating Cannon II
Dual 650mm Repeating Cannon II
Dual 650mm Repeating Cannon II
Dual 650mm Repeating Cannon II
Dual 650mm Repeating Cannon II
Dread Guristas Cloaking Device
Covert Jump Portal Generator I
Heavy Energy Neutralizer II

Large Projectile Burst Aerator II
Large Projectile Metastasis Adjuster I


Acolyte II x5
Berserker II x5
Hornet EC-300 x5


Zainou 'Deadeye' Trajectory Analysis TA-703
Eifyr and Co. 'Gunslinger' Surgical Strike SS-903
Eifyr and Co. 'Gunslinger' Large Projectile Turret LP-1003

Standard Blue Pill Booster
Agency 'Pyrolancea' DB5 Dose II


Barrage L x800
Hail L x2000
Navy Cap Booster 3200 x7
Nanite Repair Paste x100
Republic Fleet EMP L x800
Republic Fleet Phased Plasma L x800
Republic Fleet Titanium Sabot L x800
Optimal Range Script x1
Tracking Speed Script x1
Agency 'Hardshell' TB5 Dose II x1
Agency 'Pyrolancea' DB5 Dose II x1
Standard Blue Pill Booster x1
Standard Drop Booster x1
Standard Sooth Sayer Booster x1
Stasis Webifier II x1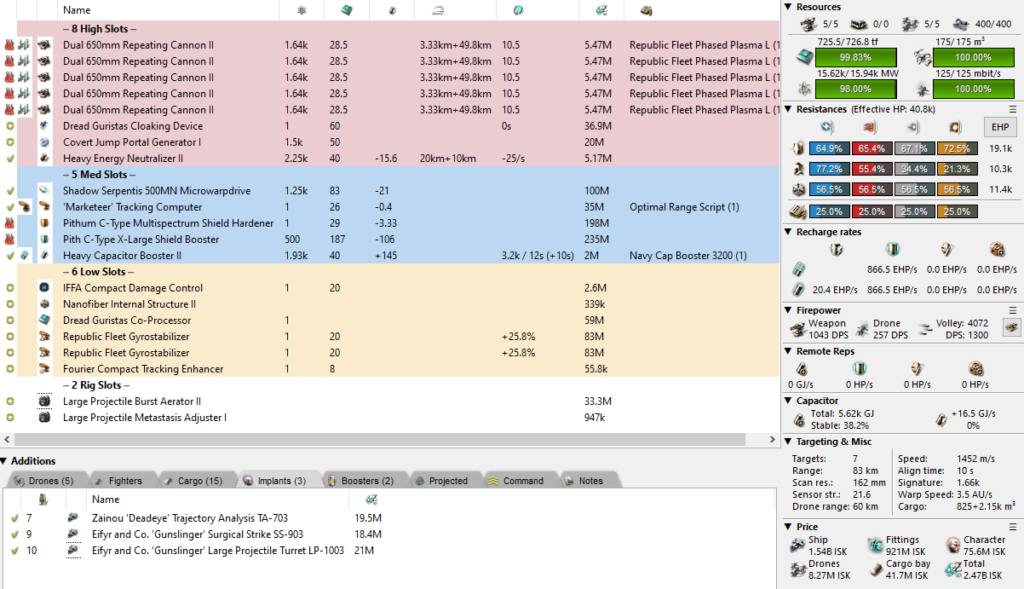
Widow
This is what everyone was waiting for isn’t it? Finally a Black Ops ship with a tank bonus and EIGHT mid slots to play with. While I think I prefer the Redeemer these days, the Widow has the unique position of doing shield DPS really bloody well while also having a good tank and room for either tackle or ECM. Speaking of ECM, a heated Sentient Burst Jammer on the Widow blasts people with a 36 strength jam. That’s enough to break locks on pretty much anything within 19.5km! I try to use it a lot of these fits since it’s a valuable escape tool and it technically adds to your tank. Just don’t Burst Jam your own fleet off.
Sticking with that theme, then, is a simple buffer torpedo Widow. It has a guidance computer, burst jammer, and rigor catalyst which is more my taste for decent application. If you run solo then you likely need to swap the jam for a scram. Not that solo buffer Widows are necessarily a good idea. In a fleet you can drop the rigor catalyst for an extender and the rest of the application for two jams of your choice. Overall it’s a decent way of using the Widow, but you can definitely do better.
One of the better ways to run a Widow is to use it as a solo, self-repping torpedo dropper. And by using a minimal amount of bling as in my fit here, you can get away with spending about 2 billion ISK. My recommendation is that you then beef up the tank with a mid-grade crystal implant set and bring along an escape bay Astero to keep it safe. Good pods are a better return on your money than spending on X-Types since they offer more value and the ability to use them again and again after a loss. I’ve fitted the Sentient Burst Jammer on here as well, but if you find application to be a problem then simply swap for a web, paint, or guidance computer. Bling the rest of the fit at your discretion, but I would do it like this (X-type) or like this (with an MJD).
Note: You can always use rapid heavies or cruises, but torpedoes are amazing and are the hardest to fit
Fleet Buffer Widow
[Widow, 2021 Buffer Widow]

Ballistic Control System II
Ballistic Control System II
Ballistic Control System II
Damage Control II

Sentient Burst Jammer
Large Micro Jump Drive
Missile Guidance Computer II
Republic Fleet Large Shield Extender
Pith C-Type EM Shield Hardener
Multispectrum Shield Hardener II
Multispectrum Shield Hardener II
'Plough' Heavy Capacitor Booster I

Torpedo Launcher II
Torpedo Launcher II
Torpedo Launcher II
Torpedo Launcher II
Torpedo Launcher II
Covert Jump Portal Generator I
Dread Guristas Cloaking Device

Large Core Defense Field Extender I
Large Warhead Rigor Catalyst II


Vespa II x5


Standard Crash Booster


Inferno Rage Torpedo x500
Mjolnir Javelin Torpedo x500
Mjolnir Rage Torpedo x500
Nova Rage Torpedo x500
Scourge Rage Torpedo x500
Navy Cap Booster 3200 x5
Missile Precision Script x1
Missile Range Script x1
Nanite Repair Paste x100
Caldari Navy Inferno Torpedo x500
Caldari Navy Mjolnir Torpedo x500
Caldari Navy Nova Torpedo x500
Caldari Navy Scourge Torpedo x500
Agency 'Pyrolancea' DB5 Dose II x1
Standard Crash Booster x1
Solo Torpedo Widow
[Widow, 2021 Solo Torp]

Missile Guidance Enhancer II
Ballistic Control System II
Ballistic Control System II
Ballistic Control System II

500MN Y-T8 Compact Microwarpdrive
Heavy F-RX Compact Capacitor Booster
Pith C-Type X-Large Shield Booster
Pithum C-Type Multispectrum Shield Hardener
Sentient Burst Jammer
Republic Fleet Target Painter
Heavy Stasis Grappler II
Warp Scrambler II

Torpedo Launcher II
Torpedo Launcher II
Torpedo Launcher II
Torpedo Launcher II
Torpedo Launcher II
Large EMP Smartbomb II
Dread Guristas Cloaking Device

Large EM Shield Reinforcer II
Large Warhead Rigor Catalyst II


Hammerhead II x5
Hornet EC-300 x5


Zainou 'Snapshot' Torpedoes TD-603
Zainou 'Deadeye' Missile Projection MP-703
Zainou 'Deadeye' Guided Missile Precision GP-803
Zainou 'Deadeye' Target Navigation Prediction TN-903
Zainou 'Deadeye' Rapid Launch RL-1003

Standard Blue Pill Booster
Agency 'Hardshell' TB5 Dose II


Inferno Rage Torpedo x500
Mjolnir Javelin Torpedo x500
Mjolnir Rage Torpedo x500
Nova Rage Torpedo x500
Scourge Rage Torpedo x500
Navy Cap Booster 3200 x5
Nanite Repair Paste x100
Caldari Navy Inferno Torpedo x500
Caldari Navy Mjolnir Torpedo x500
Caldari Navy Nova Torpedo x500
Caldari Navy Scourge Torpedo x500
Agency 'Pyrolancea' DB5 Dose II x1
Standard Blue Pill Booster x1
Standard Crash Booster x1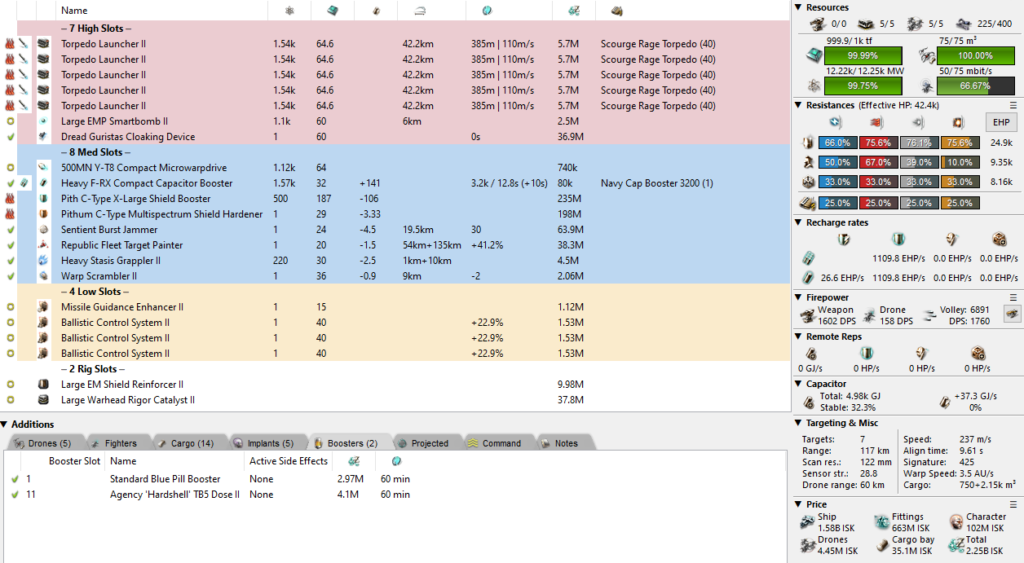
Next up is my favourite kind of Widow and one that I’ve been running for a long time now already. It’s a dual XLASB variant that gets plenty of “buffer” through using up charges and therefore should work in small fleets. As with any torpedo fit, you should be aware of your limitations with what you can apply. This particular fit either must rely on fighting only battleships, or it can rely on a fleet of bombers/T3Cs to help with painters. The fit can be made much cheaper by using compact modules as always, but I think what’s on there right now is just the right amount of bling for this particular fit.
And then finally the black sheep of the Widow family – the armour Widow. I can’t deny that even with a shield resist bonus, this thing is insane. 90.8k EHP is great, amulets will take that to 112k and some decent links can push you to 150k EHP while still remaining a very cheap fit. Why do this? Because you can get up to about 6 jams before sacrificing a prop or the cap booster (don’t drop those). I personally like the 5 jam variant with a Signature Radius Suppressor to further bolster your tank. Drop this with a spider tank or polarised gang and you’re in for a good time.
Dual XLASB Widow
[Widow, 2021 Dual XLASB Torps]

Damage Control II
Republic Fleet Ballistic Control System
Republic Fleet Ballistic Control System
Caldari Navy Power Diagnostic System

F-90 Compact Sensor Booster
Heavy F-RX Compact Capacitor Booster
Caldari Navy Warp Scrambler
Heavy Stasis Grappler II
500MN Y-T8 Compact Microwarpdrive
Pithum C-Type Multispectrum Shield Hardener
X-Large Ancillary Shield Booster
X-Large Ancillary Shield Booster

Dread Guristas Cloaking Device
Covert Jump Portal Generator I
Torpedo Launcher II
Torpedo Launcher II
Torpedo Launcher II
Torpedo Launcher II
Torpedo Launcher II

Large Processor Overclocking Unit II
Large EM Shield Reinforcer II


Hornet EC-300 x5
Vespa II x5


Zainou 'Snapshot' Torpedoes TD-603
Zainou 'Deadeye' Missile Projection MP-703
Zainou 'Deadeye' Guided Missile Precision GP-803
Zainou 'Deadeye' Target Navigation Prediction TN-903
Zainou 'Deadeye' Rapid Launch RL-1003

Standard Blue Pill Booster
Agency 'Hardshell' TB5 Dose II


Inferno Rage Torpedo x500
Mjolnir Javelin Torpedo x400
Scourge Rage Torpedo x500
Navy Cap Booster 3200 x3
Navy Cap Booster 400 x27
Nanite Repair Paste x100
ECCM Script x1
Scan Resolution Script x1
Targeting Range Script x1
Caldari Navy Mjolnir Torpedo x500
Caldari Navy Nova Torpedo x500
Agency 'Pyrolancea' DB5 Dose II x1
Standard Blue Pill Booster x1
Standard Crash Booster x1
Armour ECM Widow
[Widow, 2021 Armour ECM]

Imperial Navy 1600mm Steel Plates
Imperial Navy 1600mm Steel Plates
Imperial Navy Multispectrum Energized Membrane
Damage Control II

Sentient Burst Jammer
Magnetometric ECM II
Gravimetric ECM II
Ladar ECM II
Radar ECM II
Heavy Capacitor Booster II
Signature Radius Suppressor I
Large Micro Jump Drive

Covert Jump Portal Generator I
Dread Guristas Cloaking Device
Rapid Heavy Missile Launcher II
Rapid Heavy Missile Launcher II
Rapid Heavy Missile Launcher II
Rapid Heavy Missile Launcher II
Rapid Heavy Missile Launcher II

Large Explosive Armor Reinforcer I
Large Trimark Armor Pump I


Hornet EC-300 x5
Valkyrie II x5


Mid-grade Amulet Alpha
Mid-grade Amulet Beta
Mid-grade Amulet Gamma
Mid-grade Amulet Delta
Mid-grade Amulet Epsilon
Mid-grade Amulet Omega


Inferno Fury Heavy Missile x600
Mjolnir Precision Heavy Missile x125
Scourge Fury Heavy Missile x600
Navy Cap Booster 3200 x7
Caldari Navy Mjolnir Heavy Missile x600
Caldari Navy Nova Heavy Missile x600
Nanite Repair Paste x100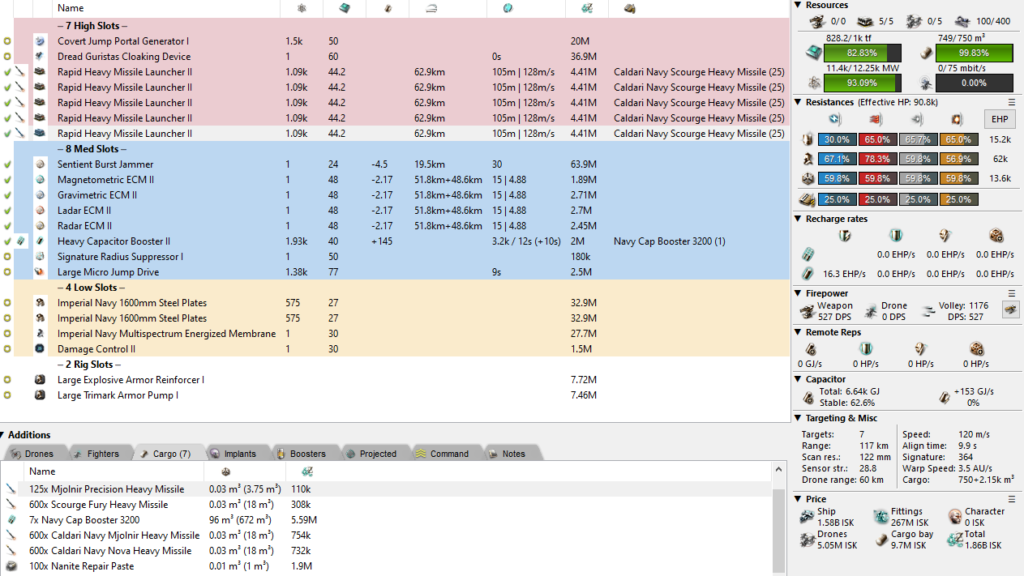
Sin
Finally we come to the Sin, the Gallente mixed hybrid-drone-neut-rep Black Ops. It has always been on the bottom of the pile, but there are definitely people who make good use out of the drone bonus by running spider remote reps, tinker tanks, or solo neuters. What I’m going to try and do here is to make more use of the blasters. They received a damage bonus in Enter the Portal so it makes sense to do so. The only issue is that the lower turret count makes for a smaller damage increase compared to the Redeemer or even the Panther – the Sin can only use four blasters.
On with the fits anyway, you can stick with the simple armour theme and run a basic blaster ship like below. With 84k EHP and almost 1.2k DPS it doesn’t stand out as particularly good, but the Sin does come with one major bonus – the drones themselves. A set of augmented Valkyries travels at 5.36km/s and warriors go even faster. With bonuses to drone damage, hitpoints, optimal, and tracking, you can bet that your drones will shred any light tackle. It’s a unique thing to have in your fleet if you don’t have any other ways of removing small ships so if someone can only fly Gallente then at least this cheap blops has a niche. Before you say anything, yes, you can do the exact same fit with neuts, just drop the blasters off. The shield version also looks like this.
Moving over to solo ships again, the Sin can actually spider tank much better than even the Panther. You’ve got the same low slots to use, decent DPS, an extra mid, and still two spare utility highs for reps! The real benefit here, though, is the new logistics drone bonus. They aren’t amazing, but a set of armour logi drones can provide about another 1.5 Large T2 Reps worth of EHP per second. In a fleet of Sins that certainly adds up, though I don’t think it’s worth making a dedicated repping Sin unless you have a specific use-case. In my opinion this 10% logi drone bonus could be bumped up without too much fear of exploitation except perhaps in a tournament format.
To round things out, I managed to make a very cheap solo neuting Sin. The Redeemer is definitely a better ship for this these days, but the Sin does the job. My particular fit is very self evident, neut the target, watch your own tank, and kill with your drones. You can make the fit slightly better by blinging the Drone Damage Amps to improve CPU and take off the overclocker rig, but I still don’t think it’s worth doing. This is another one of those fits that benefits from a cheap mid-grade crystal pod.
Simple Armour Buffer Sin
[Sin, 2021 Armour Blaster]

1600mm Steel Plates II
1600mm Crystalline Carbonide Restrained Plates
Imperial Navy Multispectrum Energized Membrane
Damage Control II
Drone Damage Amplifier II
Drone Damage Amplifier II

500MN Y-T8 Compact Microwarpdrive
'Plough' Heavy Capacitor Booster I
Sensor Booster II
Stasis Webifier II
Warp Scrambler II
Drone Navigation Computer II

Ion Blaster Cannon II
Ion Blaster Cannon II
Ion Blaster Cannon II
Ion Blaster Cannon II
Covert Jump Portal Generator I
Dread Guristas Cloaking Device
Drone Link Augmentor II

Large Trimark Armor Pump I
Large Explosive Armor Reinforcer I


'Augmented' Berserker x5
'Augmented' Valkyrie x5
Hornet II x5
Infiltrator II x5
Ogre II x5
Warrior II x5


Null L x1500
Void L x1500
Navy Cap Booster 3200 x7
Federation Navy Antimatter Charge L x1500
ECCM Script x1
Scan Resolution Script x1
Targeting Range Script x1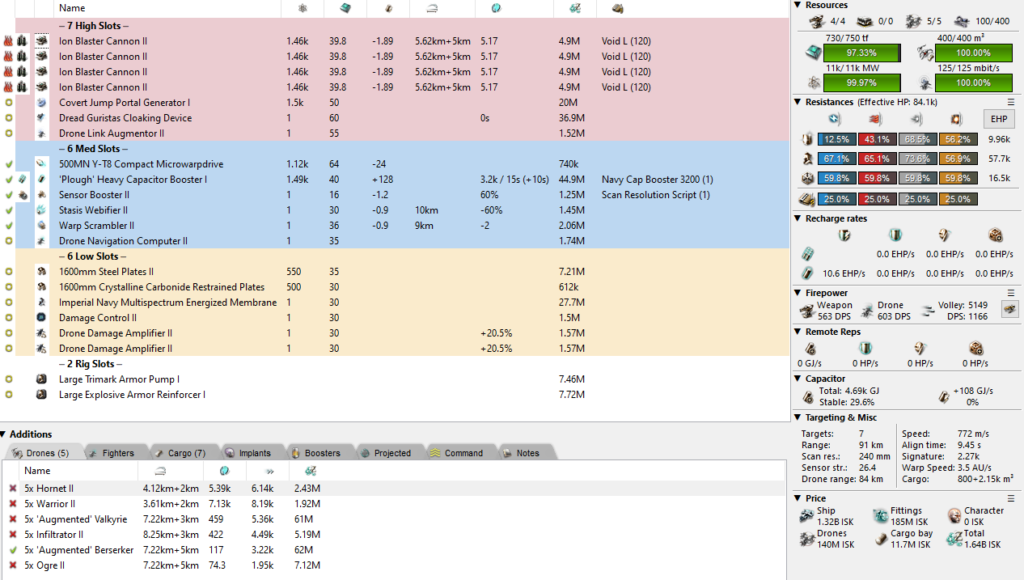
Spider Tank Sin
[Sin, 2021 Spider Tanker]

Imperial Navy 1600mm Steel Plates
Imperial Navy Multispectrum Energized Membrane
Imperial Navy Multispectrum Energized Membrane
Damage Control II
Magnetic Field Stabilizer II
Magnetic Field Stabilizer II

500MN Y-T8 Compact Microwarpdrive
Heavy F-RX Compact Capacitor Booster
Sensor Booster II
Stasis Webifier II
Warp Scrambler II
Signature Radius Suppressor I

Neutron Blaster Cannon II
Neutron Blaster Cannon II
Neutron Blaster Cannon II
Neutron Blaster Cannon II
Dread Guristas Cloaking Device
Large Remote Armor Repairer II
Large Ancillary Remote Armor Repairer

Large Ancillary Current Router I
Large Explosive Armor Reinforcer I


Heavy Armor Maintenance Bot II x5
Heavy Armor Maintenance Bot II x1
Hornet EC-300 x5
Infiltrator II x5
Warrior II x5
Wasp II x5
Wasp II x1


Null L x1500
Void L x1500
Navy Cap Booster 3200 x7
Federation Navy Antimatter Charge L x1500
ECCM Script x1
Scan Resolution Script x1
Targeting Range Script x1
Solo Shield Neut Sin
[Sin, 2021 Neut Sin Cheap]

Damage Control II
N-JM Compact Omnidirectional Tracking Enhancer
Drone Damage Amplifier II
Drone Damage Amplifier II
Drone Damage Amplifier II
Drone Damage Amplifier II

Pith B-Type X-Large Shield Booster
Gistum C-Type Multispectrum Shield Hardener
True Sansha Heavy Capacitor Booster
Warp Scrambler II
Heavy Stasis Grappler II
500MN Y-T8 Compact Microwarpdrive

Dread Guristas Cloaking Device
Heavy Energy Neutralizer II
Heavy Energy Neutralizer II
Heavy Energy Neutralizer II
Medium Energy Neutralizer II
Medium Energy Neutralizer II
Medium Energy Neutralizer II

Large EM Shield Reinforcer II
Large Processor Overclocking Unit I


'Augmented' Berserker x5
'Augmented' Valkyrie x5
Hornet II x5
Infiltrator II x5
Ogre II x5
Warrior II x5


Strong Blue Pill Booster
Agency 'Hardshell' TB5 Dose II


Navy Cap Booster 3200 x8
Agency 'Hardshell' TB5 Dose II x1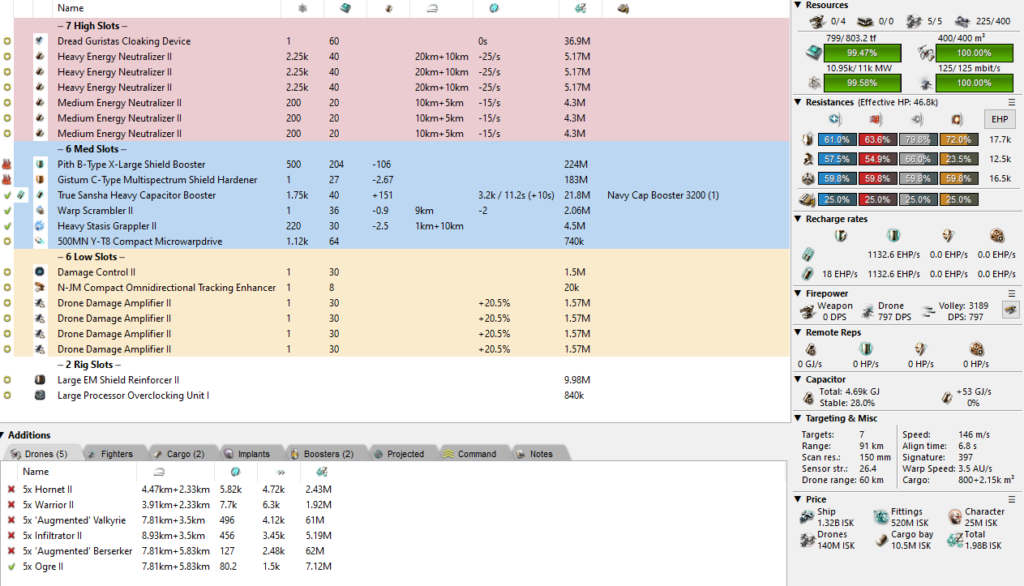
[…] Ashy in Space – Fit Kitchen: Black Ops […]
Found this a particularly interesting read, with the blops updates.
What, not a word on the Marshal? WTF?
I already spent 10+ hours on this article, most of which time was spent with a ton of anxiety dreading the abuse I would get for posting this. I did not want to write about the ship that people are super risk averse in because I was expecting extremely angry comments about how shit of a person I am.
There is also the thought that if you are buying a 7b ISK ship that you should hopefully know how to fit it. If there are enough people who want that, though, maybe I could do a CONCORD ship Fit Kitchen.
Just recently started reading your work here Ashy .. love what i see so far man ^^
Thanks! Glad you’re enjoying it 🙂
It really makes me happy when other people find my work useful
Thank you kindly for writing this. It is a lot of help! I wanted a Widow in 2010 and finally got one. 😀