Since the removal of hero-dreading as it used to exist, C5 space has been a little bit quiet on the krabbing front. Did people just forget that there’s ISK to be had or did Rorqual Spod go to their heads. With part five I certainly hope to make that a more accessible and well-known option so you too can be ganked by us earn lots of ISK! As with the low-class article there is a reference table of C5 sites which can be found here and there’s a C5/6 dread bookmarking guide here.
The fits described in this article were created before the resistance nerf in April 2020. Post-patch revised fits will be marked with a ++ at the start of each fitting name although screenshots will not always be updated.
Coming to the end of this series I’ve also realised that I am neglecting to cover methods such as Red Giant smartbombing and the like. Those methods are a little more esoteric and if I choose to do so then perhaps there will be a standalone guide in the future. Don’t count on it though. If C5/6 sites aren’t what you’re here for then go ahead and click on the appropriate title in the table below for the article on that method.
| Method | Characters Needed | Initial Investment | ISK/hour*** |
| Gas Huffing | 1+ | 10m ISK | ~75m ISK |
| Mining | 1+ | 10m ISK+ | Depends on setup/rocks |
| Planetary Interaction | 1+ | 10m ISK+ | ~1b / month / account |
| Data/Relic Sites (C1-3) | 1 | 10m ISK | Variable, <150m ISK |
| C2 Sites (T3D/Cruiser/BC) | 1+ | 50-60m ISK | ~75m ISK |
| »C5 Wolf Rayet Fleet | 3+ | 350m ISK | ~450m ISK |
| C13 Wolf Rayet Sites | 1+ | 150m ISK | ~150m ISK |
| C3 Sites (Gila/Rattle) | 1+ | 500m ISK | ~250m ISK |
| Abyssal Frigates* | 3 | ~300m ISK | ~4-600m ISK |
| Abyssal Cruisers* | 1 | 1-300m ISK+ | ~1-300m ISK |
| »C5 Sites (Nestor/Vargur)** | 2/3+ | 1.6b ISK | ~450m ISK |
| »C5 Sites + Drifter | 2/3+ | 3b ISK | ~1b ISK |
| »C5/6 Dread Sites | 2/3+ | 8-16b ISK | ~2-3b ISK |
| Bonus Article: Triglavian Ships | 1+ | 0.2-2.5b ISK | Variable |
*Abyssal sites included as they’re easily done inside your wormhole
**C4 sites can be ran using these methods for less ISK
***These are rough numbers. You can often earn more with better skills, more investment, luck etc.
If the words ‘static’ and ‘probe launcher’ seem foreign then you best start with EVE Uni first. As before, this is also not a replacement for Rykkis Guide (or Karr’s updated version). Instead, it is more of a complementary piece that explains how to actually use the numbers found in that sheet. If you’re in a rush then skim through for the key bold text and reference tables.
Perhaps I didn’t paint such a good picture of krabbing in high-class space with that intro. It’s intentional. I’ve always said that the best way to improve content in all of wormhole space is to provide opportunities for both the hunters and their prey. If you’re smart then you shouldn’t die so you have nothing to worry about and you’ll make more money than you need. Come with me and you’ll find a world of pure ISK, little krab.

Nestors, Snakes, & Leshaks – C5 Space
Have you ever wanted to smash your head into the keyboard from boredom? Do you like watching drones trundle around a Garrison blapping Sleepers? Do you like ISK? If the answer to any one of those questions is yes then Nestors are probably a good choice for you. This Sisters of EVE battleship has bonuses to remote reps, armour tanking, and drones. Luckily, we are using every aspect of that which makes things pretty damn efficient and scalable.
Their unique selling point, however, is the fact that these ships weigh in at 22,250,000kg when fully fit meaning that your dirty krabbing habit won’t compromise the chain unlike Rattlesnakes would. If that point is lost on you then I sincerely suggest you go check out EVE Uni before touching a wormhole again. If you do know what you’re getting into then Rattles and Leshaks are viable options too. The silly amount of DPS that Leshaks do pretty much means that throwing some into the fleet is always going to improve site times.
The fits described in this article are designed for tanking Garrisons, Oruze Osobnyk’s, and Quarantine Areas. Upgrade to either three Nestors (either cheap or expensive fit), or use links if you want to do the other sites.
You can get through sites in about 20-30 minutes depending on skills and setup and you should ideally keep no more than four Nestors in a site. There are diminishing returns on ISK/hr due to drone travel speed and MTU tractor beam, velocity. If you have an excess of pilots then just split off into another site and blitz everything in a system. Interestingly, each of the sites you clear out should respawn in another system in the wormhole region. That’s not exactly confirmed, but most people are pretty sure that the mechanic works that way. Check out this table for a list of sites ordered by ISK per Sleeper EHP. The better the ratio, the faster you can theoretically run them. As with low-class, relic and data are a more difficult, but I’ll include them here for comparison. Generally Strongholds and Garrisons are the easiest to chew through.
Sites by ISK/EHP
| Site Name | ISK/EHP | Total ISK | Site Type |
| Unsecured Frontier Server Bank* | 206 | 272m | Data |
| Forgotten Core Information Pen* | 206 | 333m | Relic |
| Forgotten Core Data Field | 198 | 279m | Relic |
| Unsecured Frontier Enclave Relay* | 178 | 330m | Data |
| Core Stronghold* | 145 | 235m | Combat |
| Core Garrison | 143 | 254m | Combat |
| Quarantine Area | 141 | 147m | Combat |
| Oruze Osobnyk | 140 | 165m | Combat |
*Exceptionally high DPS
As for a method in running C5’s I have to say it’s stupidly easy. Think C2 sites but bigger and meaner. Shoot everything that isn’t the trigger then finish off the wave and move on, simple. If you see something on d-scan or a new sig appears then just MJD out and live to krab another day. Either that, or set up for PvP and it might just be a fun fight. Running sites can be done with a minimum of two Nestors for a Core Garrison, Oruze Osobnyk, or Quarantine Area and either be prepped for tank refitting or use three Nestors for everything else in C5 space. It helps to use a specific logi channel and set your cap transfers one up-one down.
MJD isn’t as effective as of February 2020 due to sites now scramming them. I will update here after doing some research into all potential changes
For those of you new to high-class site running, know that part way through the site you will notice a structure uncloak. Aggressing this structure in any way will spawn a Drifter to beat your ass so watch out with the smartbombs. Choosing whether to spawn the Drifter or not for 300m ISK of loot is the crux of the “new” escalation system since Sleepless Guardians were removed.
Fits
All of the fits below can be used in the exact same way by capping each other. You can mix & match Leshaks/Nestors as you see fit if you use the one from part 6. I recommend bringing along your own flavour of refits such as spare EANMs, Drone Navigation Computers, Omnidirectional Tracking Links etc. Just save the Rattles for pulsars and alts with weird skill setups. They’ve been way too expensive for a while now anyway. Do also be sure to try and keep Amarr battleship at least level 4. Level 3 reduces your resists to a point where being alpha’d is possible.
I’ve removed the section below with the Leshak due to the new resist changes (and it wasn’t great anyway!). You now have two options for either a cheap Nestor or a slightly more expensive one. The expensive one can do some C5 sites with two players and the cheap one needs three to safely run combat sites. They should be compatible and the only difference is that the expensive one tanks more and puts out more reps. You can also get away with cheap + cheap + links. I have a great Drekavac for that in part six. Don’t skip on the implants either!
Here are some sample numbers for all-5 skills of Nestor setups in sites. All of these are cap stable and tank the 72GJ/s neuting of a C5 site. Numbers will obviously go up and down dependant on skills or if you bling tank modules.
| Setup | Reps | Price (Apr 2020) |
|---|---|---|
| Expensive x2 | 2,117 EHP/s | 2.2b ISK |
| Cheap x2 | 1,596 EHP/s | 1.2b ISK |
| Cheap x3 | 3,192 EHP/s | 1.8b ISK |
| Expensive x2 + Links | 2,918 EHP/s | 2.6b ISK |
| Cheap x2 + Links | 2,163 EHP/s | 1.6b ISK |
| Cheap x3 + Links | 4,327 EHP/s | 2.2b ISK |
2020 Update: Check out part 6 for the Drekavac and Leshak fits.
Expensive Nestor
[Nestor, ++Non Cheapy C5 Nestor]

Imperial Navy 1600mm Steel Plates
Imperial Navy Energized Adaptive Nano Membrane
Imperial Navy Energized Adaptive Nano Membrane
Damage Control II
Drone Damage Amplifier II
Drone Damage Amplifier II

Republic Fleet Large Cap Battery
Republic Fleet Large Cap Battery
Cap Recharger II
Cap Recharger II
Cap Recharger II
Cap Recharger II

Centum A-Type Medium Remote Armor Repairer
Large Remote Armor Repairer II
Large Remote Armor Repairer II
Large Remote Armor Repairer II
Large Remote Armor Repairer II
Large Remote Capacitor Transmitter II
Large Remote Capacitor Transmitter II

Large Drone Control Range Augmentor II
Large Remote Repair Augmentor I
Large Remote Repair Augmentor II


Garde II x5
Hammerhead II x5
Ogre II x5
Praetor II x5
Valkyrie II x5
Warrior II x5


Inherent Implants 'Squire' Capacitor Systems Operation EO-603
Inherent Implants 'Noble' Remote Armor Repair Systems RA-703
Inherent Implants 'Squire' Capacitor Management EM-801
Inherent Implants 'Noble' Hull Upgrades HG-1001


Nanite Repair Paste x150
Optimal Range Script x1
Tracking Speed Script x1
Energized Adaptive Nano Membrane II x1
Energized Explosive Membrane II x1
Drone Damage Amplifier II x2
Omnidirectional Tracking Link II x1
Large Micro Jump Drive x1
Stasis Webifier II x1
Warp Scrambler II x2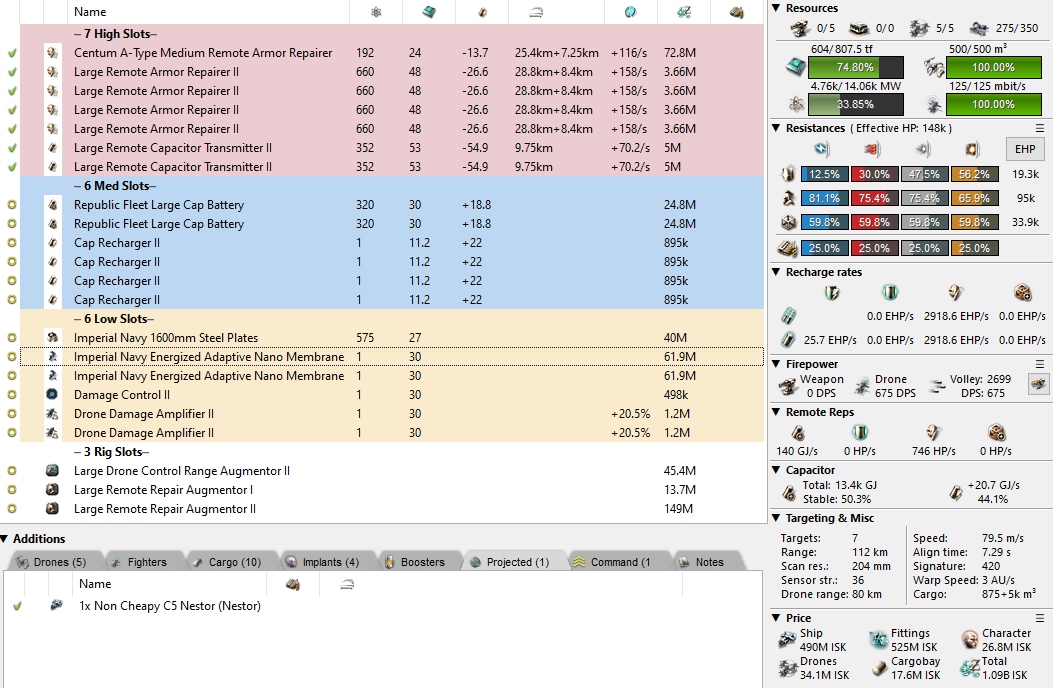
Cheap Nestor
[Nestor, ++Cheapy Nestor]

Drone Damage Amplifier II
Drone Damage Amplifier II
Energized Adaptive Nano Membrane II
Energized Adaptive Nano Membrane II
1600mm Steel Plates II
Damage Control II

Cap Recharger II
Cap Recharger II
Cap Recharger II
Cap Recharger II
Large Cap Battery II
Large Cap Battery II

Large I-ax Enduring Remote Armor Repairer
Large I-ax Enduring Remote Armor Repairer
Large I-ax Enduring Remote Armor Repairer
Medium I-ax Enduring Remote Armor Repairer
Medium I-ax Enduring Remote Armor Repairer
Large Remote Capacitor Transmitter II
Large Remote Capacitor Transmitter II

Large Remote Repair Augmentor I
Large Explosive Armor Reinforcer I
Large Drone Control Range Augmentor I


Garde II x5
Hammerhead II x5
Ogre II x5
Praetor II x5
Valkyrie II x5
Warrior II x5


Inherent Implants 'Squire' Capacitor Systems Operation EO-601
Inherent Implants 'Noble' Remote Armor Repair Systems RA-703
Inherent Implants 'Squire' Capacitor Management EM-801
Inherent Implants 'Noble' Hull Upgrades HG-1001


Nanite Repair Paste x150
Optimal Range Script x1
Tracking Speed Script x1
Energized Adaptive Nano Membrane II x1
Energized Explosive Membrane II x1
Drone Damage Amplifier II x2
Omnidirectional Tracking Link II x1
Large Micro Jump Drive x1
Stasis Webifier II x1
Warp Scrambler II x2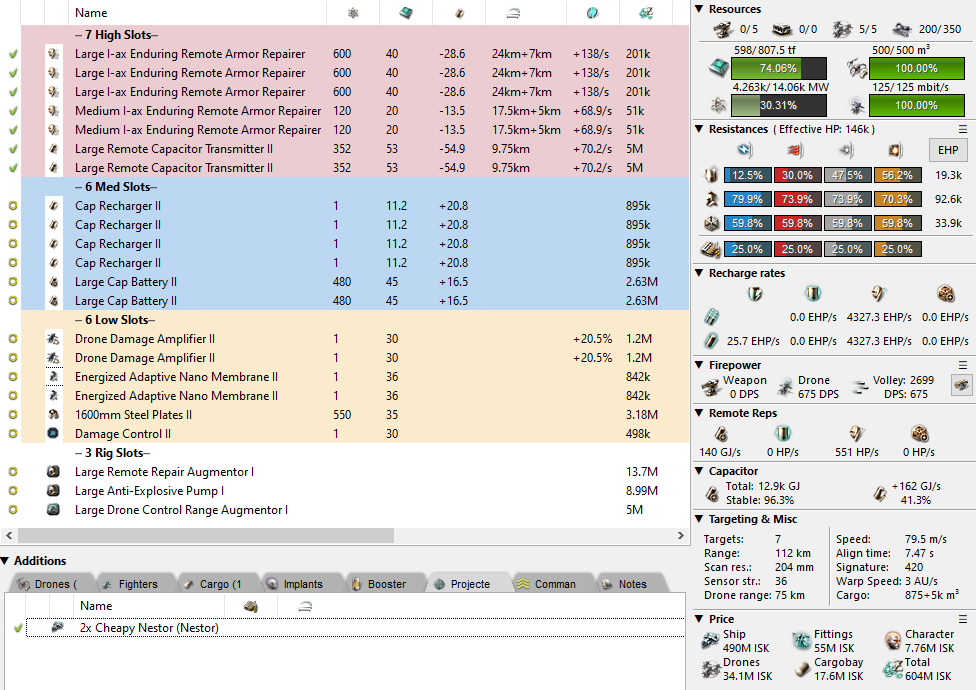
Passive Solo Garrison Rattlesnake
[Rattlesnake, ++PurgerSnake]

Caldari Navy Shield Power Relay
Caldari Navy Shield Power Relay
Shield Power Relay II
Shield Power Relay II
Shield Power Relay II
Shield Power Relay II

Pithum B-Type EM Ward Amplifier
Pithum B-Type Thermal Dissipation Amplifier
Republic Fleet Shield Recharger
Republic Fleet Shield Recharger
Republic Fleet Shield Recharger
Republic Fleet Shield Recharger
Republic Fleet Large Shield Extender

Rapid Heavy Missile Launcher II
Rapid Heavy Missile Launcher II
Rapid Heavy Missile Launcher II
Rapid Heavy Missile Launcher II
Rapid Heavy Missile Launcher II
Drone Link Augmentor II

Large Core Defense Field Purger II
Large Core Defense Field Purger II
Large Core Defense Field Purger II


Curator II x2
Gecko x1
Hornet EC-300 x5
Wasp I x2


Zainou 'Gnome' Shield Management SM-703
Zainou 'Gnome' Shield Operation SP-903


Scourge Fury Heavy Missile x10125
Caldari Navy Scourge Heavy Missile x5000
Ballistic Control System II x3
Drone Damage Amplifier II x3
Tips and Advice
- The Drifter structure spawns on wave three of some sites. You can bypass this by leaving one non-trigger open until you want to leave. This will stop people from spawning it on you early.
- The Nestor can have some mids swapped out for application to improve site times.
- Ignore all current signatures in your probe window to more easily see when a new one pops up.
- Use a logi channel to handle cap chains and always watch list everyone.
- Always use an MTU to gather loot and remember to drop it early. Packrat versions are worth it.
- You can bring any extra armour battleships that you like once two or three Nestors are on grid as long as they have enough buffer and resists.
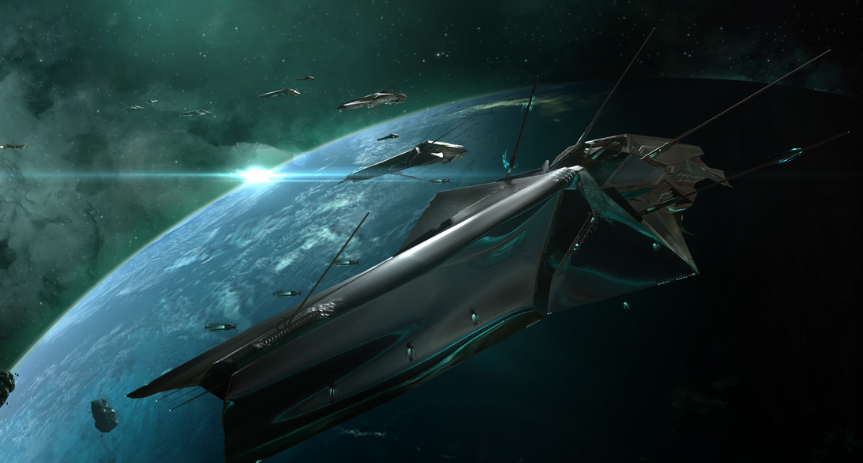
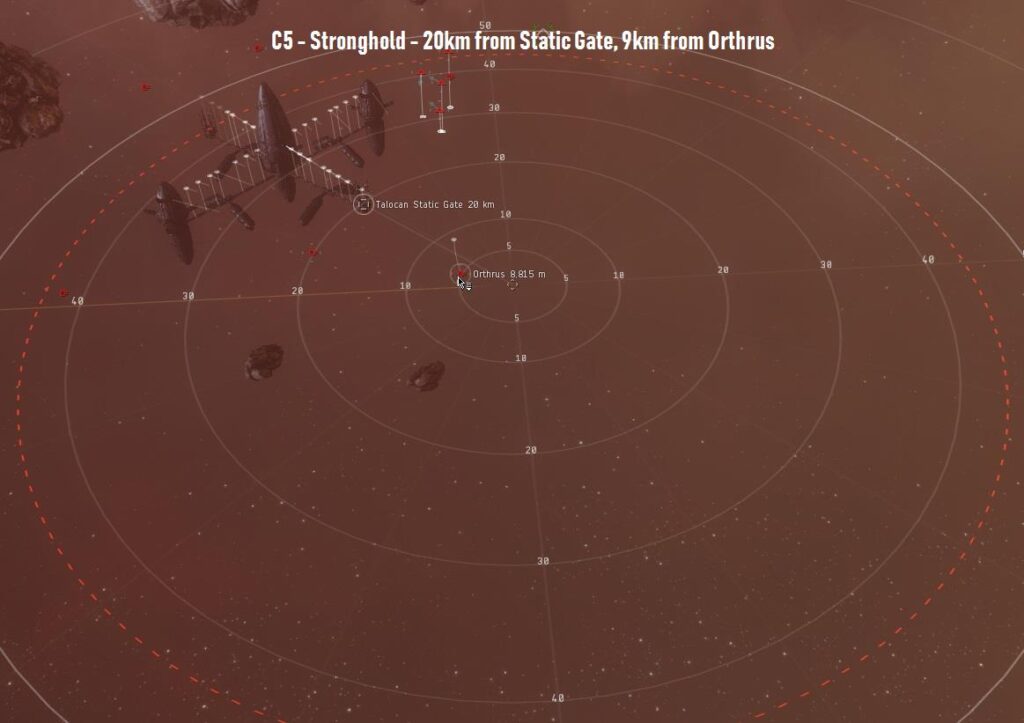
- Bookmark the Talocan structures in a C5 and warp in at 10km for a slightly more efficient clear.
- I have some additional commentary on these fits here on Reddit.
How 2 Drifter
Honestly the Drifter is the easiest thing ever. You can find his stats in Rykki’s guide, but for reference they look a little like this:
DPS: 1,600
Webbing: 1x
Scram Strength: 20x
Neuts: -200GJ/s
MWD Speed: 6km/s
Orbit: 10-12km
Warp Core Strength: 3
Shield Resists (EM/Therm/Kin/Expl):
49% / 20% / 49% / 49%
Armour Resists:
0% / 50% / 50% / 50%
The DPS isn’t so bad, but having that much neuting means that if you choose to take him on within the site then you need at least three Nestors and should refit to add scram/point/web. His new behaviour means that he will switch targets throughout the fight rather than sticking to the largest signature target. There won’t be a doomsday, but he does try to warp away at 25% armour. Once he tries that warp he won’t try again.
Because of that weird quirk of target selection it also means that you’re free to bring a selection of extra ships just to finish him off quicker. My corp members have taken to cheapo Attack Battlecruisers just to get the job done quicker if we’re in the static. Whichever way you go about it, do try and have some damage selection in order to hit those resist holes.
The other way you can kill Mr Drifter easily with any kind of Citadel set up. The trick is to anchor an Astrahus (or similar) on grid with a POCO. You can bubble the warpin if you like, but he’ll eventually end up there just chilling out. You now need to warp a frigate with lots of mids over to him and then promptly back to the citadel to tether. The Drifter should follow and start shooting your structure. This frees the frigate to double scram and web while you beat him down with Standup missiles. That’s a free 300m ISK thank you very much. This has since been patched out.
Tips and Advice
- There are occasions where the Drifter will switch target so watch out. It will usually be to another large-sig ship.
- Don’t sit at range with your frigate and think you’re good. You’ll be one shot.
- Clean them out of your wormhole ASAP unless you want corp members to die in Mastadons and rollers.
- You have about 6-7 seconds to warp while he’s on grid before you are locked and scrammed.

Wildcard: Marauders
Ignore what I’ve said below! (though the cheap fit will still work). Check out part 8 for 14 C5 running Marauder fits. They’re genuinely amazing now!
Because at least three people have said to me “but what about the Vargur”, I felt the need to include at least a small section here detailing how it’s not only possible but also a bad idea. For the truly solo players with no friends, though, this is a viable way to make ISK and a decent use of an otherwise rare ship class.
I’ll be presenting my old Vargur fit here if only because I have experience running it and know that it works. Back before I had actually useful alts, my tactic used to be Vargur + Purger Rattle in the Lazerhawks static. Granted I might have only gotten away with it thanks to the LZHX ticker. Fitting rules generally apply and you can make a Paladin work just as well by matching tank, application, capacitor, and DPS.
I’ve now updated the below fit for post-Surgical Strike. I’ve tried to keep it as cheap as possible and one way of doing that was taking off a damage mod. It’ll still be… ok. This will run you about 2.6b ISK, although you can do Garrisons for turbo cheap if you do it like in this picture. That one is 2b and will come down to 1.7b without the smartbombs. Problem is that you need those expensive 7.5km smartbombs to effectively kill off the RR frigate wave. Run it in a red giant, perhaps?
[Vargur, ++Ticker Tanking 2020]

Republic Fleet Gyrostabilizer
Republic Fleet Gyrostabilizer
Capacitor Flux Coil II
Capacitor Flux Coil II
Capacitor Flux Coil II

Pith C-Type X-Large Shield Booster
Dread Guristas Shield Boost Amplifier
Pithum C-Type Adaptive Invulnerability Shield Hardener
Republic Fleet Large Cap Battery
Republic Fleet Large Cap Battery
Large Micro Jump Drive

Imperial Navy Large EMP Smartbomb
800mm Repeating Cannon II
Bastion Module I
800mm Repeating Cannon II
800mm Repeating Cannon II
Imperial Navy Large EMP Smartbomb
800mm Repeating Cannon II
Ammatar Navy Heavy Energy Nosferatu

Large Capacitor Control Circuit II
Large Capacitor Control Circuit II


Hobgoblin II x5
Hornet EC-300 x5
Hornet II x5


Eifyr and Co. 'Gunslinger' Motion Prediction MR-701
Eifyr and Co. 'Gunslinger' Surgical Strike SS-901
Eifyr and Co. 'Gunslinger' Large Projectile Turret LP-1001

Agency 'Hardshell' TB5 Dose II


Barrage L x5000
Hail L x5000
Nanite Repair Paste x300
Republic Fleet EMP L x8000
Republic Fleet Phased Plasma L x12000
Sisters Core Scanner Probe x8
Scan Resolution Script x2
Targeting Range Script x2
Optimal Range Script x1
Tracking Speed Script x1
Standard Blue Pill Booster x2
Standard Mindflood Booster x2
Co-Processor II x2
Capacitor Power Relay II x3
Cap Recharger II x2
Improved Cloaking Device II x1
Ammatar Navy Heavy Energy Nosferatu x2
Power Diagnostic System II x2
Core Probe Launcher I x1
Shield Boost Amplifier II x1
Adaptive Invulnerability Shield Hardener II x1
Heavy Stasis Grappler II x1
Stasis Webifier II x1
Republic Fleet Target Painter x1
Tracking Computer II x1
Warp Core Stabilizer I x5
Warp Disruptor II x1
Warp Scrambler II x1
Yes. I used to fly with all that in the cargo. Here’s a killmail from three years ago where I forgot to refit to cap and wondered why I couldn’t activate my MJD. Please don’t buy this. It’s fun for about 20 minutes until you realise that it is going to take 10 hours of gank-free krabbing to break even. It’s not even particularly effective any more since Bastion gives a weapon timer and prevents refitting!
Something I should have mentioned previously is that if you run a Garrison then you need to bookmark 10km from the Talocan structure and warp there. You then MJD towards the spatial rift for the final wave to kill the Sleepers 70km away.
if you ignore all my advice not to do this then at least plug it into Pyfa. To simulate the highest expected neuting you’ll want to project 2x T2 Heavy Neut and 1x Compact Heavy Neut. This will hit your simulated fit for 72.9GJ/s which is similar to what you need to resist in sites as a worst case. You should also pack Hardshell, Blue Pill, and Mindflood in case.. problems arise.

T3 Destroyers – C5/6 Wolf Rayet Sites
One of the easiest and most accessible ways to get into high-class wormhole PvE is to start with a fleet of Confessors or Svipuls. It’s a little different to the C13 krabbing discussed in my low-class article since you actually need to run with logi instead of self tanks. I’ve seen both Augorors and Guardians used on separate occasions and your choice there depends on if you want to kill the drifter or not. Bringing a jump dessie for links and emergency GTFO button is a nice bonus, too.
To avoid rehashing everything I’ve already said for sites in general, you run these in the same way that you might PvP with them. Warp to the site together with 2-3 logi and get to work chopping up Sleepers while not sitting at 0m/s like a lemon. I recommend checking out Vulfpeck for an up to date list of effective fits exclusive to this type of wormhole. Because I’m also not a fan of pointlessly reinventing the wheel, you can find the Vulfpeck Confessor below. I’ve modified their Guardian to remove the 400mm plates though. Please don’t put frigate plates on cruisers, people…
Confessor
[Confessor, VPF Pro]

Heat Sink II
Shadow Serpentis Energized Adaptive Nano Membrane
Imperial Navy 400mm Steel Plates
Heat Sink II
True Sansha Adaptive Nano Plating

1MN Y-S8 Compact Afterburner
Fleeting Compact Stasis Webifier
Initiated Compact Warp Scrambler

Small Focused Beam Laser II
Small Focused Beam Laser II
Small Focused Beam Laser II
Small Focused Beam Laser II


Small Ancillary Current Router II
Small Trimark Armor Pump II
Small Ancillary Current Router II


Gleam S x8
Aurora S x12
Core Probe Launcher I x1
Imperial Navy Multifrequency S x8
Imperial Navy Standard S x8
Nanite Repair Paste x50
Core Scanner Probe I x16
Mobile Depot x1

Guardian
[Guardian, Better than Vulfpeck]

Damage Control II
Corpii A-Type EM Plating
Corpii A-Type Thermal Plating
Corpii A-Type Kinetic Plating
Energized Adaptive Nano Membrane II

F-90 Compact Sensor Booster
10MN Afterburner II

Large Remote Armor Repairer II
Large 'Regard' Remote Capacitor Transmitter
Large Remote Armor Repairer II
Large Remote Armor Repairer II
Large Remote Capacitor Transmitter II
Large Remote Armor Repairer II

Medium Trimark Armor Pump II
Medium Anti-Thermal Pump I


Light Hull Maintenance Bot II x5


Nanite Repair Paste x100
Core Scanner Probe I x16
ECCM Script x1
Scan Resolution Script x1
Mobile Depot x1
Medium Hull Repairer II x1
Core Probe Launcher I x1
It should go without saying that PvP fits are just fine, too. If you have some lying around that haven’t been used in a while then drop them into a Wolf Rayet for PvE and see how you get on. You may be pleasantly surprised and could have the edge on someone who drops on you, depending on your fits of course.
2020 Update: Triglavian Ships
As mentioned in part 6 of this guide, the Kikimora does a decent job in Wolf Rayets as long as you don’t get alpha’d. The fits below should do the job, but if you have a large enough fleet then there’s honestly no point. These are best used by ramping up damage on large targets while the rest of the fleet shreds other, smaller Sleepers.
Kikimora
[Kikimora, C13 Kiki]

Federation Navy 400mm Steel Plates
Imperial Navy Energized Adaptive Nano Membrane
Imperial Navy Energized Adaptive Nano Membrane
Entropic Radiation Sink II

Gistii B-Type 1MN Afterburner
F-12 Enduring Tracking Computer, Optimal Range Script
Initiated Compact Warp Scrambler

Light Entropic Disintegrator II, Mystic S
[Empty High slot]

Small Trimark Armor Pump II
Small Trimark Armor Pump II
Small Ancillary Current Router II
Honestly, the Vulfpeck fit does just fine here too for cheaper if you prefer that.
Draugur
[Draugur, C13 Links and Damage]

Federation Navy 400mm Steel Plates
Centii A-Type Kinetic Plating
Entropic Radiation Sink II
Centii A-Type EM Plating

1MN Y-S8 Compact Afterburner
Faint Epsilon Scoped Warp Scrambler
Tracking Computer II

Armor Command Burst II
Armor Command Burst II
Light Entropic Disintegrator II

Small Command Processor I
Small Anti-Kinetic Pump II


Hornet EC-300 x2
Hornet EC-300 x2

Dread Krabbing – C5/C6 Space
Are you ready kids because here’s the secret. The final part of the final guide on how to make ISK and the reason why everyone thinks all wormholers are rich. In all honesty I was dreading writing this section for so long since it means making all the screenshots and not accidentally labelling one with the wrong site. Having a good public source out there to refer to is something I’ve wanted for a while, though. Outside of the occasional Youtube video there doesn’t seem to be much available unless you do your own testing and I hope to change that.
The main advice I have to give is to just stick to C5 space at the moment with the ~512 potential holes you have to choose from. Class 6 is a little more hotly contested with just ~113 available. For an entire universe of krabs hungry for ISK that really isn’t so much when you think about it and many of them are already populated by the likes of Hard Knocks, Lazerhawks, Inner Hell, and No Vacancies.
What I describe below is also just one way to run sites. Dual dread, solo dread, and Rorqual setups are other methods that I have seen used. Whichever way you go about it you should keep things cheap and know that eventually you’re gonna lose out. It might as well be before your insurance expires.
Method
For starters, you’re going to want a turret-fit dread. Naglfars are generally great but running with a Phoenix isn’t exactly optimal. The reason is because half of what you’re going to be doing is ensuring good positioning to blap battleships before they even hit orbit, just like in the old days. Do also be aware that warping capitals in will spawn four Upgraded Avengers with 1.2k DPS and -75GJ/s of neuting each.
The way you do this is by first setting up bookmarks using the images below. I don’t have every site here but most should work. You’re going to want to use a Zephyr to get into position since it’s the only ship that Sleepers will not shoot, saving the trouble of getting decloaked. Once you have the bookmarks ready, you should warp two cap gun dreads and one HAW dread into site and slow to ~9m/s before you siege.
The cap gun dreads now shoot each Sleeper battleship while they burn away to reach orbit, hitting the triggers quickly. If battleships do reach orbit then hit them with a the HAW dread. All dreadnoughts should be running their smartbombs to kill off frigates and the HAW guns need to kill off cruisers. Kill the Drifter once you have him pointed. Easy
Bookmarking Guide
C5 – Core Stronghold 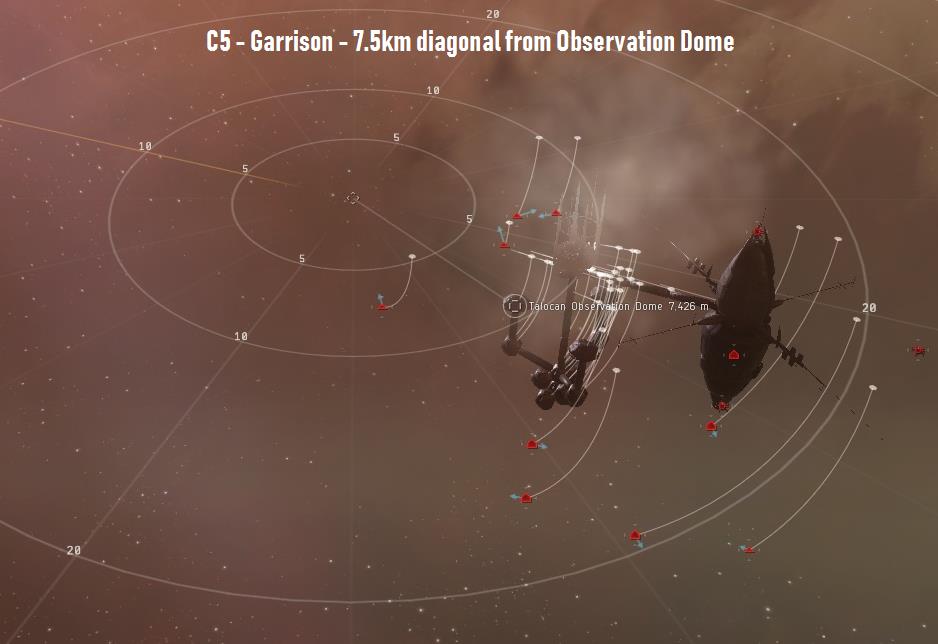
C5 – Core Garrison 
C5 – Quarantine Zone 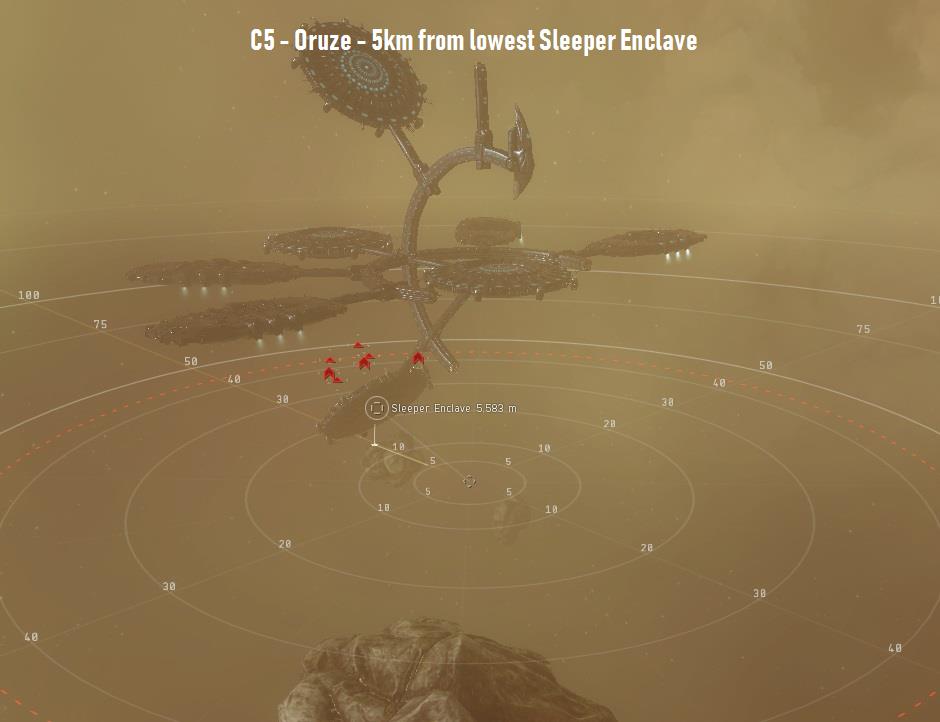
C5 – Oruze Osobnyk 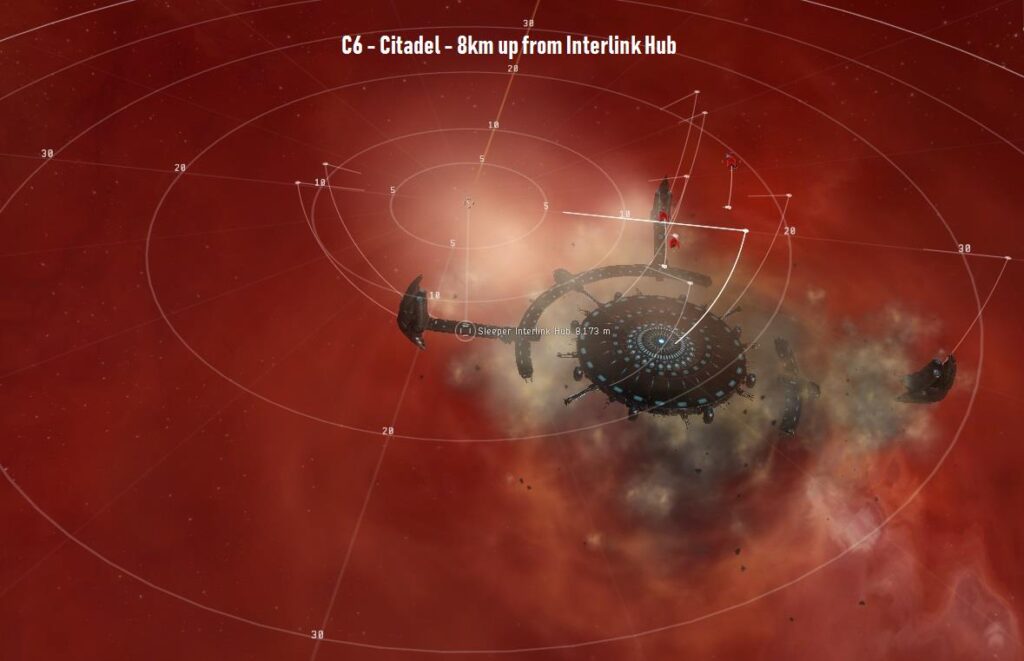
C6 – Core Citadel 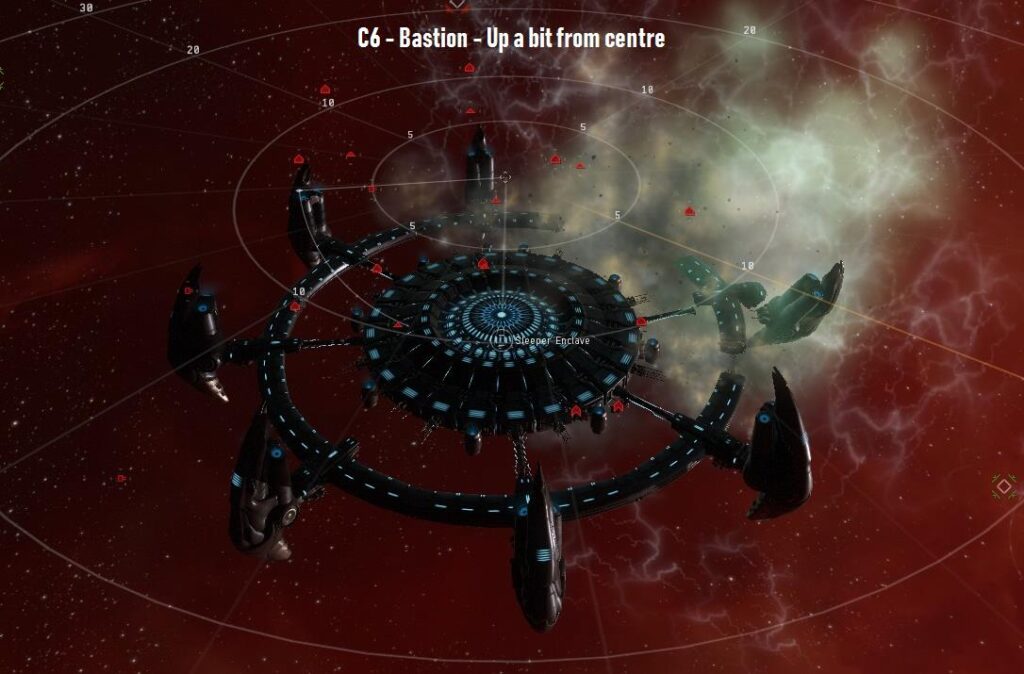
C6 – Core Bastion 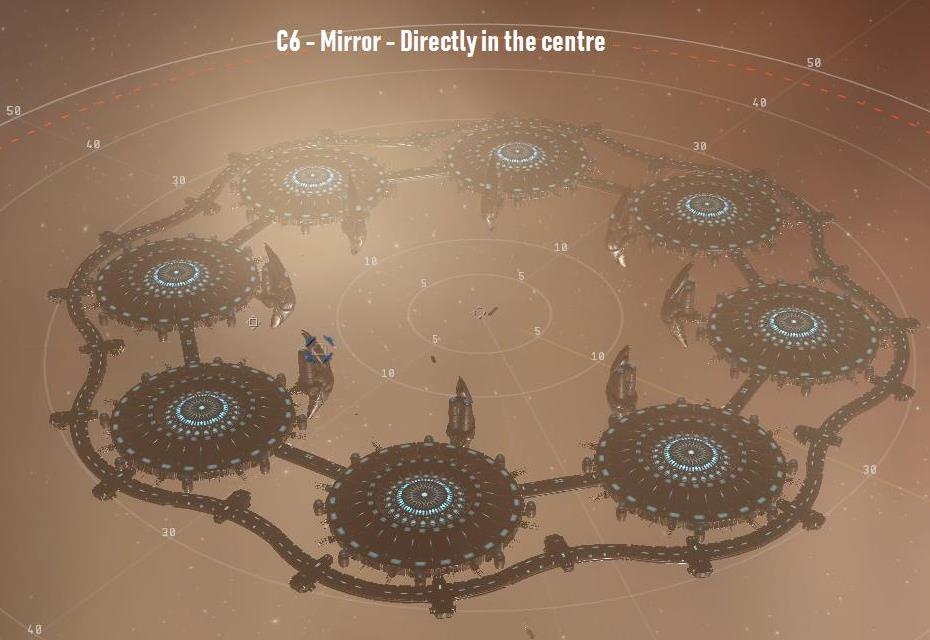
C6 – The Mirror
Fits
The fits I’m providing here are perhaps not the best in the world, but they are cheap and easy to replace. Each of them has capital sized guns fitted as an example. Do make sure to bring a set of HAWs, though, or you’ll just be stuck in site. You’ll also want to pack some additional goodies such as expanded cargoholds, webs and heavy warp disruptors for the Drifter. These should also always be ran with T2 Siege for the extra damage to kill battleships before they get a chance to orbit. Finding krabs with Siege Module I’s is just sad. Fits have not been changed since the resist nerf, just use a mobile depot and refit with a Damage Control II instead of a damage mod if you start dying. Use your DPS to tank and kill the site fast instead!
Naglfar
[Naglfar, Cheap C5 Krab]

Gyrostabilizer II
Gyrostabilizer II
Gyrostabilizer II
Gyrostabilizer II
True Sansha Capacitor Power Relay
Dark Blood Capacitor Power Relay

Capital Clarity Ward Enduring Shield Booster
Adaptive Invulnerability Field II
Target Painter II
Tracking Computer II
Tracking Computer II
Capital Cap Battery II

Hexa 2500mm Repeating Cannon II
Hexa 2500mm Repeating Cannon II
Hexa 2500mm Repeating Cannon II
Imperial Navy Large EMP Smartbomb
Siege Module II

Capital Capacitor Control Circuit I
Capital Semiconductor Memory Cell I
Capital Semiconductor Memory Cell I


Barrage XL x1000
Hail XL x1000
Nanite Repair Paste x100
Arch Angel Fusion XL x1000
Arch Angel Titanium Sabot XL x1000
Optimal Range Script x2
Tracking Speed Script x2
Moros
[Moros, Cheap C5 Krab]

Magnetic Field Stabilizer II
Magnetic Field Stabilizer II
Magnetic Field Stabilizer II
Multispectrum Energized Membrane II
Capital I-a Enduring Armor Repairer
Dark Blood Capacitor Power Relay
True Sansha Capacitor Power Relay
True Sansha Capacitor Power Relay

Capital Cap Battery II
Capital Cap Battery II
Tracking Computer II
Republic Fleet Target Painter

Ion Siege Blaster II
Ion Siege Blaster II
Ion Siege Blaster II
Siege Module II
Imperial Navy Large EMP Smartbomb

Capital Hybrid Metastasis Adjuster II
Capital Capacitor Control Circuit I
Capital Semiconductor Memory Cell I


Null XL x1000
Void XL x1000
Guristas Antimatter Charge XL x1000
Nanite Repair Paste x100
Optimal Range Script x1
Tracking Speed Script x1

Revelation
[Revelation, Cheap C5 Krab]

Dark Blood Capacitor Power Relay
True Sansha Capacitor Power Relay
Capital I-a Enduring Armor Repairer
Imperial Navy Energized Adaptive Nano Membrane
Heat Sink II
Heat Sink II
Heat Sink II
Heat Sink II

Capital Cap Battery II
Tracking Computer II
Tracking Computer II
Target Painter II

Dual Giga Pulse Laser II
Dual Giga Pulse Laser II
Dual Giga Pulse Laser II
Imperial Navy Large EMP Smartbomb
Siege Module II

Capital Capacitor Control Circuit I
Capital Capacitor Control Circuit I
Capital Semiconductor Memory Cell I


Conflagration XL x6
Scorch XL x3
Nanite Repair Paste x100
Optimal Range Script x2
Tracking Speed Script x2
Standard Exile Booster x1
Standard Mindflood Booster x1

Note that the Rev is nowhere near as good as Nag/Moros
Tips and Advice
- As with Nestors you should ignore all sigs and watch for new ones.
- Don’t panic if a sig pops up. The only way you are getting out is by krabbing harder and finishing sooner.
- Bring appropriate drugs, refits, and tracking-bonused ammo just in-case.
- Once you warp and bookmark a site you have four days to complete it before it respawns.
- If completing a site after downtime you need to pre-warp it before sending the dreads in.
- Set slightly different dread default warps and land them 1-2km apart to save from bumping.
- Double click backwards in space to slow down quicker than a simple Ctrl+Space.
- Don’t be salty if you get tackled….
Resources
Rykkis Guide (or Karr’s updated version)
3 Dreads 1 Cycle
This Guide
« Part 4: The Abyss | Part 6: Triglavian Ships »
That’s all folks
Actually scratch that, there’s a part 6 now 😉
And with that, I can conclude an insane amount of work. What started as an attempt to teach my newer corp members how to krab has turned into an extremely comprehensive list of ways to earn ISK in wormhole space. I had initially intended to write this up as a single article believe it or not. I may still do so actually so keep an eye out for the concise fits and tips megaguide if I get around to it.
If anything changes then please do let me know either on Twitter or here in the comments. I’ll be happy to update to reflect new changes or to write a standalone addition if a new krabbing method pops up.
And onto part 6, Thank You again
Drifter no longer targets via sig radius. It’s targeting is random and switches constantly through out the fight.
Thanks! Guide updated 🙂
Haven’t read it yet; any of it, but I’m excited as the charts explain it covers how to makes billions of isk per hour
Great guide man! Would it be possible to run C5 sites (including the drifter ) with 3 characters? What would be the optimal set up? 2x leshak 1x nestor or 1x leshak and 2x nestor?
Any idea what kind of clear times I’d be looking at here?
Thanks, it should be possible to run the Drifter with 3. I would personally go for 3x Nestor since whoever gets shot will be neuted out fully. You then rely on the two other Nestors to keep you alive. You’ll just have to balance the mid slot tackle vs cap regen in order to hold him down.
An optimal setup for the regular part of the sites is with three would be 2x Nestor + 1x Leshak. It would likely also be possible to run 3x Leshak if you bling, but I’m not a fan of that.
As for site times, I’d expect probably around 20-25 minutes with three Nestors, definitely on the lower end of that using a Leshak in the mix.
One thing to not be afraid of is that if it isn’t a farm and it’s just some random C5, you don’t have to do the Drifter. If represents a significant portion of the income, but if you’d rather not have the setup for it then just running through the garrisons etc. can work well enough. Just be sure that if you’re going to do a 2x Nestor setup that you pay attention to my table on this page. The numbers all changed with the resist nerf. You can make my expensive Nestors tank more, too, but I don’t think there’s much reason to.
100% possible to do garrisons with 2 shaks and a nestor as well, if you use a 5 rep stable nestor. when its targeted, use the shaks to remote rep the nestor, and the nestor is in charge of keeping shaks alive.
Thank you for the very informative reply!
2x Nestor with 1x Leshak would be my preffered setup.
You mention site run times of 20-25 minutes. Does this include the Drifter?
That doesn’t include the Drifter, no. About another 20 minutes or so for him but it depends on what you have 🙂
Hi, great guides btw. If I was to multibox with 4 toons, would it be best to use 2 nestors 2 leshaks or 2 nestors 1 leshak and boosts?
Depends on the sites that you want to do. You could fit remote reps to the Leshaks and use them in addition to Nestors to complete all C5 content if you wanted to.
I would personally go with Links+Nestors+Leshak since you could use the links Drekavac to kill small stuff while also keeping the entire setup to under 2b ISK of investment. You’ll be caught eventually so there isn’t too much of a reason to go mega bling
Do you think Its possible to use Rattlesnake without highgrades ? Of course in system without Pulsar effect.
Yeah you could do a tinker rattlesnake without high grades. It’s just going to be expensive to buy the good shield mods but you shouldn’t need the high grade crystals.
As for passive with/without Nirvanas, check out my passive purger fit here. You can either beef up the modules more, or run it slightly differently. If you drop the resist mods and two rechargers for cap booster+two Pithum C Multispectrum Hardeners then you’ll tank around 2.5k EHP/s cold without Nirvanas. You can even drop one of the shield rechargers then for a jump drive if you want to sacrifice some tank. The idea is that you use MANY small cap boosters to keep cycling and keeping the invuls on, but be careful that you don’t run out!
Theoretically, you could also use something like this to solo C6 anoms (or relics in a Pulsar), but it would earn you less ISK/hr than C5’s to do alone due to the EHP.
So running 2 Tinker snakes is still possible after the resist nerf?
The appeal is that I already have 2 who can fly them, and simpler operation of 2 clients – no swapping modules etc.
Still very possible, it’s just expensive to buy the blingy shield boosters required. I’d rather recommend Nestors since Rattles limit you to only drones anyway.
Can you run with sub-caps, then bring a Dread in to do the drifter and not have to worry about the Avengers? Will they despawn somehow if you can warp the dread off grid again then fight the drifter somewhere else?
Yeah you can spawn Driftyboy and kill him somewhere else. Don’t warp the dread into the actual site unless you want to deal with Avengers though. Your best bet is to spawn the Drifter as you warp out of site the find him and kill him on a planet/wormhole.
Hey, so I wanted to ask you, when you’re in a dread right, and you get into a C5/6 hole, what do you do exactly? ignore every sig right away and only look if there is a new one, or still try to scan sigs?
If you’re jumping blind and daytripping with a Naglfar then you’re likely to run into someone to kill you. The best thing is to lock down the hole by rolling off connections and *then* ignoring sigs.
If I had to run sites with open connections (generally wouldn’t do that in a dread) then I would scan all connections, jump them, then scan every hole off there and jump those too. There are some issues you could consider with spawning K162’s on the other side of some holes, but generally scanning a few out is safest.
Will Avengers spawn if I warp a dread in AFTER the site has cleared and the drifter structure is revealed?
Yes I believe so. You should complete the site and despawn it before you consider warping in caps.
I have not checked this though!
Hey man. Thank you for your guides.
I am nowhere close to being able to krab C5/C6 yet (only doing C3s in Tengu), but on question comes to mind – what’s so bad about using Phoenix for C5? I didn’t quite catch it from the text… also, with upcoming torp buffs, would you consider Phoenix viable?
Heya, you’re welcome 🙂
The problem with the Phoenix is that you lose out on that big benefit of being at a perfect range and being able to use cap guns to decimate things that aren’t moving much. Missiles, on the other hand, will only apply based on sig and speed. This is the same reason why artillery can be so good at killing small ships. You need to “line up” your shot, but if you get it right it can be devastating.
Hi Ashy, question about the C5 wolf rayet fleets, can you run frigate logi? We tried the setup with Confessors and Guardians, and whelped on the Drifter (lol). I figure next time we’ll have command bursts, but drifter EXCLUDED, can we run frigate logi? It’s for when we spot a C5 WR a few holes away, and want to blitz the sites without putting too much on grid.
Frig logi should be fine for wolf rayets as long as you keep your transversal up to the Sleepers.
I can imagine you dying to the drifter easily if you only brought 2 logi. The Drifter will pretty much always knock out the cap from one person no matter what you do. It’s also a lot of DPS so Confessors are going to get their little faces smashed in before they can take reps. (This is why the wolf rayet helps so much)
Ashy. Thank you for this guide. It has been a great reference point filling in the blanks between Pyfa and Rykki/Karr’s guide.
With regards to C5 ratting in your Nestor fits, would you say that it is better to use 5xPraetors over 5xOgres due to better speed on grid and tracking for just running the sites (not spawning drifter)?
Also, Would praetors be a better choice than ogres in a C3?
Thanks!
Heya, my recommendation is usually Praetors since they offer a really nice balance of speed, damage, and tracking. If you know there are going to be waves where you just threw through battleships that are relatively close, though, then go for Ogres. These ships do tend to have huge bays, though, so you can pick up a couple of sets and be good to go.
I’ve heard a lot of people have great success with Wasps too!
The decision really won’t matter that much in the end tbh. Just have a play with a few different types and see what you like most.
Hi, So this “++purgersnake” fit can solo C5 Garrisons ?
And for the 2x C5 expensive nestor, is there some strategy other than “warp-in, pewpew, warp-out” ?
Yeah the snake will solo C5’s but it will take a long while.
The two Nestors can pretty much do that, yeah. There is a slightly more optimal strategy of bookmarking the talocan structure and warping at 10km, but you don’t strictly need to do that
Is there a fit for the vargur with the new update? 2000 dps, is like ccp really wants me to buy my vargur for c5 :v
Working on it, it’s the next article. Been SUPER busy for the last couple of weeks though
out of interest, would a legion be able to solo in a c5 wolf rayet? fitting, small weapons, plates and double reps?
It is extremely unlikely. Even Marauders have a lot of difficulty tanking for cheap. You need to survive like 2,000 DPS and many heavy neuts. This is not really possible on a cruiser without spending something like 5-6 billion on your fit and even then you would be slower than a Marauder. It’s also likely that you would die to literally just a pair of standard Assault Frigates.
is there any chance we can get updated fits? ik for at least the Moros, the fitting slots have changed. plus with the drifters more and more aggresive towards a scram ship, and not wanting to deal with a warp disrupt bubble, what would you suggest?
Moros is updated now.
I still recommend a bubble if you are solo in a marauder or something. If together in a small group then simply fit scrams/webs and you’re good (unless you are using self tank ships that need all those mids for cap). Remember, you only need to scram him once while he’s at 25% armour. This is the only time he attempts to leave.
As for updating the rest of the fits, there is no need really. Nestors and Rattles have become stupidly expensive and marauders are a much better investment in C5 space.
Is there either a Tengu fit with Heavily Missiles or Heavy Assault Missiles or a Legion fit of any kind that can solo a Forgotten Frontier Evacuation Center or Forgotten Frontier Conversion Module (C4 relic)? It’s over 2K DPS to your face if you try solo. I don’t think a Nestor can, but maybe with the Tengu can try some AB sig tanking? I saw people do the Frontier Barracks solo in a Tengu, but it’s an easier site.
Yes with a max rolled abyssal everything.
It’s gonna cost you about 15 billion ISK of modules, a blingy pod, and just 351 DPS. At that DPS it will take you an hour and a half to earn the 146m ISK from the site. You will need to successfully krab for 156 hours total without breaks or looting to make back your investment.
I think needless to say – do not do this. Relic/Data sites are always equivalent to the class above them. You are essentially trying to do a C5 site in a solo T3C. Use a Marauder or Rattlesnake.
Ouch… I was hoping it wouldn’t take abyssal rolling and could be done in a clean clone as long as I used officer modules. I didn’t realize it would be essentially trying to solo a C5 site without a Marauder. I mean I know a Paladin can do these sites just fine, I’ve seen it done before. Part of the reason I hoped it would be possible in a T3C without rolling or implants was that I thought it would be cool to solo it.
I have 3 friends and we sometimes run unrated complexes and escalations. Of the last 13 times we ran escalations, we lost hulls on 3 (and I had to replace them since I told them I’d replace hulls and modules). This was because I had given each ship a restrained inertia stabilizer and went with the smallest ship I deemed was possible, but I assumed maxxed out skill points and kept forgetting they weren’t maxxed. The last 3 times we went on an adventure, I just used a ship that could solo the escalation and they tagged along and we did fine (and thanks to them I wasn’t micromanaging my drones as much and finish the sites faster). Aside from wanting to try to solo the C4 relic sites without Maurader for the sake of it, being able to solo it also means the 3 of them can tag alone with the Hurricanes with 720s and I can carry them despite their… not so great combination of 720mms + Afterburner + Armor tanking (with no kinetic resists other than a multispectral membrane, Damage Contol, and reactive hardener… I guess reactive hardener will take care of that) fits.
Say… did you say this was possible solo this site in a Rattlesnake? I can run Curator IIs, Garde IIs, and Warden IIs. Sadly given how many drones I’ve lost running these sites “Lots of Skill points” doesn’t mean “lots of skill” Does your Garrison Rattlesnake fit work for this? Without a propulsion module, not even an AB, I’m worried about the drones being like “I can’t hear you, that thing is out of range”
The Garrison Rattle should be fine with drone link augmentors, though you may want to upgrade it to use some more shield extenders since Bolstered Bulkheads.
The reason that a T3C tanks an escalation so very easily is because you only need to tank 2 damage types. Now let’s examine an example situation:
– Fighting EM/Thermal Rats in Highsec
– Using an armour tank (Armour naturally bonused towards high EM/Therm resists)
– Using T2/T3 Minmatar ship such as the Loki (Minmatar T2 resists are +++EM ++Thermal
– Using a few resist modules in EM and Thermal
All of this stacks super well! A Loki will now have resists of 96.1 / 93.4 / 36.3 / 23.5
It will tank 1,455 EHP/s on a T2 armour repairer. Holy shit that’s a lot.
Now let’s shoot it in Explosive: It tanks 96 EHP/s
This is simply not possible in wh space due to the omni damage of sleepers. I hope that explains things 😀
Thanks for your advice. Your Rattlesnake (with an extra shield extender) works great the last 3 times I went into a C4. and I cleared them and got the blue loot and I was able to carry my friends when they came in the next week to join the fun.
Any tips for running solo? I’ve been running the Garrision Rattle the same way I use my Heavy Ion + Sentry Dominex (the turret arrangement saves some PG for tanking). However it occurred to me that a Passively tanked Rattle might be treated differently than an armor repped Space Potato even if I use sentries on both.
I’ve often found in DED sites that even when I use a fit appropriate for the site, someone inevitably suggests a way to optimize. This either means outright clearing faster when I’m using something that can tank the site, or warping off less if it’s one of those that needs a repair break. One time someone suggested the obvious “uh… kill the stasis towers?” which I thought wouldn’t do anything since I was flying a BC and it turned out to save me time.