Welcome to a bit of a different version of How 2 Krab. If you already know everything there is to know about earning ISK in wormholes then this guide probably won’t apply to you. Here, I’m going to try to better explain the exact mechanics of wormhole sites, how you complete them, and (more importantly!) the fits that an alpha clone will need to run them.
If you’re an Omega clone then it would be better for you to check out the rest of this series for more optimal fits. The theorycrafting I’ve done here is designed around being exceptionally tanky, easy to fit, and cheap. I will mention upfront, though, that I designed them with “max alpha” skills in mind. As always, I recommend plugging them into Pyfa with your own skills and comparing against expected damage/neuting. I’ll show you how to do that below, it’s easy!
You can also watch some of this theorycrafting as it was done live on Twitch here.
| Method | Characters Needed | Initial Investment | ISK/hour*** |
| Gas Huffing | 1+ | 10m ISK | ~75m ISK |
| Mining | 1+ | 10m ISK+ | Depends on setup/rocks |
| Planetary Interaction | 1+ | 10m ISK+ | ~1b / month / account |
| Data/Relic Sites (C1-3) | 1 | 10m ISK | Variable, <150m ISK |
| C2 Sites (T3D/Cruiser/BC) | 1+ | 50-60m ISK | ~75m ISK |
| C5 Wolf Rayet Fleet | 3+ | 350m ISK | ~450m ISK |
| C13 Wolf Rayet Sites | 1+ | 150m ISK | ~150m ISK |
| C3 Sites (Gila/Rattle) | 1+ | 500m ISK | ~250m ISK |
| Abyssal Frigates* | 3 | ~300m ISK | ~4-600m ISK |
| Abyssal Cruisers* | 1 | 1-300m ISK+ | ~1-300m ISK |
| C5 Sites (Nestor/Vargur)** | 2/3+ | 1.6b ISK | ~450m ISK |
| C5 Sites + Drifter | 2/3+ | 3b ISK | ~1b ISK |
| C5/6 Dread Sites | 2/3+ | 8-16b ISK | ~2-3b ISK |
*Abyssal sites included as they’re easily done inside your wormhole
**C4 sites can be ran using these methods for less ISK
***These are rough numbers. You can often earn more with better skills, more investment, luck etc.
How to Read Pyfa
Seems like a strange place to start on a wormhole guide, doesn’t it? I feel that it’s very important, though, and I’m including it here in order to help show newer players how to calculate if you’re going to survive a site before you ever enter it. This isn’t a full theorycrafting guide or a guide on how to add your character, but it should be enough to at least “read” my fits better and to understand them.
Below, you’ll find the main stats panel shown in Pyfa. Every fit will have details like this and you can easily match them up to what the ship does. Here are descriptions of each numbered section and why it is important.
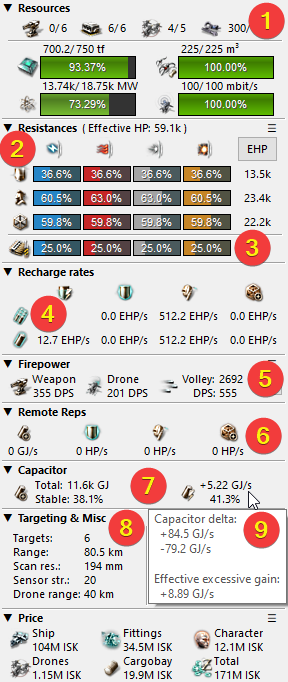
- Fitting / drones & cargo / hardpoints. These are simple to understand, as long as the fit isn’t above 100% in any area then things will fit. You can also use the PG/CPU % to easily determine if you’d rather use an implant of 1,2, or 3%
- Resists. From top to bottom you have shield, armour, and hull resists. Against Sleepers (wormhole enemies) you need these to be balanced if possible. The “EHP” button toggles to zero resists or “raw” HP.
- Incoming Damage. For the purposes of tank calculation, you can change incoming damage to other profiles such as the Thermal + Kinetic Serpentis. Leave it as omni for my guides.
- Tank. This shows you how much you can repair per second with resists and damage profile considered. The top number is the maximum and the bottom is the best you can get under current simulated capacitor. If stable, these numbers are the same. From left to right: Passive shield regen, active shield reps, active armour reps, hull reps. “Projected” remote reps onto you will appear here, too.
- Outgoing DPS. The amount of damage you deal. Right click to factor in reload time.
- Outgoing Reps. Most useful for logi fit comparison, not so much for solo/duo fits.
- Capacitor Stats. Shows raw capacitor and how much you have when stable. The right hand side shows capacitor resistance and how much you are stable by in gigajoules per second.
- Targeting and drones. Normally this isn’t something to consider so much unless you have a long-ranged fit or a drone boat. Note the drone control range and the range at which enemies will orbit you.
- Capacitor Tooltip. This will show you the effective excessive cap regen that you have. This is the best number to compare to incoming NPC neuts per second.
I highly recommend using Pyfa if anything to at least check your skills in advance (make sure to add and select the right character!). It’s also very useful for fixing the imports of modules which have been updated through tiericide. If you’re not sure how to import fits in that way then check out my short guide.
I would also like to clarify what different types of tank actually mean and their benefits in PvE. This is particularly important because I’ve seen people trying to complete sites in cruisers with 400mm armour plates. That doesn’t work!
- Armour or Shield Buffer – Both are bad options in PvE. If you run out of tank, you either warp off or simply die. (Ancillary rep modules are usually a form of buffer, too)
- Passive Shield Regen – This is distinct from buffer since you use modules which focus on making your shield recharge super fast. Peak regen will be around 25% so if you hit that then you need to think about aligning out. You will usually have close to zero capacitor due to how this works so think about not using any active modules at all.
- Active Armour or Shield Reps – Very simple. You use modules to directly boost shields or armour back up. Shield tanks typically have more DPS and armour tanks will have more control modules such as webs, painters, or tracking computers.
- Remote Rep “Spider Tank” – This needs two or more different ships with remote reps fitted to deal damage and repair each other at the same time. Fleets with dedicated logistics are also viable.
- Tinker Tanking – A very very niche method. To do this you often do not repair each other, but instead, use strong self reps and many remote cap transfers to facilitate the use of such reps.
There are combinations of each of the above that work, but for the most part those are the general principles of tanking to be aware of. Try reading module descriptions in my fits (in-game) and you’ll start to understand why things are done the way they are.

How to Find Sites (and which to do)
In order to actually find combat sites in wormhole space, it’s as simple as finding any wormhole (by scanning Cosmic Signatures anywhere) and venturing in. Immediately in your probe scanner, you will find ‘green’ signatures/anomalies that you can warp straight to. These are what I typically refer to when I talk about completing sites in any particular wormhole class.
You also have the option of scanning the wormhole cosmic signatures to find Sleeper data and relic sites. A good rule of thumb is that they are always about one class higher in terms of difficulty, but can have good rewards if you choose to complete them. Some them require specific triggers such as hacking cans. For that reason, and for the purposes of checking triggers, I recommend reading through Rykkis Guide below.
I’ve also gone ahead and created some tables here of preferred sites split by Anomaly or Signature. Read from the top down for the “best” sites to complete. When you actually complete the sites, it’s as simple as burning around and killing all of the Sleeper enemies to pick up their loot (no bounties!). Using a Mobile Tractor Unit is very handy, and make sure you don’t kill the last of the trigger enemies per wave or you will bring another wave early.

While completing these combat sites, you should always be checking your directional scanner for new hostiles. If you’re new, then be sure to check Rykki’s Guide for the Sleepers and prioritise targets other than the last one of those. Usually, this means clearing neuts or heavy DPS as soon as possible. Some Sleepers also remote repair each other and if can tank the wave easily then those are a good first target.
The sites below are limited to C1, C2, and C3 space because they are some of the most newbro friendly, and in the case of C3 sites, the best ISK/hr with little investment. C4 sites aren’t worth your time without a long ranged battleship fleet, and C5/C6 sites start to become the kind of thing that you really do need to be Omega to effectively do.
Salvaging and Selling the Loot
A quick note on this in case you didn’t already know. Sleeper “blue loot” is sold to NPCs; you can easily determine these as they will be flat amount of ISK available in seemingly random stations. The main trade hub in Amarr, for example, has NPC buy orders for it.
Salvage is also particularly worthwhile in wormholes. It isn’t what it used to be, but if you can easily do it, it’s worth running a salvaging ship over once you’re done with the site and it’s safe enough to do so.
Best Anomalies (C1-C3)
| Anomaly Name | ISK/EHP | Total ISK | Class |
|---|---|---|---|
| The Oruze Construct | 150 | 44.5m | C3 |
| Fortification Frontier Stronghold | 147 | 41.1m | C3 |
| Solar Cell | 123 | 55.2m | C3 |
| Outpost Frontier Stronghold** | 100 | 45.1m | C3 |
| The Line* | 106 | 12m | C1 |
| Perimeter Hangar | 74 | 15.6m | C2 |
| The Ruins of Enclave Cohort 27 | 58 | 15.6m | C2 |
| Perimeter Camp* | 79 | 10.4m | C1 |
| Phase Catalyst Node | 70 | 9m | C1 |
| Perimeter Ambush Point | 66 | 8.6m | C1 |
| Perimeter Checkpoint | 53 | 12.9m | C2 |
| Sleeper Data Signature Sanctuary | 46 | 11.6m | C2 |
**Hope you enjoy lots of webs and 800+ DPS!
Best Signatures (C1-C3)
| Data/Relic Signature Name | ISK/EHP | Total ISK | Class |
|---|---|---|---|
| Forgotten Frontier Quarantine Outpost | 153 | 79.4m | C3 |
| Unsecured Frontier Receiver | 150 | 72.2m | C3 |
| Unsecured Frontier Database** | 176 | 88.4m | C3 |
| Unsecured Perimeter Transponder Farm | 68 | 26.7m | C2 |
| Forgotten Perimeter Habitation Coils | 65 | 25.4m | C2 |
| Forgotten Perimeter Gateway | 65 | 19.2m | C2 |
| Forgotten Frontier Recursive Depot** | 179 | 92.5m | C3 |
| Unsecured Perimeter Amplifier* | 114 | 10.2m | C1 |
| Forgotten Perimeter Power Array* | 84 | 9.2m | C1 |
| Unsecured Perimeter Comms Relay | 54 | 20.2m | C2 |
| Forgotten Perimeter Coronation Platform* | 72 | 12.8m | C1 |
| Unsecured Perimeter Information Center* | 74 | 11.8m | C1 |
**These sites are ranked lower due to very high DPS waves that may need another fit

Alpha Clone C1 & C2 Fits
C1 and C2 sites are naturally some of the easiest wormhole content in the game. For that reason I can definitely recommend them to someone with very low SP. All it takes is some decent battlecruiser skills and the ability to read which triggers to not shoot until last. Additionally, none of these sites scram, making it easy to think about aligning out if you get low and need to warp.
That said, here are a number of fits which I’ve designed to keep cheap and easy to fly. They’re biased towards drone/missile setups since those really are the best at most PvE content due to application and ease of use. I personally did my very first C2 sites in a passive tanked autocannon Hurricane slowly burning around sites and I don’t recommend it.
The DPS and neuts you’re going to want to tank for these are as follows. Be sure to check the fits against your skills. If it’s just a tiny bit lower then try it anyway and you should be fine. Feel free to also upgrade the weapons to T2 or drones to faction at your leisure.
- C1 (all sites) – 225 DPS, 18 GJ/s neuting (with more in “The Line”)
- C2 (anomalies) – 425 DPS, 10 GJ/s neuting
- C2 (relic & data) – 600 DPS, 22 GJ/s neuting
C1
The below fits don’t need a huge amount of explanation and out of all of them, I’d probably fly the Gnosis since it’s so damn cheap. The Drake offers a shield option, though, and the Myrmidon has an MWD if you feel that moving around on grid a lot is necessary. Almost anything works in these sites though as long as you meet the requirements above.
With any and all of my fits you should also bring along some appropriate drugs in the cargo. A Hardshell II and a Standard Exile will go a long way in stopping you from dying if things get hairy in almost any fit. It will eat into your profit margins to keep chugging them, but it’s better to survive with a small ISK loss than to lose the entire ship.
50m ISK C1 Gnosis
[Gnosis, C1 Alpha Clone]

Medium I-a Enduring Armor Repairer
Ballistic Control System II
Damage Control II
Compact Multispectrum Energized Membrane
Ballistic Control System II
Medium I-a Enduring Armor Repairer

Large Compact Pb-Acid Cap Battery
Large Compact Pb-Acid Cap Battery
Cap Recharger II
Cap Recharger II
Cap Recharger II
10MN Monopropellant Enduring Afterburner

XR-3200 Heavy Missile Bay
XR-3200 Heavy Missile Bay
XR-3200 Heavy Missile Bay
XR-3200 Heavy Missile Bay
XR-3200 Heavy Missile Bay
Drone Link Augmentor I

Medium Nanobot Accelerator I
Medium Auxiliary Nano Pump I
Medium Auxiliary Nano Pump I


Hammerhead I x5

C1 Passive Drake
[Drake, C1 Alpha Clone]

Shield Power Relay II
Shield Power Relay II
Ballistic Control System II
Ballistic Control System II

Large Azeotropic Restrained Shield Extender
Large Azeotropic Restrained Shield Extender
Large Azeotropic Restrained Shield Extender
Missile Guidance Computer I
Pithum C-Type Thermal Shield Amplifier
EM Shield Amplifier II

XR-3200 Heavy Missile Bay
XR-3200 Heavy Missile Bay
XR-3200 Heavy Missile Bay
XR-3200 Heavy Missile Bay
XR-3200 Heavy Missile Bay
XR-3200 Heavy Missile Bay
Core Probe Launcher I

Medium Core Defense Field Purger I
Medium Core Defense Field Purger I
Medium Core Defense Field Purger I


Acolyte I x5

C1 Myrmidon
[Myrmidon, C1 Alpha Clone]

Medium Armor Repairer II
Energized Adaptive Nano Membrane II
Damage Control II
Energized Adaptive Nano Membrane II
Drone Damage Amplifier II
Drone Damage Amplifier II

Large Compact Pb-Acid Cap Battery
Large Compact Pb-Acid Cap Battery
Cap Recharger II
Drone Navigation Computer I
50MN Quad LiF Restrained Microwarpdrive

Dual 180mm Prototype Automatic Cannon
Dual 180mm Prototype Automatic Cannon
Dual 180mm Prototype Automatic Cannon
Dual 180mm Prototype Automatic Cannon
Drone Link Augmentor I

Medium Auxiliary Nano Pump I
Medium Auxiliary Nano Pump I
Medium Explosive Armor Reinforcer I


Imperial Navy Praetor x4

C2
So how do you step it up from here to C2s? It’s 200 more DPS for anomalies and 400 more to complete all content including data/relic. This can be done quite well in many ships, but I’d like to show off three of my recommendations here.
The first two are very simple; a Drake that can complete any C2 anomaly, and a Praxis with much more DPS that can complete any C2 site at all. The Praxis is just over twice the price of the Drake, but you get a lot more out of it with the ability to clear more sites with more DPS. Neither fit has a prop mod, so you’re just going to be sitting around spewing missiles out at Sleepers. If you specifically want to land on the other side of the site then you can easily do that by bookmarking a structure and rewarping.
The last fit is much more interesting. It’s a Cyclone that breaks the rules and uses cap boosters in PvE. You only have 9-10 of them and are barely stable, especially with the MWD on. The tradeoff is that you can get 622 DPS as an alpha or 789 DPS with all 5 skills. My test run on an alpha character managed to do a Perimeter Hangar in about 6 minutes or so and used 0.02m ISK worth of cap boosters (4). I highly suggest using this if you want a more active method of PvE similar to flying in the abyss. It’s also the fastest overall bar a T2 fit Praxis.
Any old abyssal or C3 Gila fit will also work, but keep in mind that you’re paying a lot more for something you don’t need.
C2 Alpha Drake
(Anomalies)
[Drake, Alpha C2 Site Drake]

Power Diagnostic System II
Shield Power Relay II
Shield Power Relay II
Ballistic Control System II

Large F-S9 Regolith Compact Shield Extender
Large Shield Extender II
Large Shield Extender II
Large Shield Extender II
Shield Recharger II
Compact Multispectrum Shield Hardener

Heavy Missile Launcher II
Heavy Missile Launcher II
Heavy Missile Launcher II
Heavy Missile Launcher II
Heavy Missile Launcher II
Heavy Missile Launcher II
Drone Link Augmentor I

Medium Core Defense Field Purger I
Medium Core Defense Field Purger I
Medium Core Defense Field Purger I


Imperial Navy Acolyte x5


Scourge Fury Heavy Missile x240

C2 Alpha Praxis
(All content)
[Praxis, Alpha C2 Blitz Praxis]

Large Armor Repairer II
Large Armor Repairer II
Reactive Armor Hardener
Energized Adaptive Nano Membrane II
Energized Adaptive Nano Membrane II
Damage Control II
Ballistic Control System II

Large Cap Battery II
Large Cap Battery II
Cap Recharger II
Cap Recharger II
Cap Recharger II
Cap Recharger II
Parallel Enduring Target Painter

YO-5000 Rapid Heavy Missile Launcher
YO-5000 Rapid Heavy Missile Launcher
YO-5000 Rapid Heavy Missile Launcher
YO-5000 Rapid Heavy Missile Launcher
YO-5000 Rapid Heavy Missile Launcher
YO-5000 Rapid Heavy Missile Launcher
Drone Link Augmentor I

Large Capacitor Control Circuit I
Large Capacitor Control Circuit I
Large Auxiliary Nano Pump I


Hammerhead I x5
Praetor I x4
Vespa I x5
Warrior I x5


Inherent Implants 'Noble' Repair Systems RS-603
Zainou 'Snapshot' Heavy Missiles HM-701
Zainou 'Deadeye' Guided Missile Precision GP-801
Inherent Implants 'Noble' Repair Proficiency RP-901
Zainou 'Deadeye' Rapid Launch RL-1001
C2 Alpha Cyclone
(Anomalies)
[Cyclone, Alpha C2 Cyclone]

Damage Control II
Ballistic Control System II
Ballistic Control System II
Ballistic Control System II
Pro-Nav Compact Missile Guidance Enhancer

X-Large Clarity Ward Enduring Shield Booster
Compact Multispectrum Shield Hardener
Copasetic Compact Shield Boost Amplifier
Medium F-RX Compact Capacitor Booster
50MN Quad LiF Restrained Microwarpdrive

Heavy Assault Missile Launcher II
Heavy Assault Missile Launcher II
Heavy Assault Missile Launcher II
Heavy Assault Missile Launcher II
Heavy Assault Missile Launcher II
[Empty High slot]
[Empty High slot]

Medium Core Defense Capacitor Safeguard II
Medium Core Defense Capacitor Safeguard II
Medium EM Shield Reinforcer II


Caldari Navy Vespa x5


Scourge Javelin Heavy Assault Missile x500
Scourge Rage Heavy Assault Missile x1500
Cap Booster 800 x9
Caldari Navy Scourge Heavy Assault Missile x1500
Mobile Tractor Unit x1
Agency 'Hardshell' TB5 Dose II x1
Standard Blue Pill Booster x1

Alpha Clone C3 Fits
Now this is where things get difficult. As an alpha clone in wormhole space, you’ll find that tanking the DPS and neuts of many C3 sites to be particularly difficult. I’ve already mentioned in previous tech 3 cruiser guides that you can do them easily with a 400 DPS tank if you sig tank, but I wouldn’t want to throw that at newbros and call it a day. Instead, I’ve focused here on trying to make sure that you can easily run the sites without too much trouble.
As before, here are the DPS and neut values to tank. Compare these to your fits in Pyfa.
- C3 Anomalies – 815 DPS, ~20 GJ/s
- C3 Data/Relic – 1,400 DPS, 44 GJ/s (some are easier)
The Praxis fit below is the one that I’m most likely to recommend to a solo alpha clone wanting to run sites. It’s about as entry-level as I can make it without either over engineering the tank, blinging it into ISK oblivion, or otherwise. It uses some cheap implants that aren’t completely necessary, but they will improve the time you have piloting this Praxis. Same as many other alpha fits in how you use it. Warp in, shoot Sleepers, and rep. The tank is technically slightly lower than what you need for a couple of waves; you can fix this with Standard Exile, Hardshell II, or just a bit of overheating.
The other thing I can suggest for running C3 sites is an unorthodox version of a Dominx pair. This will need a second pilot, but you can scale it up and keep bringing more to add onto the chain as necessary. It’s a tinker shield tank fitted in a particular way to get around Alpha Clone drone limitations. By squeezing two Drone Link Augmentors on, you get the range up to a respectable 80km for one. A shield fit also means 3x Drone Damage Amplifiers compared to zero or one that you would have on an alpha armour fit. I tried it, and running a battleship with 250 DPS just isn’t cool. To fly these, you should warp in together and send cap to each other while running your local shield boosters. Be sure to stay within range.
A more common way to do this as I’ve already said would be with remote reps, but if you really want to go down that route, then my best suggestion would be to use the cheaper version of my Part 5 Nestor. It all fits easily and those Nestors will allow alpha clones to run most, if not all content if in a pair and being careful with cap. They’re about 520m ISK each and will enable the ability to bring along any third armour battleship that you want. My only change would be to drop one medium rep for a Drone Link Augmentor I and to drop the plate for a Reactive Armour Hardener.
C3 Alpha Clone Solo Praxis
[Praxis, Alpha C3 Solo Praxis]

Large Armor Repairer II
Large Armor Repairer II
Reactive Armor Hardener
Energized Adaptive Nano Membrane II
Energized Adaptive Nano Membrane II
Damage Control II
Capacitor Power Relay II

Large Cap Battery II
Large Cap Battery II
Cap Recharger II
Cap Recharger II
Cap Recharger II
Cap Recharger II
Missile Guidance Computer II

Rapid Heavy Missile Launcher II
Rapid Heavy Missile Launcher II
Rapid Heavy Missile Launcher II
Rapid Heavy Missile Launcher II
Rapid Heavy Missile Launcher II
Rapid Heavy Missile Launcher II
Drone Link Augmentor I

Large Capacitor Control Circuit II
Large Auxiliary Nano Pump I
Large Nanobot Accelerator I


Hammerhead I x5
Praetor I x4
Vespa I x5
Warrior I x5


Inherent Implants 'Noble' Repair Systems RS-603
Zainou 'Snapshot' Heavy Missiles HM-701
Zainou 'Deadeye' Guided Missile Precision GP-801
Inherent Implants 'Noble' Repair Proficiency RP-901
Zainou 'Deadeye' Rapid Launch RL-1001


Inferno Fury Heavy Missile x3000
Mjolnir Fury Heavy Missile x3000
Mjolnir Precision Heavy Missile x1000
Nova Fury Heavy Missile x3000
Nova Precision Heavy Missile x1000
Scourge Fury Heavy Missile x3000
Caldari Navy Inferno Heavy Missile x2000
Caldari Navy Scourge Heavy Missile x2000
Missile Precision Script x1
Missile Range Script x1
Nanite Repair Paste x50
Agency 'Hardshell' TB5 Dose II x2
Standard Exile Booster x1
Standard Mindflood Booster x1
C3 Alpha Clone Tinker Dominix
[Dominix, Alpha C3 Tinker Pair]

Damage Control II
'Deuce' Co-Processor I
Co-Processor II
N-JM Compact Omnidirectional Tracking Enhancer
Drone Damage Amplifier II
Drone Damage Amplifier II
Drone Damage Amplifier II

X-Large Clarity Ward Enduring Shield Booster
Multispectrum Shield Hardener II
5a Prototype Shield Support I
Multispectrum Shield Hardener II
X-Large Clarity Ward Enduring Shield Booster

Large Inductive Compact Remote Capacitor Transmitter
Large Inductive Compact Remote Capacitor Transmitter
Large Inductive Compact Remote Capacitor Transmitter
Large Inductive Compact Remote Capacitor Transmitter
Drone Link Augmentor I
Drone Link Augmentor I

Large Egress Port Maximizer II
Large Egress Port Maximizer II
Large Egress Port Maximizer I


Caldari Navy Hornet x5
Caldari Navy Vespa x5
Federation Navy Hammerhead x5
Federation Navy Ogre x5
Imperial Navy Praetor x5


Nanite Repair Paste x100
Agency 'Hardshell' TB5 Dose II x1
Standard Blue Pill Booster x1
That’s it for now about alpha clones. If I can think of any reliable and unique ways to complete C5 or C6 sites as an alpha clone then I will update this guide, but I doubt that. It’s just so much DPS and neut pressure that guides for fleets of under five people start to become a little pointless. My recommendation would be to stick to Wolf Rayets and use my T3C fits and similar. C4 sites are, as ever, annoying to do due to the 1-200km spawns. I do not recommend them.
I need to nitpick the following:
– The gas huffing initial investment should include the skill book price – it’s actually quite steep for completely new players.
– The 0 damage mod armor Praxis will have such pathetic clear times that I doubt it is worth the investment and the exposure, it will probably take over 15 minutes to clear a site. Shelling out another 100 or so million for an active shield fit will allow the use of at least 2 damage mods, or more if you don’t aim to be stable. On top of that, the armor Praxis tanks less if skills are low – the shield version has fixed tank values.
– Using t2 launchers on the Praxis adds quite a lot of training time without necessarily adding much in the way of performance.
– It seems really strange to use hammerheads and praetors over just using Cal. Navy Wasps for everything. Drone aggro is a major problem in solo alpha ratting.
All that said – an alpha rattlesnake is almost as good as an omega Rattlesnake in C3s, and it blows all these fits out of the water. Very expensive currently, so I wouldn’t recommend it to inexperienced players.
>If I can think of any reliable and unique ways to complete C5 or C6 sites as an alpha clone then I will update this guide
C5s and C6s are mostly a multibox or group deal. Alpha Nestors slot into C5 Leshak comps perfectly as the ship’s rep power is massive and has essentially no skill requirement, on top of bringing the option of free refits to Leshaks.
Gas Huffing: I didn’t mention gas huffing here, that table links to my other article regarding mining in general and the investment prices reflect that. If I were to include skill prices for everything then it would become a case of “where do I stop? Do I include injecting prices for new alts?”
Zero Damage Mod Praxis: This was a version of my standard fit from other articles in which the armour version works very nicely due to the great application afforded by the mid slots. I felt it was important to keep it similar since it offers a shield and an armour option without the extra time spent theorycrafting the optimal shield version. I’ve run a few tests on that, though, and it’s a good point. I just don’t like it enough right now to include a version of it. You can drop to the same tank as a shield version if you add a BCS onto the armour version.
T2 Launchers: True, but the weapon choices on these fits aren’t necessarily a direct instruction. Most of the fits here use T1 launchers, but I felt that it was quite nice on that Praxis if the player can use them. The Missile Guidance Computer helps with making Fury missiles a more attractive option vs battleships.
Drone choices: Again, not necessarily a direct instruction. I sometimes include them in my fits as something that I’m a fan of, but I often omit them to fix formatting. For alphas, I very much appreciate the extra speed (and tracking) of Amarr drones.
Rattlesnake: Absolutely true. Same deal with the Gila which I mention. If alphas want to reach out to start using Rattles then I have several other fits in this guide series showing how to do just that. I didn’t include anything like that here, though, because they’re so expensive. The loss of a Rattle for someone in their second month could cause them to quit the game.
Regarding C5s/C6s: Yeah, that’s true. I was mostly thinking about effective ways to run high-class sites with 1-2 alphas though. If you’re looking at 4/5 people or more then of course Nestors will work, I mention it as part of the C3 section anyway and have fits in Part 5. Without thinking of the cap stability of alpha clone ships, the other main problem here can be just how expensive that is as an option for them. Same deal as the rattlesnake.
Gas Huffing: It’s up to you to pick what to include. I just believe the skillbook price is relevant in that context, as it is basically the first individually ‘expensive’ skillbook for an otherwise low-requirement activity. This is partially based on my interaction with fresh new players and their frustrations with the price of the skillbook.
Praxis: I’m still skeptical of your fondness for the armor version. Not only does it require the lengthy Hull Upgrades V to work (without spending extra ISK on green EANMs to make up for lost tank), it also does a good 100 DPS less than even a conservative fit shield version with t1 launchers and decent cap stability %, just on the virtue of not having low slot room. Not having a damage mod on a battleship is simply a huge loss in performance by default. Same criticism applies to the C2 praxis.
The shield fit, on top of having more DPS, takes less time to get into, due to active shield tanking not requiring almost any medium-long training other than Tac. Shield Manipulation IV, which is in stark contrast to Armor Comps, Repair Systems, Hull Upgrades V etc which are crucial to get the PYFA All V armor tanking numbers in reality.
What I will admit is that the armor fit has a very low price (efficient shield variants will cost at least 50-200m more depending on what you pick), so in that sense, the fit has some merit. I just can’t justify actually using it in practice or recommending it to someone.
All that said, I did specify I was nitpicking. I think it’s ultimately good that you’re putting fits out there, even though I have objections to some. All these are still significantly better than some of the stuff used out there.
Another Wonderful post!
Theory crafting for alphas done by omegas typically never work and unfortunately, you’re not different. You really need to run an alpha character yourself to truly understand the reality of being an alpha.
For starters, “max alpha skills” is a myth. Nobody has the 20 mil SP max alpha skills because they are soft capped at 5 mil SP and increasing skills from there you typically only do with login events, which takes forever. Using alpha skill injectors is just a waste that nobody does because it is better spend on omega time.
I tested your C3 Gnosis and it doesn’t even fit, not in Pyfa on “max alpha skills” and not on my 9 mil SP in-game alpha.
Thanks for the input. I designed these fits using max alpha skills since it’s the most sensible place that I can have a level playing field. This is the same as in every fit for Omegas where I use all 5 skills. For the most part, fitting is rarely an issue except for if I accidentally design something with great rigging skills in mind. If I didn’t do this then it introduces a massive amount of work in querying hundreds of alphas and finding out what the average 3m SP pilot has.
There are also a specific subset of people who will have max Alpha skills, older players. People who have perhaps decided that they don’t want to pay any more or just want to play casually with an alpha account. You also do not need max skills in every area. If someone makes an alpha or trains their alpha towards my fits then I’m very sure that they could fly these with under 5m SP total.
As for a C3 Gnosis, I provided a C1 Gnosis and a C3 Praxis. I’ve rechecked both of these again and, sure enough, they should fit. If you let me know by how much you are over on PG/CPU then I can help you determine what went wrong there or where the skill deficit is, though I suspect it’s armour rigging 3 that you need. My suggestion in the meantime would be to use a powergrid implant or some other simple swaps that have minimal impact such as enduring -> compact on a module.
I do want to try and make the best guides I can, so if there is anything that anyone wants to bring up which they feel could be done better, please do so. I think my understanding of alpha clones is perfectly sound, though.
c13 ratting is doable in a succubus as an alpha, the ab bonus and t2 guns work well