Marauders are great again! After 13 years we have a massive buff to these mini Dreads by way of the Bastions of War update. The key point here is that Bastion now doubles your rate of fire. Notably that means double DPS. And what does double DPS mean? It means half the site time and twice the ISK per hour. Drifters are also now possible to kill in high-class wh space with a Marauder thanks to this patch. Previously, the 40-minute requirement to kill put a severe damper on any attempt, but a Golem can now down a Drifter in just 15-16 minutes for an easy 300m ISK.
From the extensive testing I’ve done for this article, I’ve found that pretty much any Marauder can run C5 sites and some can even complete the hardest C6 sites if you’re willing to spend enough money. In order of preference for site times and Drifter kill times, you’re looking at something like Golem > Paladin > Vargur > Kronos. I’ll explain these differences as we go, but it mostly comes down to damage application to long-range targets for some sites and damage selection for killing the Drifter. The Paladin has good application and decent ammo, but the Golem has more sheer DPS and perfect ammo selection.
Let me also say this up front, Golems can earn you 800m ISK/hr easily solo, more if you’re a bit more optimal. Two Marauders can even push for 2b ISK/hr depending on ship choice too.
Strategy
Vargur
Paladin
Golem
Kronos
2023 update!!!
I have updated this article to make the Vargur and Kronos usable at least and am working on a better, more efficient article that cares less about Marauders 4 and low skills. There has been a lot of criticism of my fits here over the years but you have remember that I designed these for very different module prices and to be insanely stable. I wanted to be able to let anyone flying one of my fits go completely AFK in the hardest wave of a site to deal with their kids or whatever.
| Method | Characters Needed | Initial Investment | ISK/hour*** |
| Gas Huffing | 1+ | 10m ISK | ~75m ISK |
| Mining | 1+ | 10m ISK+ | Depends on setup/rocks |
| Planetary Interaction | 1+ | 10m ISK+ | ~1b / month / account |
| Data/Relic Sites (C1-3) | 1 | 10m ISK | Variable, <150m ISK |
| C2 Sites (T3D/Cruiser/BC) | 1+ | 50-60m ISK | ~75m ISK |
| C5 Wolf Rayet Fleet | 3+ | 350m ISK | ~450m ISK |
| C13 Wolf Rayet Sites | 1+ | 150m ISK | ~150m ISK |
| C3 Sites (Gila/Rattle) | 1+ | 500m ISK | ~250m ISK |
| Abyssal Frigates | 3 | ~300m ISK | ~4-600m ISK |
| Abyssal Cruisers | 1 | 1-300m ISK+ | ~1-300m ISK |
| C5 Sites (Nestor) | 2/3+ | 1.6b ISK | ~450m ISK |
| C5 Sites + Drifter | 2/3+ | 3b ISK | ~1b ISK |
| C5/6 Dread Sites | 2/3+ | 8-16b ISK | ~2-3b ISK |
| Marauders | 1+ | 2.2-4b ISK | 800m – 1.2b ISK |
*Abyssal sites included as they’re easily done inside your wormhole
**C4 sites can be ran using these methods for less ISK
***These are rough numbers. You can often earn more with better skills, more investment, luck etc.
If the words ‘static’ and ‘probe launcher’ seem foreign then you best start with EVE Uni first. As before, this is also not a replacement for Rykkis Guide (or Karr’s updated version). Instead, it is more of a complementary piece that explains how to actually use the numbers found in that sheet. If you’re in a rush then skim through for the key bold text and reference tables.
This guide will mostly focus on C5 and, to an extent, C6 sites. It’s also pretty much all been tested out on SISI with Marauders 5 and theorycrafted with Marauders 4 in mind. That’s a long skill train so if I can keep it accessible to lower skills then I will. Another key focus of these fits (in addition to efficiency) is ship cost. There is no point in me telling you to use a max roll abyssal module or some particular 3b ISK item. With that said, please make sure you read the Strategy section ahead. Additionally, all of my fits are theorcrafted in this process: Drifter Kill -> Refit to create Garrison killer -> Add refits for other C5 sites. Do note that the last step can always be replaced by Crystal or Asklepian implants.
C5 Marauder Strategy
Alright, let’s do this! Marauders right now do a hell of a lot more damage than they used to to the point of being able to run sites in 15-20 minutes and kill a Drifter in about 16 minutes if you use a Golem. This can be sped up with all sorts of Implants and Boosters but my testing was done on a nearly max Character with some basic 3% Implants and minimal Boosters. In fact, the only safe Boosters I recommend are Hardshell (+other Agency) and Synth Mindflood. Here are some of the kill times across the many tests I ran:
Drifter Kills
– Golem: 16 min
– Vargur: 17-18 min
– Paladin: 17-18 min
– Kronos: 22 min
C5 Core Garrison Completion
All approx 17 minutes, some sites will be faster or slower for different fits depending on range and number of sentries or other small targets to burn through.
So the question is, which Marauder is best? My answer is that the Golem is clearly best at killing him (due to damage selection and Rage Torps) and the Kronos is the worst (terrible damage selection). The rest of the sites are going to be a mix depending on the range and number of sentries to kill. I say this because killing sentries can be surprisingly difficult for a Torp Golem instead of a gun-based Marauder which just eats them up fast. The Paladin will then excel at sites that have long-range Sleeper Battleships due to Scorch. The Vargur does slightly worse with Barrage, and the Kronos requires double Tracking Computer to make Null even hit them. Sleeper Cruisers are definitely a mix too since the horrible tracking of the Paladin means it can barely hit them. The Vargur and Kronos, however, have little trouble.
As for the general site killing strategy, it’s going to be as simple as following the triggers like usual. Kill off lightly tanked neuting NPCs first and then remove the highest DPS. Frigates are a little more unique in that you need to use your double Smartbombs to blast them (this is the reason for the Imperial Navy EMP Smartbombs). Just be wary of them being the trigger. This is particularly apparent on Core Garrison wave 2 where the frigates remote rep. You need to Smartbomb as many as you can without killing all and pushing the wave. Warp in points are the same/similar to those provided for Dreads in How 2 Krab Part 5. A general rule, however, is to bookmark near to a Sleeper/Talocan main structure and warp to that at 10km but you will learn this in time.
Killing the Drifter is your next big task. This has always been possible by Marauders, but the difficulty was that it would take literally 40 minutes to do, leading to very little ISK and you likely being caught. He delivers about 1,600 DPS and the equivalent of EIGHT T2 Heavy Neuts. Ouch. The way you get around this is by refitting to an anti Drifter setup to tank the neuts while still doing as much damage as possible. A fit will be provided for each of my Marauders below (in cargo and as another fit). Simply refit, spawn by shooting the structure, and kill him (with staggered Nos applied, too). The trick to holding him on-grid will be to bring a Mobile Medium Warp Disruptor II in the cargo. If you can’t use that then T1 or Syndicate works, but you want a quick onlining time to get the bubble up and down fast. The way I see it, you’re permatackled anyway, a bubble doesn’t hurt. One important point is to make sure you move 5km away from wrecks and large collidables to anchor the bubble before spawning the Drifter.
As with all of my fits, please plug these into Pyfa with your own skills to be sure of cap stability. I’ve designed them with Marauders 4 in mind, but your other skills need to be pretty good. Carry Blue Pill, Exile, and Mindflood just in case because once you’re in site, you’re in site. I’ll try to explain everything you need to know in the text above each fit so be sure to read it. And some advice: Hardshell 2/3 and a slot 6 Repair implant can make you good enough to make a Marauders 5 fit work at Marauders 4. You might also want to refer to my Frigate Escape Bay guide to protect your pod. Update: Ensure that you stagger your Nosferatu on the Drifter so that you don’t get neuted down past 25%
Vargur
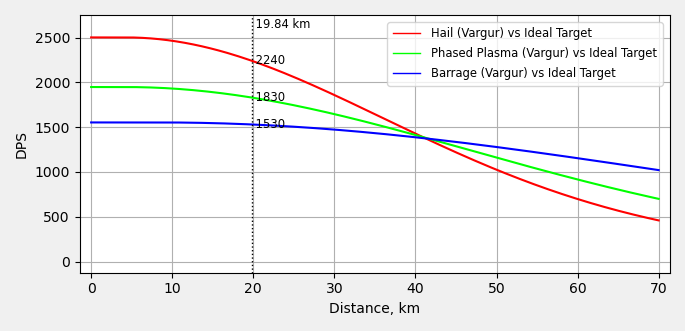
The Vargur is probably my favourite Marauder for running C5 wormhole sites and that isn’t just because I’m a Minmatar fangirl. It’s just a really nice mix of damage, tracking, and range with a relatively low price. The problem it runs into is that while Barrage is decent, it is a bit slower than the Paladin at killing long-range Sleeper Battleships. I’ve included an image below which describes the best ammo to use at each range (1x optimal TC + 3x Gyro, no implants).
And now for the fits. You’re going to notice a standard theme among all of these being that there are two main variants. In the case of shield Marauders, that means Gist X-Type Booster and Pith X-Type Booster. The Gist is better on cap, but costs 3x as much as the time of writing. You should check out both and decide which works best for you with current prices and your skills.
My Pith X-Type features a Micro Jump Drive for safety, though I would recommend dropping this off for a Tracking Computer instead. To fit this MJDd it needs a Gistum C-Type Multispectrum instead of Pithum, you can get more tank from a Pithum if you drop it. It has been designed to tank 1,920 EHP/s // 2,033 EHP/s depending on Marauders skill for completing Core Garrisons and Oruze Obonyks. Fitting a second Multispectrum Hardener (ideally Pithum C-Type) in the “EWAR” slot will allow you to complete sites with more difficulty. Dropping Gyro -> Damage Control is also an option for a minor tank bump.
For killing the Drifter with this fit you will be swapping to an extra battery and 2x more Nosferatu. You might also consider swapping Flux Coils -> Dark Blood Cap Power Relays if you capacitor skills are bad. Just be sure to move away from any wrecks/structures and anchor the bubble then trigger the Drifter. Be sure to shoot thermal into his shield and EM into his armour using faction ammo, not Hail. The drugs in the fit are not needed at all times, but keep them on hand just in case.
2023 Note! I have updated the fits below to be usable and am working on a better, more efficient Marauder article too.
Pith-X Type Vargur – Garrison
[Vargur, 2023 NEW Ashy's Pith-X - Site copy]

Capacitor Flux Coil II
Capacitor Flux Coil II
Capacitor Flux Coil II
Republic Fleet Gyrostabilizer
Republic Fleet Gyrostabilizer
Republic Fleet Gyrostabilizer

Republic Fleet Large Cap Battery
Republic Fleet Large Cap Battery
Tracking Computer II
Large Micro Jump Drive
Pithum C-Type Multispectrum Shield Hardener
Pith X-Type X-Large Shield Booster

Bastion Module I
Imperial Navy Large EMP Smartbomb
Imperial Navy Large EMP Smartbomb
800mm Repeating Cannon II
800mm Repeating Cannon II
800mm Repeating Cannon II
800mm Repeating Cannon II

Large Capacitor Control Circuit II
Large Capacitor Control Circuit II


Acolyte II x5
Hobgoblin II x5
Hornet II x5


Inherent Implants 'Squire' Capacitor Systems Operation EO-603
Eifyr and Co. 'Gunslinger' Motion Prediction MR-703
Inherent Implants 'Squire' Capacitor Management EM-803
Eifyr and Co. 'Gunslinger' Surgical Strike SS-903
Eifyr and Co. 'Gunslinger' Large Projectile Turret LP-1003

Synth Mindflood Booster
Agency 'Hardshell' TB5 Dose II


Barrage L x5000
Hail L x9000
Nanite Repair Paste x100
Republic Fleet EMP L x6000
Republic Fleet Phased Plasma L x6000
Republic Fleet Titanium Sabot L x2000
Optimal Range Script x3
Tracking Speed Script x3
Mobile Depot x1
Mobile Tractor Unit x1
Mobile Medium Warp Disruptor II x1
Thukker Large Cap Battery x1
Capacitor Flux Coil II x2
Damage Control II x1
True Sansha Heavy Energy Nosferatu x2
Gyrostabilizer II x1
Multispectrum Shield Hardener II x1
Tracking Computer II x2
Tracking Enhancer II x1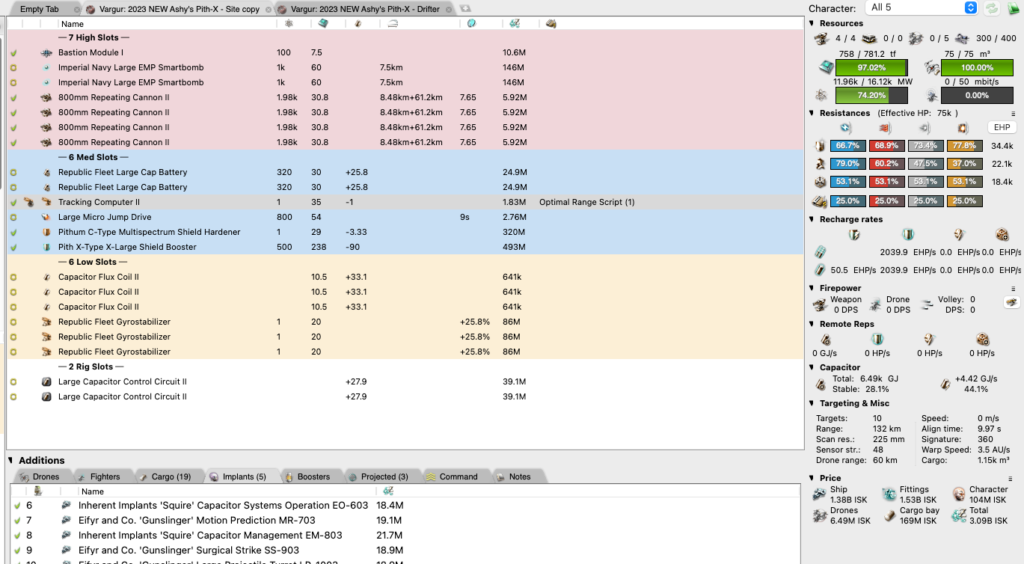
Pith-X Type Vargur – Drifter Refit
[Vargur, 2023 NEW Ashy's Pith-X - Drifter]

Capacitor Flux Coil II
Capacitor Flux Coil II
Capacitor Flux Coil II
Republic Fleet Gyrostabilizer
Republic Fleet Gyrostabilizer
Republic Fleet Gyrostabilizer

Republic Fleet Large Cap Battery
Republic Fleet Large Cap Battery
Thukker Large Cap Battery
Imperial Navy Cap Recharger
Pithum C-Type Multispectrum Shield Hardener
Pith X-Type X-Large Shield Booster

Bastion Module I
Imperial Navy Large EMP Smartbomb
Imperial Navy Large EMP Smartbomb
800mm Repeating Cannon II
800mm Repeating Cannon II
800mm Repeating Cannon II
800mm Repeating Cannon II

Large Capacitor Control Circuit II
Large Capacitor Control Circuit II


Acolyte II x5
Hobgoblin II x5
Hornet II x5


Inherent Implants 'Squire' Capacitor Systems Operation EO-603
Eifyr and Co. 'Gunslinger' Motion Prediction MR-703
Inherent Implants 'Squire' Capacitor Management EM-803
Eifyr and Co. 'Gunslinger' Surgical Strike SS-903
Eifyr and Co. 'Gunslinger' Large Projectile Turret LP-1003

Synth Mindflood Booster
Agency 'Hardshell' TB5 Dose II


Barrage L x4000
Hail L x9000
Nanite Repair Paste x100
Republic Fleet EMP L x5000
Republic Fleet Phased Plasma L x5000
Republic Fleet Titanium Sabot L x2000
Optimal Range Script x2
Tracking Speed Script x2
Mobile Depot x1
Mobile Tractor Unit x1
Mobile Medium Warp Disruptor II x1
Capacitor Flux Coil II x2
Damage Control II x1
Gyrostabilizer II x1
Large Micro Jump Drive x1
Multispectrum Shield Hardener II x1
Imperial Navy Large EMP Smartbomb x2
Tracking Computer II x2
Tracking Enhancer II x1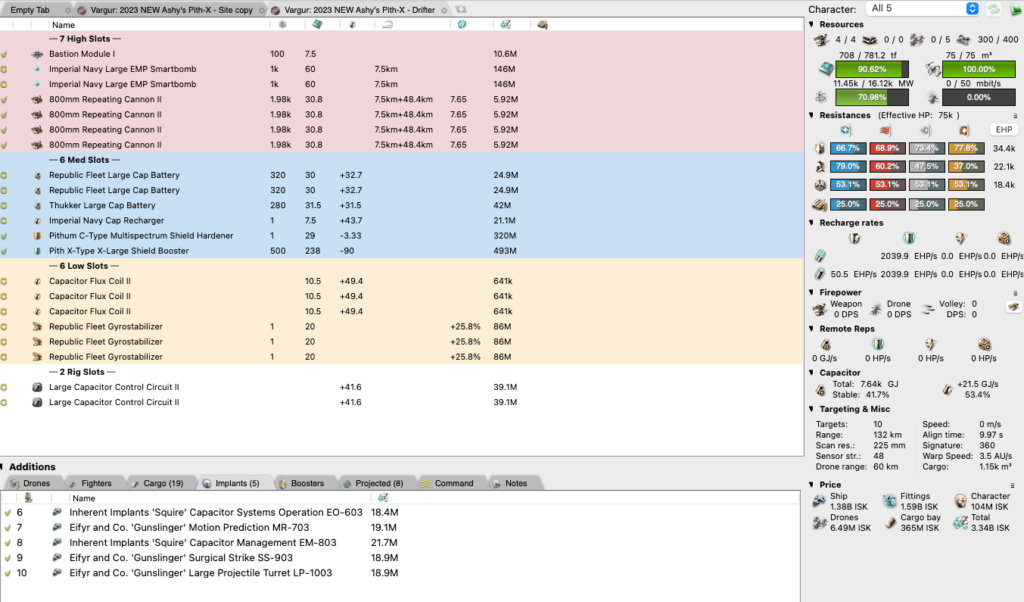
The other kind of fit that you can put together on a Vargur utilises the Gist X-Type instead. This is typically a better shield booster and allows for much better cap stability. This reflects in an improved Drifter kill speed and a second EWAR slot for 2x Tracking Computer in the sites if you wish. The problem, however, is that at the time of writing that booster alone costs over 900m ISK.
Regardless of the price, the strategy is the same as Pith for this Gist version. If you have Marauders 4 then you may need Hardshell II to complete sites more safely and the standard upgrade of dropping an EWAR mid for a Multispectrum will let you do the harder sites. The only other thing to be aware of is that the capacitor is a little less stable mid-site so be sure to remove the neut pressure ASAP. You won’t be neuted out, but it will come close and excessive Smartbomb use will kill you.
HISTORIC PURPOSES ONLY – PITH WORKS BETTER NOW DUE TO DPS/EHP BREAKPOINTS. SEE ABOVE
Gist X-Type Vargur – Garrison
[Vargur, OLD Ashy's Gist-X - Site]

Capacitor Flux Coil II
Republic Fleet Gyrostabilizer
Republic Fleet Gyrostabilizer
Republic Fleet Gyrostabilizer
Damage Control II

Thukker Large Cap Battery
Republic Fleet Large Cap Battery
Large Micro Jump Drive
Tracking Computer II
Pithum C-Type Multispectrum Shield Hardener
Gist X-Type X-Large Shield Booster

Dark Blood Heavy Energy Nosferatu
Imperial Navy Large EMP Smartbomb
Imperial Navy Large EMP Smartbomb
800mm Repeating Cannon II
800mm Repeating Cannon II
800mm Repeating Cannon II
800mm Repeating Cannon II
Bastion Module I

Large Capacitor Control Circuit II
Large Capacitor Control Circuit II


Acolyte II x5
Hobgoblin II x5
Hornet II x5


Inherent Implants 'Squire' Capacitor Systems Operation EO-603
Eifyr and Co. 'Gunslinger' Motion Prediction MR-703
Inherent Implants 'Squire' Capacitor Management EM-803
Eifyr and Co. 'Gunslinger' Surgical Strike SS-903
Eifyr and Co. 'Gunslinger' Large Projectile Turret LP-1003

Synth Mindflood Booster
Agency 'Hardshell' TB5 Dose II


Barrage L x5000
Hail L x9000
Nanite Repair Paste x100
Republic Fleet EMP L x5000
Republic Fleet Phased Plasma L x5000
Republic Fleet Titanium Sabot L x2000
Optimal Range Script x2
Tracking Speed Script x2
Mobile Depot x1
Mobile Tractor Unit x1
Mobile Medium Warp Disruptor II x1
Thukker Large Cap Battery x1
Capacitor Flux Coil II x2
True Sansha Heavy Energy Nosferatu x2
Gyrostabilizer II x1
Multispectrum Shield Hardener II x1
Tracking Computer II x1
Tracking Enhancer II x1
Gist X-Type Vargur – Drifter
[Vargur, OLD Ashy's Gist-X - Drifter]

Capacitor Flux Coil II
Republic Fleet Gyrostabilizer
Republic Fleet Gyrostabilizer
Republic Fleet Gyrostabilizer
Gyrostabilizer II

Thukker Large Cap Battery
Thukker Large Cap Battery
Republic Fleet Large Cap Battery
Imperial Navy Cap Recharger
Gist X-Type X-Large Shield Booster
Pithum C-Type Multispectrum Shield Hardener

Dark Blood Heavy Energy Nosferatu
True Sansha Heavy Energy Nosferatu
True Sansha Heavy Energy Nosferatu
800mm Repeating Cannon II
800mm Repeating Cannon II
800mm Repeating Cannon II
800mm Repeating Cannon II
Bastion Module I

Large Capacitor Control Circuit II
Large Capacitor Control Circuit II


Acolyte II x5
Hobgoblin II x5
Hornet II x5


Inherent Implants 'Squire' Capacitor Systems Operation EO-603
Eifyr and Co. 'Gunslinger' Motion Prediction MR-703
Inherent Implants 'Squire' Capacitor Management EM-803
Eifyr and Co. 'Gunslinger' Surgical Strike SS-903
Eifyr and Co. 'Gunslinger' Large Projectile Turret LP-1003

Synth Mindflood Booster
Agency 'Hardshell' TB5 Dose II


Barrage L x4000
Hail L x9000
Nanite Repair Paste x100
Republic Fleet EMP L x5000
Republic Fleet Phased Plasma L x5000
Republic Fleet Titanium Sabot L x2000
Optimal Range Script x2
Tracking Speed Script x2
Mobile Depot x1
Mobile Tractor Unit x1
Mobile Medium Warp Disruptor II x1
Capacitor Flux Coil II x2
Damage Control II x1
Gyrostabilizer II x1
Large Micro Jump Drive x1
Multispectrum Shield Hardener II x1
Imperial Navy Large EMP Smartbomb x2
Tracking Computer II x2
Tracking Enhancer II x1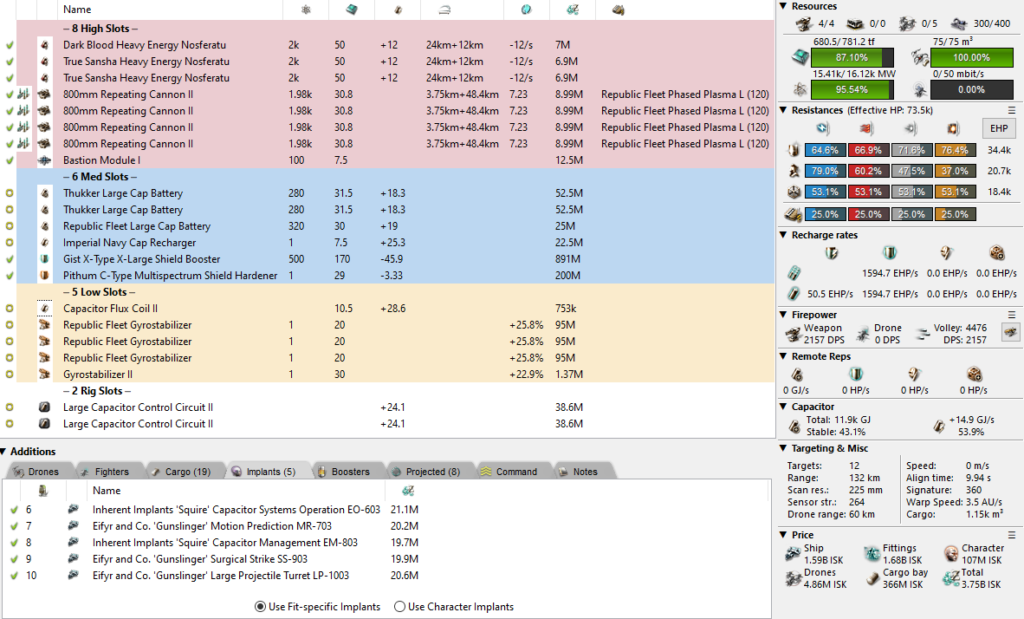
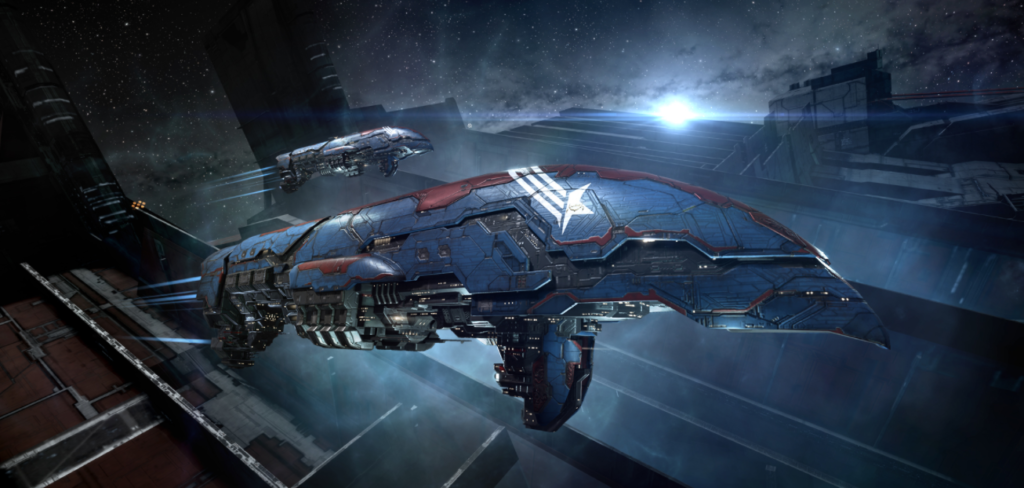
Paladin
And now we move onto what most people have considered as the best PvE ship to Pulses being great and really never having to replace laser crystals. I can’t deny that the crystal aspect of this ship is appealing. It is, however, pretty hilarious to burn through half your Conflag on one target. No fancy info needed for the Paladin really other than “load tracking ammo and shoot targets”. That said, it does struggle to hit cruisers so you’d do well to invest in a decent motion prediction implant. Remember, your pod is going to probably get out anyway using my escape bay frigs.
The first set of fits here are single rep and utilise either the Centus or Corpus X-Type Large Armour Reps. This is another case of picking the fit you prefer based on skills. Marauders 4 can just about handle it and may need Hardshell to compensate. Do remember that if you are just below a site/drifter DPS amount then you can either pick up a stack of 10 Hardshell or spend on 1-2 Low-Grade Asklepian implants for cheap. You do not need the full set. Same deal with before about the drugs in the fit, you don’t need them at all times.
That said, there is a specific way to run this fit if you want to complete sites harder than a Garrison. The first is by using the aforementioned mid-grade Asklepians. A full mid-grade set is enough to do several more sites, not including the Stronghold. You can, however, drop a Heat Sink for a T1 Large Enduring rep and use that to top up your armour during the hard waves. It works and I’ve tried it! An alternative is to drop the Tracking Computer for a Cap Recharger, then swap the Power Relay to the extra Enduring rep.
2023 Update: Paladin is still good, it only lost some range.
Single Rep Paladin – Garrison
[Paladin, Ashy's Single Rep - Site]

Imperial Navy Heat Sink
Imperial Navy Heat Sink
Damage Control II
Centus X-Type Large Armor Repairer
Dark Blood Capacitor Power Relay
Coreli A-Type Multispectrum Coating
Coreli A-Type Multispectrum Coating

Republic Fleet Large Cap Battery
Thukker Large Cap Battery
Imperial Navy Cap Recharger
Tracking Computer II

Mega Pulse Laser II
Mega Pulse Laser II
Mega Pulse Laser II
Mega Pulse Laser II
Dark Blood Heavy Energy Nosferatu
Imperial Navy Large EMP Smartbomb
Imperial Navy Large EMP Smartbomb
Bastion Module I

Large Capacitor Control Circuit II
Large Auxiliary Nano Pump II


Acolyte II x5
Hobgoblin II x5
Hornet II x5


Inherent Implants 'Noble' Repair Systems RS-603
Eifyr and Co. 'Gunslinger' Motion Prediction MR-703
Inherent Implants 'Squire' Capacitor Management EM-803
Eifyr and Co. 'Gunslinger' Surgical Strike SS-903
Inherent Implants 'Lancer' Large Energy Turret LE-1003

Synth Mindflood Booster
Agency 'Hardshell' TB5 Dose II


Conflagration L x20
Scorch L x8
Imperial Navy Gamma L x8
Imperial Navy Multifrequency L x12
Nanite Repair Paste x100
Optimal Range Script x2
Tracking Speed Script x2
Mobile Depot x1
Mobile Tractor Unit x1
Mobile Medium Warp Disruptor II x1
Large I-a Enduring Armor Repairer x1
Capacitor Power Relay II x2
Cap Recharger II x1
True Sansha Heavy Energy Nosferatu x2
Heat Sink II x1
Tracking Computer II x1
Tracking Enhancer II x1
Large Micro Jump Drive x1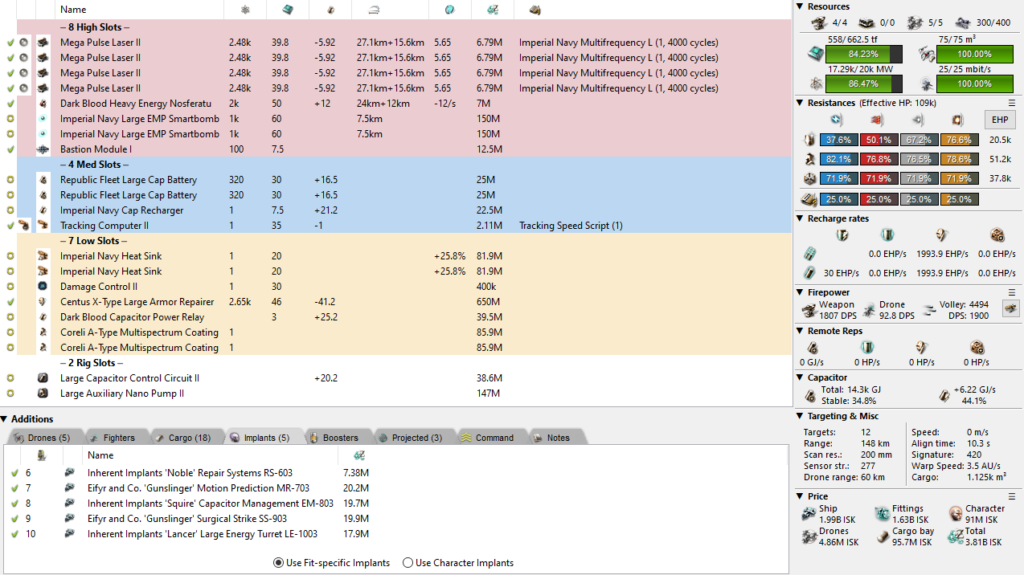
Single Rep Paladin – Drifter
[Paladin, Ashy's Single Rep - Drifter]

Corpus X-Type Large Armor Repairer
Coreli A-Type Multispectrum Coating
Coreli A-Type Multispectrum Coating
Dark Blood Capacitor Power Relay
Capacitor Power Relay II
Imperial Navy Heat Sink
Imperial Navy Heat Sink

Republic Fleet Large Cap Battery
Thukker Large Cap Battery
Imperial Navy Cap Recharger
Cap Recharger II

Mega Pulse Laser II
Mega Pulse Laser II
Mega Pulse Laser II
Mega Pulse Laser II
Bastion Module I
True Sansha Heavy Energy Nosferatu
True Sansha Heavy Energy Nosferatu
Dark Blood Heavy Energy Nosferatu

Large Capacitor Control Circuit II
Large Auxiliary Nano Pump II


Acolyte II x5
Hobgoblin II x5
Hornet II x5


Inherent Implants 'Noble' Repair Systems RS-603
Eifyr and Co. 'Gunslinger' Motion Prediction MR-703
Inherent Implants 'Squire' Capacitor Management EM-803
Eifyr and Co. 'Gunslinger' Surgical Strike SS-903
Inherent Implants 'Lancer' Large Energy Turret LE-1003

Synth Mindflood Booster
Agency 'Hardshell' TB5 Dose II


Conflagration L x20
Scorch L x8
Imperial Navy Gamma L x8
Imperial Navy Multifrequency L x12
Nanite Repair Paste x100
Optimal Range Script x2
Tracking Speed Script x2
Mobile Depot x1
Mobile Tractor Unit x1
Mobile Medium Warp Disruptor II x1
Large I-a Enduring Armor Repairer x1
Capacitor Power Relay II x1
Damage Control II x1
Heat Sink II x1
Imperial Navy Large EMP Smartbomb x2
Tracking Computer II x2
Tracking Enhancer II x1
Large Micro Jump Drive x1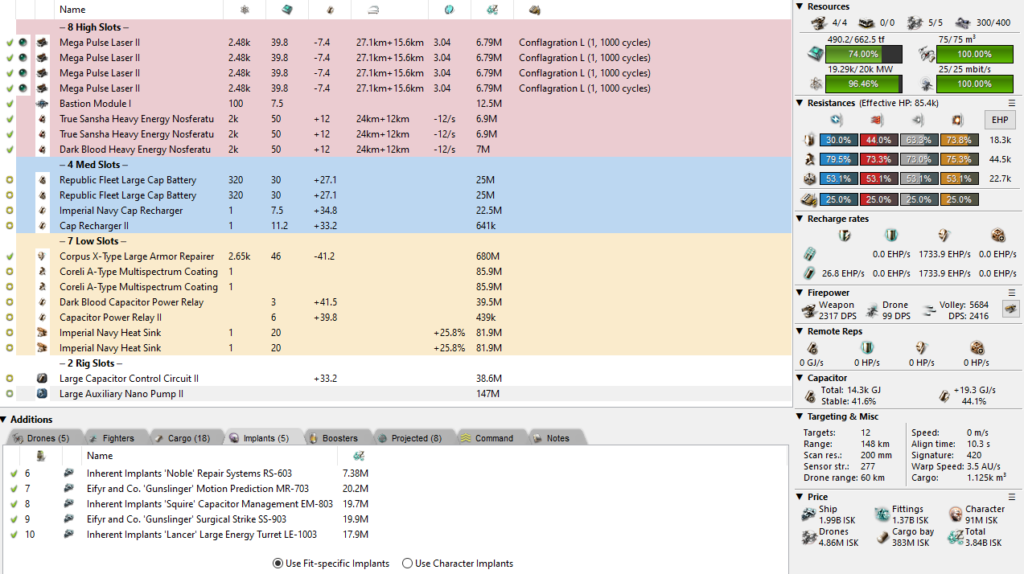
As you might have expected, there is an alternative option to the single rep. Dual rep! Instead of going down the route of using two super bling reps, I used 2x Core X-Types instead. These are much cheaper and rep a little bit less. The result is very similar to the single rep performance, but this one manages to squeeze on an extra Heat Sink in the site fit. You can take this off for an extra Multispectrum Energized Membrane for the completion of harder sites. Overall, though, I think upgrading with Asklepians is better suited here.
Due to the capacitor situation with this particular fit, my recommendation is to use the recommended implants plus a Synth Mindflood during at least your first few sites. It should be possible without, but is technically unstable otherwise. If the instability is something you dislike on your Marauder in general then a second Cap Power Relay will sort it out easily, as will rolling a very nice abyssal cap battery.
Dual Rep Paladin – Garrison
[Paladin, Ashy's Dual Rep - Site]

Imperial Navy Heat Sink
Imperial Navy Heat Sink
Imperial Navy Heat Sink
Coreli A-Type Multispectrum Coating
Dark Blood Capacitor Power Relay
Core X-Type Large Armor Repairer
Core X-Type Large Armor Repairer

Republic Fleet Large Cap Battery
Republic Fleet Large Cap Battery
Imperial Navy Cap Recharger
Tracking Computer II

Mega Pulse Laser II
Mega Pulse Laser II
Mega Pulse Laser II
Mega Pulse Laser II
Dark Blood Heavy Energy Nosferatu
Imperial Navy Large EMP Smartbomb
Imperial Navy Large EMP Smartbomb
Bastion Module I

Large Capacitor Control Circuit II
Large Capacitor Control Circuit II


Acolyte II x5
Hobgoblin II x5
Hornet II x5


Inherent Implants 'Squire' Capacitor Systems Operation EO-603
Eifyr and Co. 'Gunslinger' Motion Prediction MR-703
Inherent Implants 'Squire' Capacitor Management EM-803
Eifyr and Co. 'Gunslinger' Surgical Strike SS-903
Inherent Implants 'Lancer' Large Energy Turret LE-1003

Synth Mindflood Booster
Agency 'Hardshell' TB5 Dose II


Conflagration L x20
Scorch L x8
Imperial Navy Gamma L x8
Imperial Navy Multifrequency L x12
Nanite Repair Paste x100
Optimal Range Script x2
Tracking Speed Script x2
Mobile Depot x1
Mobile Tractor Unit x1
Mobile Medium Warp Disruptor II x1
Synth Mindflood Booster x4
Capacitor Power Relay II x2
Cap Recharger II x1
Damage Control II x1
Multispectrum Energized Membrane II x1
True Sansha Heavy Energy Nosferatu x1
True Sansha Medium Energy Nosferatu x1
Heat Sink II x1
Tracking Computer II x1
Tracking Enhancer II x1
Large Micro Jump Drive x1
Dual Rep Paladin – Drifter
[Paladin, Ashy's Dual Rep - Drifter]

Imperial Navy Heat Sink
Imperial Navy Heat Sink
Capacitor Power Relay II
Coreli A-Type Multispectrum Coating
Dark Blood Capacitor Power Relay
Core X-Type Large Armor Repairer
Core X-Type Large Armor Repairer

Republic Fleet Large Cap Battery
Thukker Large Cap Battery
Imperial Navy Cap Recharger
Cap Recharger II

Mega Pulse Laser II
Mega Pulse Laser II
Mega Pulse Laser II
Mega Pulse Laser II
Bastion Module I
Dark Blood Heavy Energy Nosferatu
True Sansha Heavy Energy Nosferatu
True Sansha Medium Energy Nosferatu

Large Capacitor Control Circuit II
Large Capacitor Control Circuit II


Acolyte II x5
Hobgoblin II x5
Hornet II x5


Inherent Implants 'Squire' Capacitor Systems Operation EO-603
Eifyr and Co. 'Gunslinger' Motion Prediction MR-703
Inherent Implants 'Squire' Capacitor Management EM-803
Eifyr and Co. 'Gunslinger' Surgical Strike SS-903
Inherent Implants 'Lancer' Large Energy Turret LE-1003

Synth Mindflood Booster
Agency 'Hardshell' TB5 Dose II


Conflagration L x20
Scorch L x8
Imperial Navy Gamma L x8
Imperial Navy Multifrequency L x12
Nanite Repair Paste x100
Optimal Range Script x2
Tracking Speed Script x2
Mobile Depot x1
Mobile Tractor Unit x1
Mobile Medium Warp Disruptor II x1
Synth Mindflood Booster x4
Capacitor Power Relay II x1
Cap Recharger II x1
Damage Control II x1
Multispectrum Energized Membrane II x1
Heat Sink II x1
Imperial Navy Heat Sink x1
Imperial Navy Large EMP Smartbomb x2
Tracking Computer II x2
Tracking Enhancer II x1
Large Micro Jump Drive x1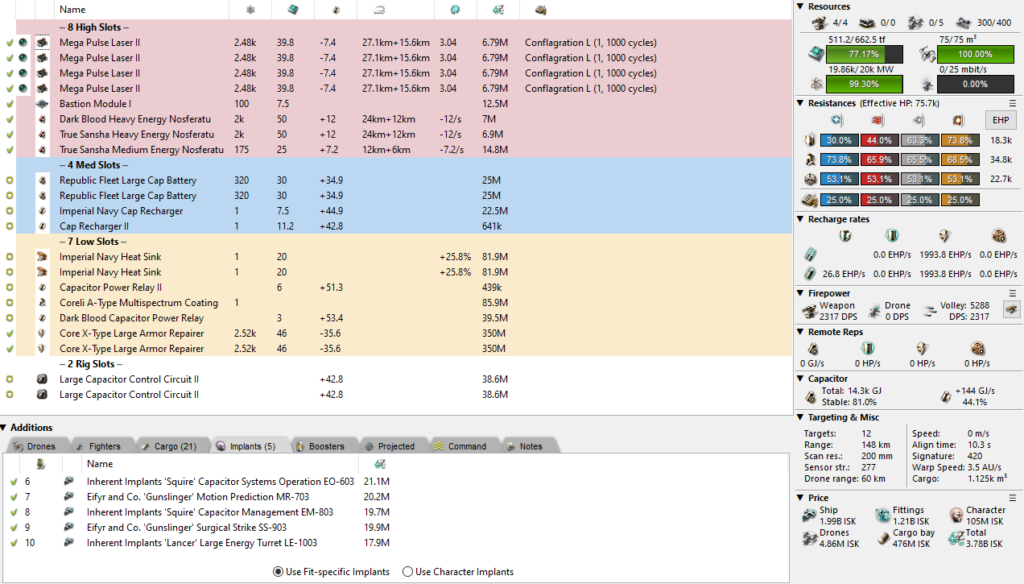
Golem
Moving back to the shield Marauders, we have the Golem! This beauty is the best Drifter killer in the entire lineup for two reasons: Rage Torpedoes and damage selection. Being able to perfectly apply to the Drifter is great and you can select your ammos accordingly: Thermal for shield and EM for armour. With all 5 skills this will take approximately 16 minutes which works out to about 1.15b ISK per hour of just Drifters.
You might be thinking that it’s impossible to just kill Drifters, but it really is. All you need to do is multibox/fleet up to complete sites with 2x Marauders using the following method. Golem + other Marauder (ideally turret based) enter a site and complete it together. Turret Marauder goes to the next site, Golem stays and kills Drifter. You then continue this pattern for as long as desired and the Golem doesn’t need to do much more than tank and press F1. Depending on the sites chosen and how good the site running Marauder is, you could achieve 2b ISK/hr from this method from a 5-7b ISK investment.
Talking about the Golem specifically anyway, it has a Pith-X and Gist-X setup just like the Vargur. The first one here is the cheaper and less efficient Pith X-Type boosted version. It uses 2x Ballistic Control and 1x EWAR module by way of a heavily bonused Target Painter. I will say, however, that this is just on the edge of being able to fit a second EWAR module or a Ballistic Control depending on how stable you want to be. I recommend running the first few sites in the baseline setup, but then maybe try swapping out ONE of the Cap Rechargers or ONE Cap Flux Coil.
If you want to upgrade this fit for use in harder sites than a Garrison then it’s the same process as before. Either use some mid-grade Crystal implants or replace the Painter/Cap recharger with a second Multispectrum Shield Hardener and it will do just fine. Swapping a Cap Flux Coil to a Damage Control would also be a viable change depending on how much more you need to tank and if neuts are an issue in the specific site. Everything you need for this will be in the cargo. Just remember to plug the fit into Pyfa with your own skills first to verify and make your own decisions before you get yourself killed. Implants/Boosters also not necessary and are only for safety/speed.
Pith-X Type Golem – Garrison
[Golem, Ashy's Pith-X - Site]

Capacitor Flux Coil II
Capacitor Flux Coil II
Caldari Navy Ballistic Control System
Caldari Navy Ballistic Control System

Republic Fleet Target Painter
Cap Recharger II
Imperial Navy Cap Recharger
Republic Fleet Large Cap Battery
Republic Fleet Large Cap Battery
Pithum C-Type Multispectrum Shield Hardener
Pith X-Type X-Large Shield Booster

Corpum A-Type Medium Energy Nosferatu
Imperial Navy Large EMP Smartbomb
Imperial Navy Large EMP Smartbomb
Bastion Module I
Torpedo Launcher II
Torpedo Launcher II
Torpedo Launcher II
Torpedo Launcher II

Large Capacitor Control Circuit II
Large Capacitor Control Circuit II


Acolyte II x5
Hobgoblin II x5
Hornet II x5


Zainou 'Snapshot' Torpedoes TD-603
Zainou 'Deadeye' Guided Missile Precision GP-803
Zainou 'Deadeye' Target Navigation Prediction TN-903
Zainou 'Deadeye' Rapid Launch RL-1003

Synth Mindflood Booster
Agency 'Hardshell' TB5 Dose II


Inferno Rage Torpedo x3400
Mjolnir Javelin Torpedo x3400
Mjolnir Rage Torpedo x3400
Missile Precision Script x2
Missile Range Script x2
Nanite Repair Paste x100
Caldari Navy Mjolnir Torpedo x3400
Mobile Depot x1
Mobile Tractor Unit x1
Mobile Medium Warp Disruptor II x1
Ballistic Control System II x2
Republic Fleet Large Cap Battery x1
Capacitor Flux Coil II x1
Damage Control II x1
Medium Energy Nosferatu II x1
True Sansha Heavy Energy Nosferatu x1
Large Micro Jump Drive x1
Missile Guidance Computer II x2
Missile Guidance Enhancer II x1
Shield Boost Amplifier II x1
EM Shield Hardener II x1
Multispectrum Shield Hardener II x1
Target Painter II x1
Pith-X Type Golem – Drifter Refit
[Golem, Ashy's Pith-X - Drifter]

Capacitor Flux Coil II
Capacitor Flux Coil II
Caldari Navy Ballistic Control System
Caldari Navy Ballistic Control System

Republic Fleet Large Cap Battery
Cap Recharger II
Imperial Navy Cap Recharger
Republic Fleet Large Cap Battery
Republic Fleet Large Cap Battery
Pithum C-Type Multispectrum Shield Hardener
Pith X-Type X-Large Shield Booster

Corpum A-Type Medium Energy Nosferatu
Medium Energy Nosferatu II
True Sansha Heavy Energy Nosferatu
Bastion Module I
Torpedo Launcher II
Torpedo Launcher II
Torpedo Launcher II
Torpedo Launcher II

Large Capacitor Control Circuit II
Large Capacitor Control Circuit II


Acolyte II x5
Hobgoblin II x5
Hornet II x5


Zainou 'Snapshot' Torpedoes TD-603
Zainou 'Deadeye' Guided Missile Precision GP-803
Zainou 'Deadeye' Target Navigation Prediction TN-903
Zainou 'Deadeye' Rapid Launch RL-1003

Synth Mindflood Booster
Agency 'Hardshell' TB5 Dose II


Inferno Rage Torpedo x3400
Mjolnir Javelin Torpedo x3400
Mjolnir Rage Torpedo x3400
Missile Precision Script x2
Missile Range Script x2
Nanite Repair Paste x100
Caldari Navy Mjolnir Torpedo x3400
Mobile Depot x1
Mobile Tractor Unit x1
Mobile Medium Warp Disruptor II x1
Ballistic Control System II x2
Capacitor Flux Coil II x1
Damage Control II x1
Large Micro Jump Drive x1
Missile Guidance Computer II x2
Missile Guidance Enhancer II x1
Shield Boost Amplifier II x1
EM Shield Hardener II x1
Multispectrum Shield Hardener II x1
Imperial Navy Large EMP Smartbomb x2
Republic Fleet Target Painter x1
Target Painter II x1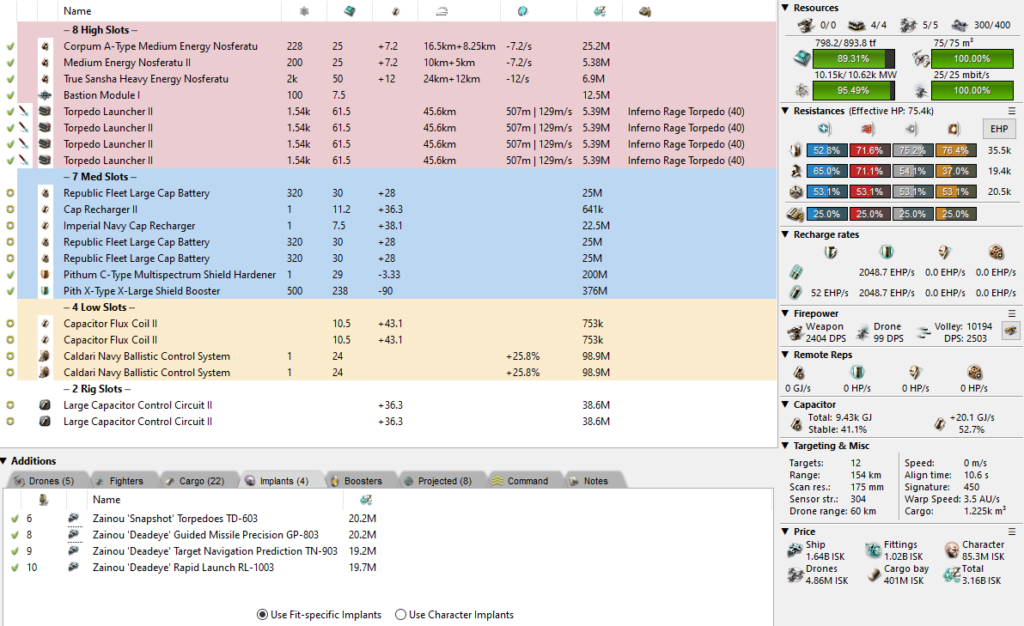
The Gist version of the Golem is very similar to the Pith one with some key differences: it gains a mid slot for a Missile Guidance Computer and an extra Ballistic Control. This, however, is really only applicable with Marauders 5. A Marauders 4 pilot running this Drifter refit may wish to either use a Hardshell II or drop a damage module for a Damage Control.
There is one other quirk to know about this setup. It uses just one Imperial Navy EMP Smartbomb instead of two like the rest of the fits. This is partially for fitting and partially for capacitor via the Nos. Fitting in this way allows for the Gist X-Type Golem to kill frigates through a combination of smartbombing and Caldari Navy Torpedoes. You can change it if you like, but my objective with all of the fits is to achieve cap stability with enough tank to complete the waves you need while achieving the best safe time possible.
Once again this is a standard upgrade path for harder sites. Replace one of your modules with a Shield Boost Amp, EM Hardener, or a Damage Control. Crystals, of course, are also really nice to have. I should also note that the site fit here specifically hits -1.19GJ/s under 72GJ/s of neuting, meaning that you will die if you don’t kill anything in 25 minutes while in wave 3 of a Garrison. Or, you know, you could just pulse the Shield Booster briefly instead of running it flat out.
Gist-X Type Golem – Garrison
[Golem, Ashy's Gist-X - Site]

Capacitor Flux Coil II
Caldari Navy Ballistic Control System
Caldari Navy Ballistic Control System
Caldari Navy Ballistic Control System

Republic Fleet Target Painter
Missile Guidance Computer II
Thukker Large Cap Battery
Republic Fleet Large Cap Battery
Pithum C-Type Multispectrum Shield Hardener
Pithum C-Type Multispectrum Shield Hardener
Gist X-Type X-Large Shield Booster

Dark Blood Heavy Energy Nosferatu
Corpum A-Type Medium Energy Nosferatu
Imperial Navy Large EMP Smartbomb
Bastion Module I
Torpedo Launcher II
Torpedo Launcher II
Torpedo Launcher II
Torpedo Launcher II

Large Capacitor Control Circuit II
Large Capacitor Control Circuit II


Acolyte II x5
Hobgoblin II x5
Hornet II x5


Zainou 'Snapshot' Torpedoes TD-603
Inherent Implants 'Squire' Capacitor Management EM-803
Zainou 'Deadeye' Target Navigation Prediction TN-903
Zainou 'Deadeye' Rapid Launch RL-1003

Synth Mindflood Booster
Agency 'Hardshell' TB5 Dose II


Inferno Rage Torpedo x3600
Mjolnir Javelin Torpedo x3600
Mjolnir Rage Torpedo x3600
Missile Precision Script x2
Missile Range Script x2
Nanite Repair Paste x100
Caldari Navy Mjolnir Torpedo x3600
Mobile Depot x1
Mobile Tractor Unit x1
Mobile Medium Warp Disruptor II x1
Ballistic Control System II x1
Republic Fleet Large Cap Battery x1
Capacitor Flux Coil II x1
Cap Recharger II x2
Damage Control II x1
True Sansha Medium Energy Nosferatu x1
Large Micro Jump Drive x1
Missile Guidance Computer II x1
Missile Guidance Enhancer II x1
Shield Boost Amplifier II x1
EM Shield Hardener II x1
Target Painter II x1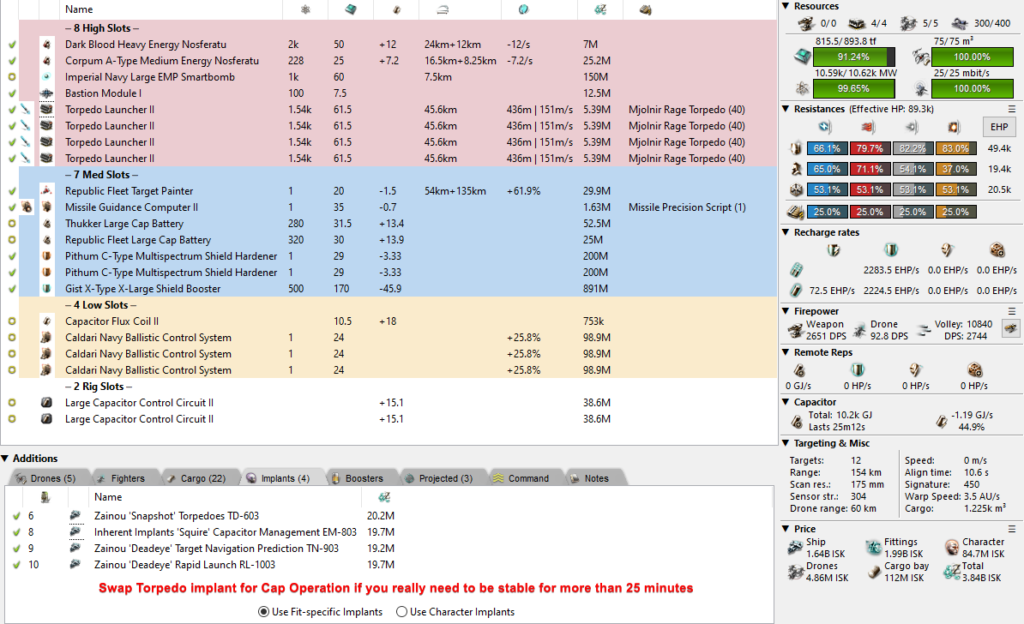
Gist-X Type Golem – Drifter Refit
[Golem, Ashy's Gist-X - Drifter]

Capacitor Flux Coil II
Caldari Navy Ballistic Control System
Caldari Navy Ballistic Control System
Caldari Navy Ballistic Control System

Cap Recharger II
Cap Recharger II
Thukker Large Cap Battery
Republic Fleet Large Cap Battery
Republic Fleet Large Cap Battery
Pithum C-Type Multispectrum Shield Hardener
Gist X-Type X-Large Shield Booster

Dark Blood Heavy Energy Nosferatu
Corpum A-Type Medium Energy Nosferatu
True Sansha Medium Energy Nosferatu
Bastion Module I
Torpedo Launcher II
Torpedo Launcher II
Torpedo Launcher II
Torpedo Launcher II

Large Capacitor Control Circuit II
Large Capacitor Control Circuit II


Acolyte II x5
Hobgoblin II x5
Hornet II x5


Zainou 'Snapshot' Torpedoes TD-603
Inherent Implants 'Squire' Capacitor Management EM-803
Zainou 'Deadeye' Target Navigation Prediction TN-903
Zainou 'Deadeye' Rapid Launch RL-1003

Synth Mindflood Booster
Agency 'Hardshell' TB5 Dose II


Inferno Rage Torpedo x3600
Mjolnir Javelin Torpedo x3600
Mjolnir Rage Torpedo x3600
Missile Precision Script x2
Missile Range Script x2
Nanite Repair Paste x100
Caldari Navy Mjolnir Torpedo x3600
Mobile Depot x1
Mobile Tractor Unit x1
Mobile Medium Warp Disruptor II x1
Ballistic Control System II x1
Capacitor Flux Coil II x1
Damage Control II x1
Large Micro Jump Drive x1
Missile Guidance Computer II x2
Missile Guidance Enhancer II x1
Shield Boost Amplifier II x1
EM Shield Hardener II x1
Pithum C-Type Multispectrum Shield Hardener x1
Imperial Navy Large EMP Smartbomb x1
Republic Fleet Target Painter x1
Target Painter II x1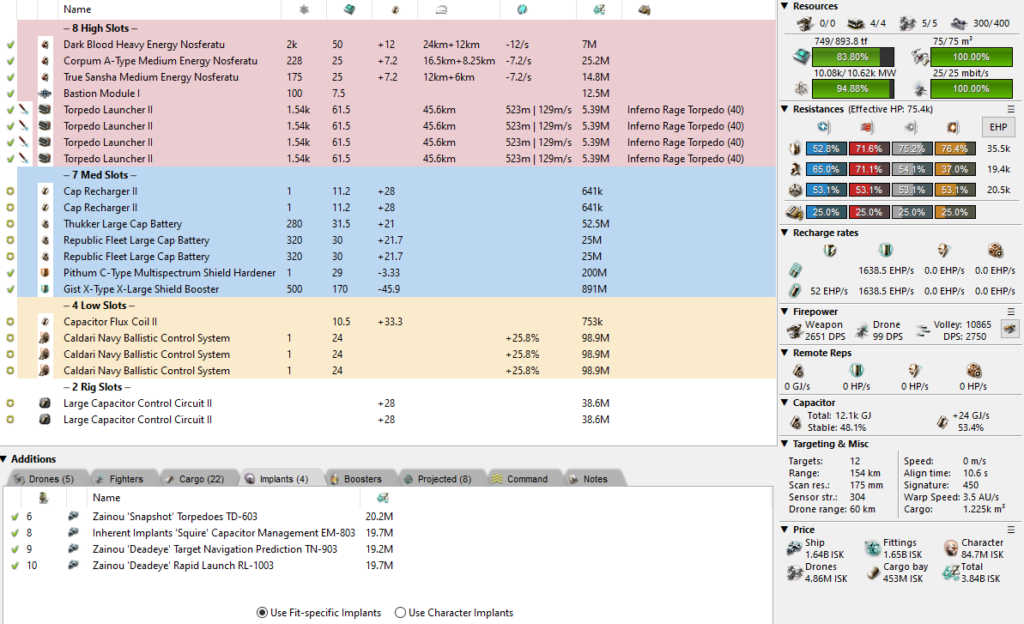
Kronos
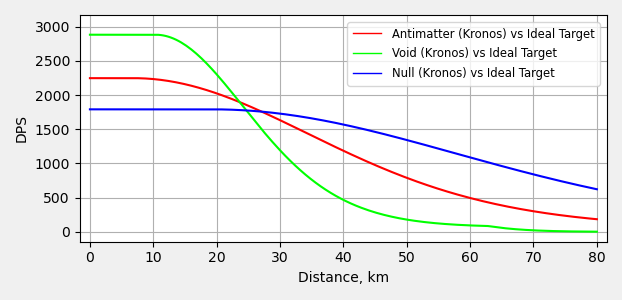
Finally we arrive at the black sheep of the Marauder family, the Kronos. It took me a while to come up with a viable fit for C5 sites purely because of the lack of range from Blasters. There was even a short period where I considered giving you guys a mixed Railgun+Blaster setup but that’s just not good. In the end, I decided on dual rep, dual Tracking Computer, and dual Mag Stab. It needs all three of these to be any good at all.
So why is that? Well for one, the range is horrible. At 20km which is a standard range for many Sleeper Battleships you do 1,250 DPS with Void. Two optimal range Tracking Computers will bump this up to 2,294 DPS which is much nicer. And before you ask, I did all the calculations on Void vs Null vs Antimatter. The sheer DPS increase of Void means that up to about 20km it remains the most effective if you can track well enough. Feel free to try Antimatter out, but I managed to use Void for almost an entire site without problems. Just make sure you load Null for anything past 25km.
So regardless of the range issues, it’s pretty standard and behaves similarly to every other fit here. Smartbomb the frigates carefully, make good use of your Tracking Computers and just keep pumping out Void. This even works perfectly with Marauders 4 and is nice and stable so that’s fun. The improvement to complete harder sites is pretty much just swapping Mag Stabs for resist modules or using implants. In this case, a set of mid-grade Asklepian’s is enough to do almost everything including a Stronghold if you use Hardshell II.
There is a ton of Synth Sooth Sayer in the cargo since it’s a good DPS increase and is less than 1m ISK per hour of use.
2023 Update!!
The site fit below now has slightly too low tank and requires the mindflood to work but both versions gain a magstab. Again, give it a go until I get a new article span up
Dual Rep Kronos – Garrison
[Kronos, 2023 NEW Ashy's Kronos - Site]

Federation Navy Magnetic Field Stabilizer
Federation Navy Magnetic Field Stabilizer
Federation Navy Magnetic Field Stabilizer
Dark Blood Capacitor Power Relay
Dark Blood Capacitor Power Relay
Core X-Type Large Armor Repairer
Core X-Type Large Armor Repairer

Republic Fleet Large Cap Battery
Republic Fleet Large Cap Battery
Imperial Navy Cap Recharger
Tracking Computer II
Tracking Computer II

Bastion Module I
Imperial Navy Large EMP Smartbomb
Imperial Navy Large EMP Smartbomb
Neutron Blaster Cannon II
Neutron Blaster Cannon II
Neutron Blaster Cannon II
Neutron Blaster Cannon II

Large Capacitor Control Circuit II
Large Auxiliary Nano Pump II


Hobgoblin II x5
Caldari Navy Vespa x5
Infiltrator II x5


Inherent Implants 'Noble' Repair Systems RS-603
Zainou 'Deadeye' Trajectory Analysis TA-703
Eifyr and Co. 'Gunslinger' Surgical Strike SS-903
Zainou 'Deadeye' Large Hybrid Turret LH-1003

Synth Mindflood Booster
Synth Sooth Sayer Booster
Agency 'Hardshell' TB5 Dose II


Null L x10000
Void L x14000
Federation Navy Antimatter Charge L x5000
Nanite Repair Paste x100
Optimal Range Script x3
Tracking Speed Script x3
Mobile Depot x1
Mobile Tractor Unit x1
Mobile Medium Warp Disruptor II x1
Synth Sooth Sayer Booster x10
Capacitor Power Relay II x2
Cap Recharger II x2
Damage Control II x1
Explosive Energized Membrane II x1
Multispectrum Energized Membrane II x1
True Sansha Heavy Energy Nosferatu x1
True Sansha Medium Energy Nosferatu x1
Magnetic Field Stabilizer II x2
Large Micro Jump Drive x1
Tracking Computer II x1
Tracking Enhancer II x1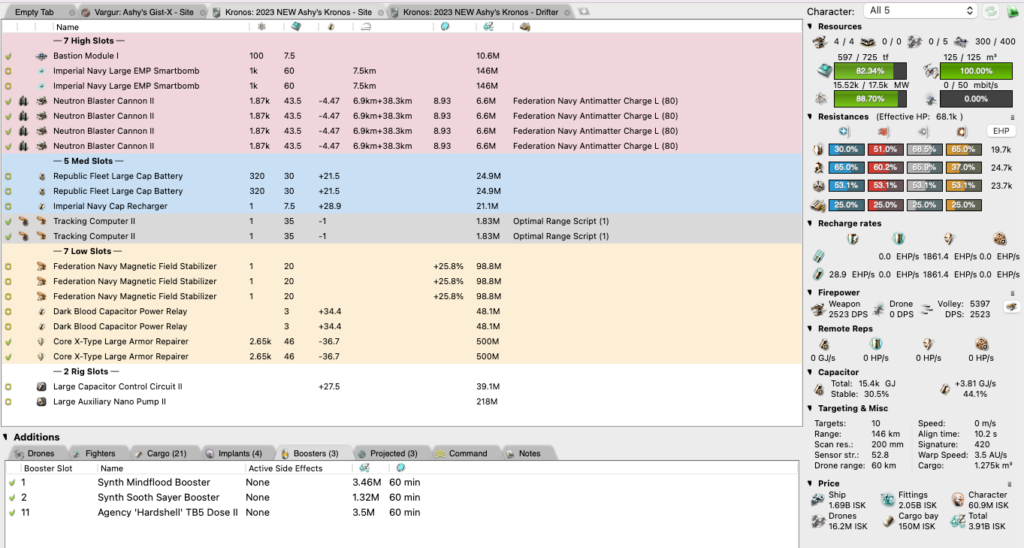
Dual Rep Kronos – Drifter
[Kronos, 2023 NEW Ashy's Kronos - Drifter]

Federation Navy Magnetic Field Stabilizer
Federation Navy Magnetic Field Stabilizer
Federation Navy Magnetic Field Stabilizer
Dark Blood Capacitor Power Relay
Dark Blood Capacitor Power Relay
Core X-Type Large Armor Repairer
Core X-Type Large Armor Repairer

Republic Fleet Large Cap Battery
Republic Fleet Large Cap Battery
Imperial Navy Cap Recharger
Imperial Navy Cap Recharger
Imperial Navy Cap Recharger

Bastion Module I
Imperial Navy Large EMP Smartbomb
Imperial Navy Large EMP Smartbomb
Neutron Blaster Cannon II
Neutron Blaster Cannon II
Neutron Blaster Cannon II
Neutron Blaster Cannon II

Large Capacitor Control Circuit II
Large Auxiliary Nano Pump II


Hobgoblin II x5
Caldari Navy Vespa x5
Infiltrator II x5


Inherent Implants 'Noble' Repair Systems RS-603
Zainou 'Deadeye' Trajectory Analysis TA-703
Eifyr and Co. 'Gunslinger' Surgical Strike SS-903
Zainou 'Deadeye' Large Hybrid Turret LH-1003

Synth Mindflood Booster
Synth Sooth Sayer Booster
Agency 'Hardshell' TB5 Dose II


Null L x10000
Void L x14000
Federation Navy Antimatter Charge L x5000
Nanite Repair Paste x100
Optimal Range Script x3
Tracking Speed Script x3
Mobile Depot x1
Mobile Tractor Unit x1
Mobile Medium Warp Disruptor II x1
Synth Sooth Sayer Booster x10
Capacitor Power Relay II x2
Damage Control II x1
Explosive Energized Membrane II x1
Multispectrum Energized Membrane II x1
Magnetic Field Stabilizer II x2
Large Micro Jump Drive x1
Imperial Navy Large EMP Smartbomb x2
Tracking Computer II x3
Tracking Enhancer II x1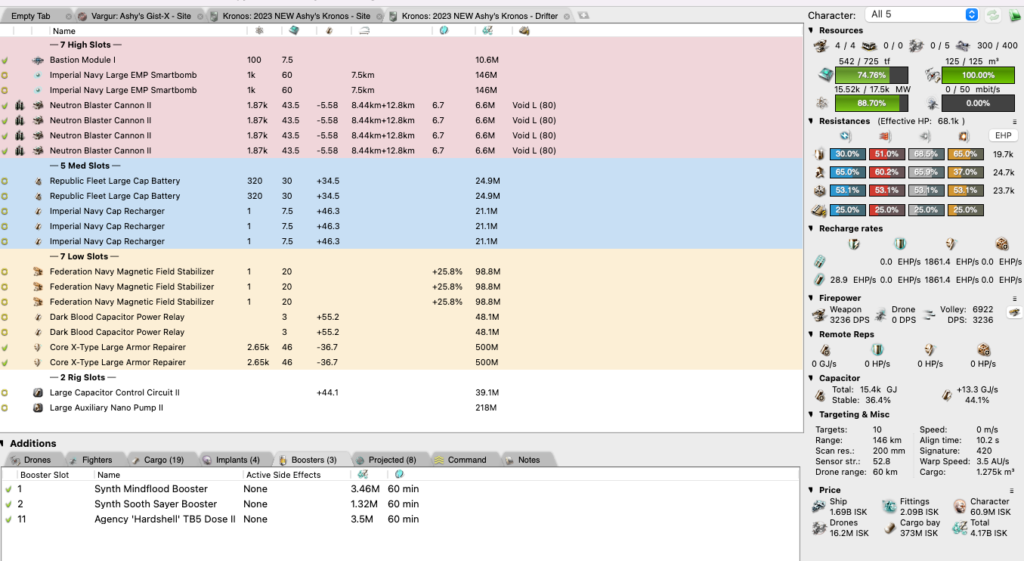
I’m afraid that’s about it for now. I hope you guys have fun and make a lot of ISK from these fits. I also sincerely hope that I catch and kill you because that’s fun too. If you find any problems in these fits then let me know in the comments below and I’ll get that fixed up asap. I already managed to put medium crystals in the Paladin while fitting at 3am so I’m sure that there is a problem somewhere.
If the fits don’t perform like you expect them to then, once again, use Pyfa and check out your skills. It might be a tracking issue, it might be poor support skills, or you might accidentally have left Marauders at 3 and now you’re overheating your way to an explosion. The key things to remember will be to learn from your mistakes, scan the chain properly, and recognise that once you undock you are already dead. Just try and break even on the ship first.
o/
Ashy
Very nice. Are strongholds doable you think, or should we stick to garrisons only for now?
If you like. Strongholds are doable, just read through my wording above each set of fits where I explain what you need to change on the fit to take on a Stronhold. Essentially, each of the fits here is designed to do a Garrison as base (including tanking the neuts) with upgrades to complete harder sites. You can also try out different upgrades to what I recommend if you have, for example, a site which does more DPS than a Garrison but with hardly any neuting.
Thanks for the great guide. I was just wondering if you could simply use drones instead of the rather expensive smart bombs to kill the frigates. Or is this not practical?
It’s entirely possible, just very slow and you’ll be often pulling you drones back in as they get shredded.
Looks good for the site. No need for a grappler or web to hold the DRB?
No need for any tackle other than either scrams or a bubble to stop it warping off 🙂
Doesn’t the DRB orbit at 40km?
No, 10-12km
Oh, sweet! Did they change that? Also, does the DRB still go real fast or does it slow down to the point where Rage can apply?
It goes fast-ish, but it’s capital size kinda so Rage is just fine to use.
Why is the vargur the only one that used a Jump Drive in the non drifter fit?
I did that just to make it easy for someone to choose one with an MJD. I don’t think they are useful, but I at least wanted to offer a configuration which has one by default and that Vargur is it. The rest of the fits have an MJD in their cargo as an option if they REALLY want one.
Oh and sorry that your comment needed approval. I have it set up this way because otherwise it’s easy to end up with quite literally thousands of bots advertising viagra. It’s kind of insane how many WP comment bots there are.
apart from being able to fly the fit, are there minimal skill requirements?
Yes, though it’s just the standard stuff you’d expect. Marauders 4 MINIMUM with good support skills, cap skills
Great article! Interested to maybe test these out, or at least ganking some more juicy Marauders!
For the normal sites, is the NOS doing anything? I’m running 3 smart bombs since I was of the impression the NOS doesn’t work on sleepers?
The nos DOES work on Sleepers. It works based on absolute cap so it’s a necessity against the Drifter and it can be helpful against the regular Sleepers.
If you need proof then I can get it if you like, but it does work 🙂
Nice, I did not know that 🙂 Been running the Drifter on my Paladin without NOS uptil now, but this opens up more flexibility.
One nitpick/curiousity I have regarding the Golem: the DRB has a sig of 25,000m, isn’t a paint kind of unnecessary?
Correct, that is totally unnecessary. I think you’ve not read the article properly though? The Drifter refits don’t have paints on them
Hey! Really appreciate the post. I’ve been using the Vargur fit, and it’s been doing well for me. However, I’m not seeing the 17-18 minute drifter kills– mine are more like 22 minutes w/3% pyro– and I’m wondering what I’m missing compared to your tests. My Garrison clears are about 17 minutes, so that matches.
I’m shooting RF Phased Plasma into the shield, and RF EMP into the armor, and I have Marauders 4 + Large Autocannon Spec 4. For gunnery supports, I have 4s in Controlled Bursts, Sharpshooter, Trajectory Analysis, and Surgical Strike (5s in others). Of those, the only one I’d think would be relevant to the Drifter fight is Surgical Strike, and when I tried substituting that with the 3% Pyrolancea I didn’t do any better than 22 minutes (no system effect).
Is one of those skills more relevant than I think it is?
Heyhey, those numbers are from my testing with all 5 in turret skills. I likely also did those tests with some 3% damage implants in which can add a lot. Make sure you also use your drones on the drifter (though he occasionally shoots them). This will add another 100 DPS
Through these 2% skill amounts, DPS lost to falloff and tracking (maybe 1-2%), some implants, and no drones you could be dropping something like 2-300 DPS maybe. It works out that by dropping 300 DPS from absolute max (to about 1,900) then you will shift the drifter kill time up by 3 minutes.
You are chewing through 2,350,000 EHP total. The maths here is easy. Do ( 2350000 / [your DPS] ) / 60 = [time in minutes to kill]. My numbers provided in the article are not theoretical, though. I tested and timed each one for about 10 hours of testing total with all 5 skills (and several times where I used characters with Marauders 4) as well as a mixture of 3%, 5% implants and other tests.
Best of luck optimising your setup, every bit of DPS counts when it’s a long bash!
Worth noting that I feel something is missing here, I just welp’d a perfectly skilled Paladin to a Drifter. Eventually, you will cap the Drifter out with your nos. I would have killed him in exactly 14m32s (high grade asklepian/hw 5s), and I died about two thirds in. First half of the encounter went swimmingly, no cap issues, was very easily able to tank it and cap was easily stable at 33%, towards the end I started to notice I was getting less and less cap back from him. Later in the fight you’ll get no cap back from him at all.
Possible ninja nerf by CCP? Only evidence I’ve seen of them being killed by Marauders was back in March and the fits used batteries/CPRs instead. Probably best to just do it with batteries.
Were you using Ashy’s fit exactly? I just fed my Vargur after 5 or 6 successful drifter kills on TQ (+several on Sisi), but I had screwed up on the refit– I swapped out my cap flux coil for an extra gyro, instead of swapping out the DCII. Same as you, I capped out the Drifter with my noses and then promptly fed.
However, with the cap flux coil in place, I’m able to successfully kill the Drifter even with some skill 4s (see previous comment– they’re all in gunnery, my tank/cap skills are 5s). A good system effect helps– it’s downright easy in a pulsar– but even in no-effect systems I can successfully kill with drugs (either synth mindflood or hardshell) and careful tank + heat management (I deactivate my shield booster and then do one or two heated cycles to catch up).
The noses are basically helping me keep my cap high enough until I can kill the drifter, so if your TTK is also substantially longer, you might find more issues there.
Running the Site with the Asklepian high’s i have a good rep cycle but i find it a little easier with a Amulet Highs to get a little bit more buffer and still rep well with out asklepian. The changes is about 30k EHP. with asklepian i was about 85k EHP with 540 hp/s and with the Amulet i was getting 112k EHP with 400 HP/s.
Ashy with the paladin, Would you use a full set pod with the slot 6 omega, pr would you just fit 1-5 and have the ‘Inherent Implants ‘Squire’ Capacitor Systems Operation EO-603′ in its place ?
That should work. Fitting the Omega is fine too and will help because ultimately you can compensate for worse cap by just delaying one of your reps a tiny bit every now and then. If you have more rep power in general then it isn’t an issue. I suggest plugging it into Pyfa with your OWN skills and dropping 8x T2 heavy neuts on to simulate the drifter or 2x T2 and 1x Scoped to simulate the site. This will give you a crystal clear picture of how much you can tank and how much it stresses your cap. Even if you are being capped out, check the lower number in Pyfa: this is your “max sustainable tank” under that amount of neuting. It is likely to only be a few EHP/s lower.
Hello Ashy, big fan of the guide. In our corp discord there’s currently a discussion about which marauder is best for wormhole pve. I’m a big Golem believer, but a lot of my corp mates prefer the vaugur because “vaugur is best ship, golem is only good vs drifter”. I’ve linked them your guide, but they say it’s out of date. Do you have a crushing argument I could use as a devoted member of the golem-church?
Yeah absolutely. Go tell your corp members that they’re dumb for believing that this guide is out of date. There have been zero updates to marauders, balance in general, or wormhole sites since I wrote it. It continues to be used today and I maintain that these are some of the best marauder fits you can use for C5s.
Honestly it really annoys me that I have articles which I strive to keep up to date and I have so many people who immediately dismiss them saying “lol out of date”. The only one that really fits that is my mining article which I need to update soon.
As for talking about the Golem itself… Well it’s pretty awesome. I like the Vargur in general because it’s cool but a Golem has the bonus of being great in a Black Hole. The Golem can also use torps/paints on frigates to speed up the waves where you are smartbombing stuff.
If you wanna chat or if your friends have any complaints then send them to my Discord. Link is in the sidebar on my site here 🙂
Wondering why you’re not using railguns on your Kronos?
Wintiki – 255 million skill points and counting
That’s because the railguns do much less damage with horrific tracking. Using them means you can’t really hit the cruisers at all and do super low DPS regardless.
Feels pretty interesting how wormholes running and incursion running went opposite directions with regards to marauders. As stated here, Golems are great at running sites and are the best drifter killer, while Kronoses have range problems and shoot into Drifter resists. Whereas in incursion running, Kronoses obsoleted Leshaks with all that DPS in tower bashes while Golems’ missile delay means they’re useless in contests and generally bad if their missiles hit dead Sansha.
So considering I’ve got characters that can fly non-Golem marauders at the ready, is it still worth it to train a golem anyway, or will, say, dual Vargurs or dual Paladins (maybe even triple) chew through everything too quickly to matter anyway?
The other turret marauders will be perfectly fine. Whether it is worth it is subjective really. Do you have a lot of SP and nothing else to train? Do it. Do you have better things to be training for more DPS or for a fun ship you want to fly some day? Do that instead.
Also golem\vargur can farm using 2-3x XL ASB. So cheap and same effective. But need drop 200-300 cap batteries (400).
I have video https://www.youtube.com/watch?v=p8IPG19hLwY
Did the increase in resists make any impact on the fits? As in did it give some room to drop a resist module or something like that? I’ve heard of 4 heatsink Paladin fits for C5s and wonder how that could be made.
I have been thinking about making a new version that is super accessible with cheaper marauders. i.e. not Gist X-type
This might be the better route to go down instead of making them expensive and all-round better for a lot more ISK.
To answer your question directly, though, it’s a maybe. I would imagine that you would need to upgrade the marauder and make it more expensive to drop an entire module even with the 10% buff. My suggestion is to continue to use the fits here with the knowledge that you have further safety in case you mess it up or have lower skills 🙂
As someone trying to get into WHs and using marauders as they’re what I was training into, what sort of preparation can I do against getting dropped on while running these sites? If I get scanned down while a marauder is in bastion mode, presumably I am just dead? (perhaps I can fight back if I use 3/4 chars in each site?) Perhaps this falls more under general topic that is answered elsewhere, so apologies if so. Does the ISK/hr make up for the occasional gank?
How do you prevent the drifter from just warping off with no points in the mid slots?
For starters, you read the article that discusses this point around using a bubble to do it.
Realistically, though, the meta for holding the drifter has changed a bit since this point. People will now sometimes just warp in a sabre, use a frigate to scram him, or will chase him off to a wormhole then kill him there. I expect that marauders will be nerfed a bit at some point so I don’t plan on updating this article, at least not until then. Oh and you CAN make fits that will both scram and kill the drifter alone, but they require a lot more bling or will do it slowly due to lack of slots to be used on damage.
Now that Viridian is released, do you plan on updating the fits for their new slot layouts?
Thoughts on updates to marauders this expansion and how if effects ability to solo sites?
Kronos new mid seems interesting.
Currently moving my corp to a C5 so I’m not in a massive rush to make the updates yet. In the meantime you could just get away with fitting an extra cap recharger or cap flux coil for the Kronos and Vargur respectively.
I was reading this again today and noticed that you still say that you can run Abyssals in WH space…Which is no longer possible.
Thanks for the rest of the info!