Round four, here we go. Today’s instalment is a guide on how to make ISK from the abyss whether you’re in frigates or cruisers. The focus will be almost entirely on tier four and fives since that’s where the real money is. If that isn’t what you’re here for then go ahead and click on the appropriate title in the table below for the article on that method.
The fits described in this article were created before the resistance nerf in April 2020. Post-patch revised fits will be marked with a ++ at the start of each fitting name although screenshots will not always be updated.
| Method | Characters Needed | Initial Investment | ISK/hour*** |
| Gas Huffing | 1+ | 10m ISK | ~75m ISK |
| Mining | 1+ | 10m ISK+ | Depends on setup/rocks |
| Planetary Interaction | 1+ | 10m ISK+ | ~1b / month / account |
| Data/Relic Sites (C1-3) | 1 | 10m ISK | Variable, <150m ISK |
| C2 Sites (T3D/Cruiser/BC) | 1+ | 50-60m ISK | ~75m ISK |
| C5 Wolf Rayet Fleet | 3+ | 350m ISK | ~450m ISK |
| C13 Wolf Rayet Sites | 1+ | 150m ISK | ~150m ISK |
| C3 Sites (Gila/Rattle) | 1+ | 500m ISK | ~250m ISK |
| »Abyssal Frigates* | 3 | ~300m ISK | ~4-600m ISK |
| »Abyssal Cruisers* | 1 | 1-300m ISK+ | ~1-300m ISK |
| C5 Sites (Nestor/Vargur)** | 2/3+ | 1.6b ISK | ~450m ISK |
| C5 Sites + Drifter | 2/3+ | 3b ISK | ~1b ISK |
| C5/6 Dread Sites | 2/3+ | 8-16b ISK | ~2-3b ISK |
| Bonus Article: Triglavian Ships | 1+ | 0.2-2.5b ISK | Variable |
*Abyssal sites included as they’re easily done inside your wormhole
**C4 sites can be ran using these methods for less ISK
***These are rough numbers. You can often earn more with better skills, more investment, luck etc.
If the words ‘static’ and ‘probe launcher’ seem foreign then you best start with EVE Uni first. As before, this is also not a replacement for Rykkis Guide (or Karr’s updated version). Instead, it is more of a complementary piece that explains how to actually use the numbers found in that sheet. If you’re in a rush then skim through for the key bold text and reference tables.
I also know I’m going to have at least a few people saying “hol’ up Ashy, these aren’t wormhole sites…” Yes, it’s true that they aren’t exclusive to wormhole space, but when you’ve closed off the chain or don’t want to leave home they’re perfect. One site will only take about 18/19 minutes at most which is a nice chunk of time. Any longer and I can already tell you that things aren’t going well for you, buddy.
Abyssal Cruisers
If it seems to you like this is a bit more of a generic guide to the abyss, then you’d be right. I’m not pretending to know the ins and outs of every PvE method out there. I wouldn’t be running a wormhole PvP corp if that were the case. What I can tell you is what I know works and how to do it. This is doubly true for abyssal space where the next wave of six damn Leshaks could split you like a banana. Until that point, things should be good though!
The Gila (Because why would you fly anything else?)
What were you expecting? A magical guide about how <your favourite ship> does sites? Unfortunately, that isn’t the case. The Gila still hits harder than almost anything else in-class despite nerfs thanks to resist bonuses and crazy good damage. To make things worse, the fit that INN describes as an entry level fitting for Tier 1-2 sites goes on to be able to run T4 sites relatively easily according to NER. This isn’t a dig at either organisation, it’s making a point that THIS is how you do it. Here’s my version.
Note that since the resist change this has dropped about 30 EHP/s. This makes the fit susceptible to the Leshak room. I’m also providing a second fit below which is more expensive, but a bit safer.
Original Gila
[Gila, T4 Runner]

Caldari Navy Power Diagnostic System
Drone Damage Amplifier II
Drone Damage Amplifier II

10MN Afterburner II
Adaptive Invulnerability Shield Hardener II
Adaptive Invulnerability Shield Hardener II
Large Shield Extender II
Large Shield Extender II
Large Shield Extender II

Rapid Light Missile Launcher II
Rapid Light Missile Launcher II
Rapid Light Missile Launcher II
Rapid Light Missile Launcher II
Medium Energy Nosferatu II

Medium Core Defense Field Purger II
Medium Core Defense Field Purger II
Medium Core Defense Field Purger II


Hammerhead II x2
Hammerhead II x2
Infiltrator II x2
Valkyrie II x2
Vespa II x2


Eifyr and Co. 'Rogue' Acceleration Control AC-601
Zainou 'Gnome' Shield Management SM-701
Zainou 'Deadeye' Guided Missile Precision GP-801
Zainou 'Gnome' Shield Operation SP-901
Zainou 'Deadeye' Rapid Launch RL-1001


Inferno Fury Light Missile x4000
Inferno Precision Light Missile x1000
Scourge Fury Light Missile x4000
Scourge Precision Light Missile x1000
Caldari Navy Inferno Light Missile x1000
Caldari Navy Scourge Light Missile x1000
Safer Gila
[Gila, ++T4 Runner Safer]

Caldari Navy Power Diagnostic System
Drone Damage Amplifier II
Drone Damage Amplifier II

10MN Afterburner II
Adaptive Invulnerability Shield Hardener II
Adaptive Invulnerability Shield Hardener II
Republic Fleet Large Shield Extender
Republic Fleet Large Shield Extender
Republic Fleet Large Shield Extender

Rapid Light Missile Launcher II
Rapid Light Missile Launcher II
Rapid Light Missile Launcher II
Rapid Light Missile Launcher II
Medium Energy Nosferatu II

Medium Core Defense Field Purger II
Medium Core Defense Field Purger II
Medium Core Defense Field Purger II


Hammerhead II x4
Infiltrator II x2
Valkyrie II x2
Vespa II x2


Eifyr and Co. 'Rogue' Acceleration Control AC-601
Zainou 'Gnome' Shield Management SM-703
Zainou 'Deadeye' Guided Missile Precision GP-801
Zainou 'Gnome' Shield Operation SP-903
Zainou 'Deadeye' Rapid Launch RL-1001


Inferno Fury Light Missile x4000
Inferno Precision Light Missile x1000
Scourge Fury Light Missile x4000
Scourge Precision Light Missile x1000
Caldari Navy Inferno Light Missile x1000
Caldari Navy Scourge Light Missile x1000
Variations on this that I’ve seen include:
- Replacing one invul with a passive hardener for site weather
- A Damage Control instead of Power Diagnostic for more capless buffer
- Shield Power Relays for the best shield regen possible
- More shield extenders, fewer shield extenders, a web for dark sites….
The list just keeps going on, but when it comes down to it the standard passive Gila is cheap and effective. My setup uses a Caldari Navy PDU to get the regen, and also to allow space for a 10MN Afterburner II and Medium Nosferatu II. Doing this gives us better cap stability than most other setups providing that you stick your nos on nearby ships. That’s vital since the invuls and sig tanking with speed are what let you survive. I’ve included a full set of 1% implants which cost 4m ISK, upgrade them to 3% if you enjoy the fit or if skills are an issue.
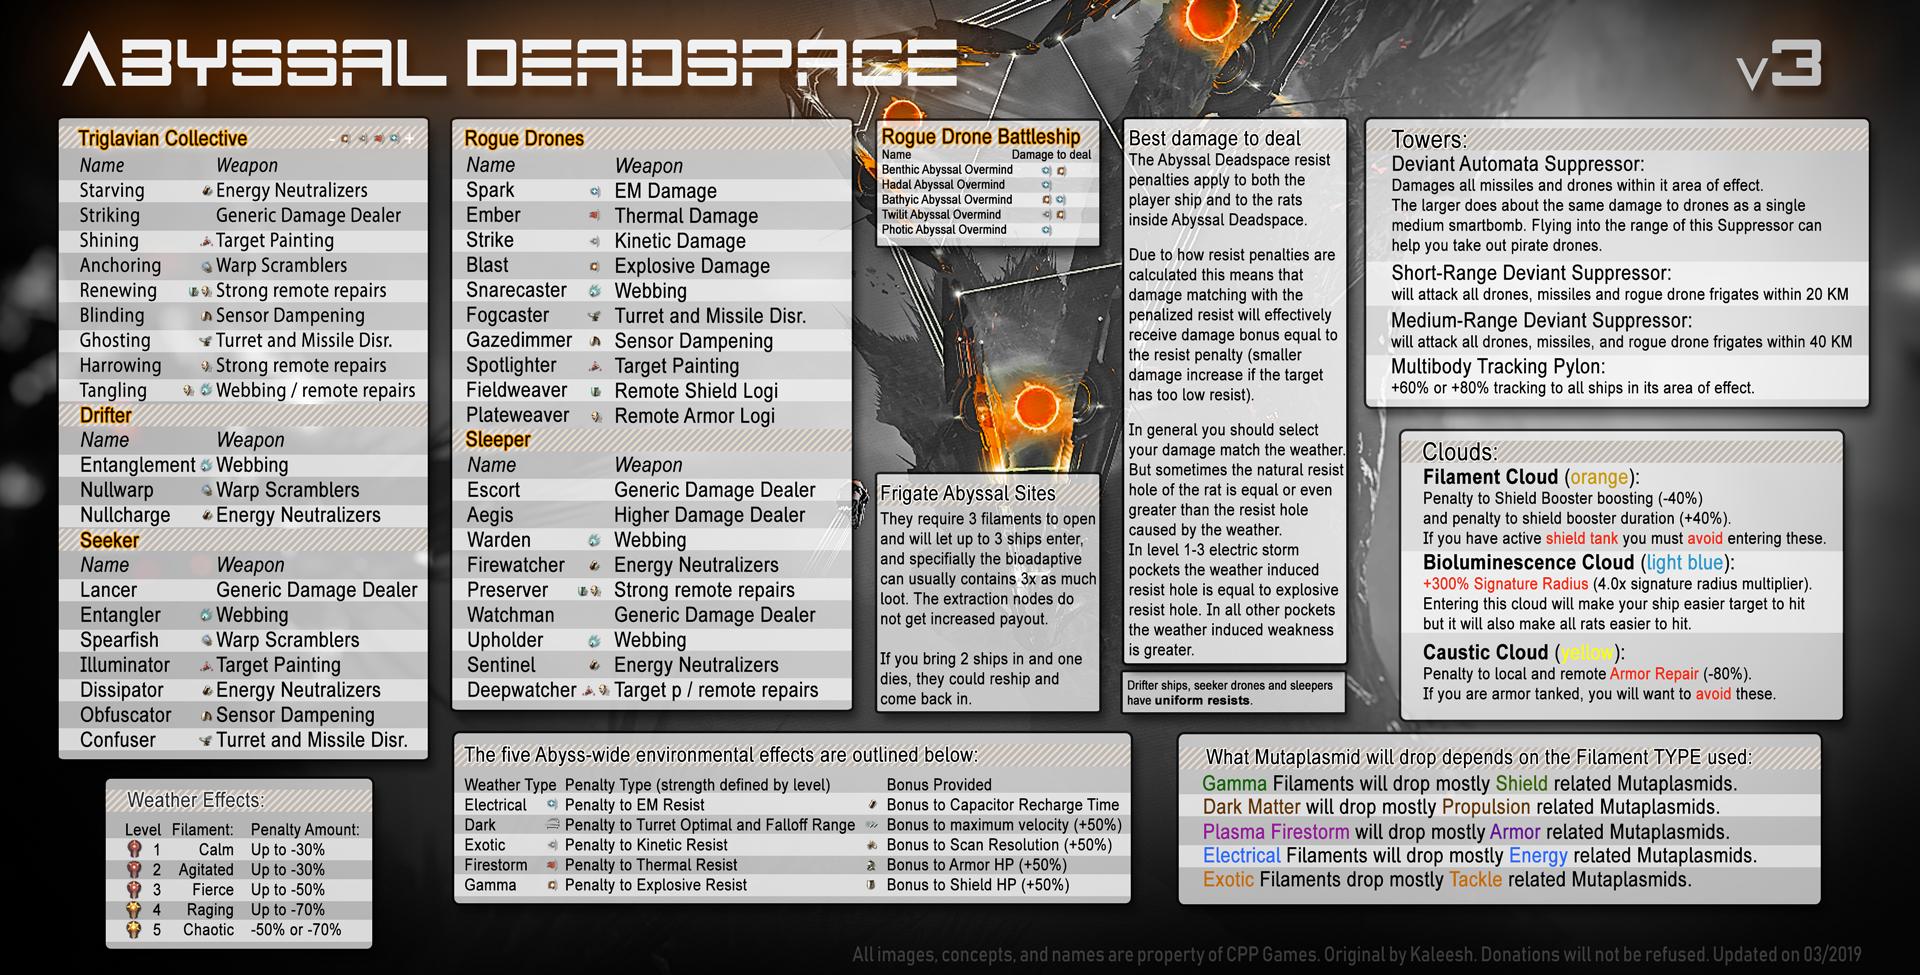
The fit itself should be able to run the following filaments (and below):
- T4 – Gamma (+Shield capacity, easiest)
- T3-4 – Exotic
- T3-4 – Electrical
- T3 – Firestorm
- T3 – Dark (remove an extender for a web, run the 3% implants)
The key to any of these sites, though, is going to be proper piloting and target prioritisation. Don’t expect to go AFK and let the drones do all the work like in nullsec you dirty krabs. The trick to not dying is to focus the targets that will hurt you most and to keep transversal up against the big boy battleships, ideally without just clicking orbit. That order depends on what you’re flying, but for this Gila it simply goes Heavy Neuts > Logi > Partial HP Ships > Webs > All Others in a typical situation. The use of a nos and PDS also means that you can be a little more forgiving of neuts and instead blitz through Plateweavers (remote reps) before moving on. Either that or just split your DPS between missiles and drones. Keep the cheatsheet open and burn backwards away from the rats if you need more time to think and analyse the grid.
If you do mess up and die then don’t worry about it. With a 300m ISK fit you’re all but guaranteed to run into problems at some point like the Leshak wave. There isn’t much point splashing the cash unless you know that value is going somewhere useful. Overtanking is definitely a thing and will cut down on your long term profits. So too will dying, but running cheap like this means that the losses won’t sting quite so much.
A magical guide on how to make your favourite ship work
The easiest way to make any ship complete any level of PvE effectively is to compare it to something you already know works. For cruiser abyssals this essentially means comparing your new ship to every aspect of the Gila and asking yourself “is this as good?” Let’s go through a similarly priced Sacrilege and see how it stands up for each stat. Heated/drugged numbers in brackets.
| Ship Stats | Gila | Sacrilege |
| DPS Tanked | 343 (404) | 407 (657) |
| AB Speed | 671 (884) | 628 (817) |
| DPS | 765 (804) | 668 (758) |
| Application | RLML+Med Drones | Dual web |
| Cap Stability (Resist) | +11.5GJ/s (-0%) | +17GJ/s (-27%) |
| Price | 351m ISK | 367m ISK |
Without going into a lecture on how to fit ships, this is honestly all it takes to make something work. There are definitely nuances such as the Gila’s ability to apply damage from further away and the Sac’s extra neut resistance, but those can mostly be ironed out if you know what you’re doing. Pick a ship then give it tank, DPS, application, a good capacitor and compare to others. The same is true if you’re developing a kiting abyssal ship. Find one that works and compare other ship fits until something matches closely enough. Just make sure you know what you’re fitting. An XLASB for example looks great on paper if you don’t know about the minute reload!
If you want the Sac fit here it is. Reactive Armour Hardener vs Assault Damage Control is your choice, but I’m personally a fan of the “oh shit” button. This particular fit should run Dark sites easily enough providing that you get your webs on.
[Sacrilege, T3-4 Abyss]

Ballistic Control System II
Assault Damage Control II
Medium Armor Repairer II
Medium Armor Repairer II
Energized Adaptive Nano Membrane II

Republic Fleet Large Cap Battery
10MN Afterburner II
Stasis Webifier II
Stasis Webifier II

Heavy Assault Missile Launcher II
Heavy Assault Missile Launcher II
Heavy Assault Missile Launcher II
Heavy Assault Missile Launcher II
Heavy Assault Missile Launcher II
Medium Knave Scoped Energy Nosferatu

Medium Bay Loading Accelerator II
Medium Auxiliary Nano Pump I


Federation Navy Hammerhead x5
Hammerhead II x5


Inherent Implants 'Noble' Repair Systems RS-601
Zainou 'Snapshot' Heavy Assault Missiles AM-701
Zainou 'Deadeye' Guided Missile Precision GP-801
Zainou 'Deadeye' Target Navigation Prediction TN-901
Zainou 'Deadeye' Rapid Launch RL-1001

Standard Exile Booster
Agency 'Hardshell' TB5 Dose II


Nova Javelin Heavy Assault Missile x3000
Nova Rage Heavy Assault Missile x3000
Caldari Navy Inferno Heavy Assault Missile x2000
Caldari Navy Mjolnir Heavy Assault Missile x2000
Caldari Navy Nova Heavy Assault Missile x2000
Caldari Navy Scourge Heavy Assault Missile x2000
Nanite Repair Paste x100
Running T5s
I have to confess I’ve run very few of these to date. The step up from T4 to T5 Filaments is pretty hefty and I hate risking my blingiest ship when my computer crashes so easily. Suitonia has a pretty great guide on his own Sacrilege fit, here’s the video:
Following the same rules that I described above, it shouldn’t be too hard to figure out a decent fit. Just make sure that the focus is on throwing out as much DPS as you can; some of the EHP grinds in chaotic filaments can be lengthy. Check out some of the guides in the resources section. I personally got my fit from an ex-corp member who ran them all the time so I can be quite confident that this one does the job, too. This is a bit suspect since the resist nerf so be careful.
[Gila, Ashy's Level 5 Runner]

C3-X 'Hivaa Saitsuo' Ballistic Control System
Imperial Navy Drone Damage Amplifier
Imperial Navy Drone Damage Amplifier

Corelum B-Type 10MN Afterburner
Thukker Large Cap Battery [1]
Pithum A-Type Medium Shield Booster
Pithum C-Type Adaptive Invulnerability Field
Pithum C-Type Adaptive Invulnerability Field
Pith X-Type Shield Boost Amplifier

Dark Blood Medium Energy Nosferatu
Rapid Light Missile Launcher II, Scourge Fury Light Missile
Rapid Light Missile Launcher II, Scourge Fury Light Missile
Rapid Light Missile Launcher II, Scourge Fury Light Missile
Rapid Light Missile Launcher II, Scourge Fury Light Missile

Medium Core Defense Operational Solidifier I
Medium Capacitor Control Circuit II
Medium Semiconductor Memory Cell I


'Augmented' Hammerhead x2
'Augmented' Valkyrie x2
Caldari Navy Vespa x2
Federation Navy Hammerhead x2
Republic Fleet Valkyrie x2


High-grade Crystal Alpha
High-grade Crystal Beta
High-grade Crystal Gamma
High-grade Crystal Delta
High-grade Crystal Epsilon
High-grade Crystal Omega
Eifyr and Co. 'Rogue' Evasive Maneuvering EM-703
Inherent Implants 'Squire' Capacitor Management EM-803
Zainou 'Snapshot' Light Missiles LM-903
Zainou 'Deadeye' Rapid Launch RL-1003

Agency 'Hardshell' TB5 Dose II


Caldari Navy Scourge Light Missile x2000


[1] Thukker Large Cap Battery
  Gravid Large Cap Battery Mutaplasmid
  capacitorBonus 1868, cpu 37.55, energyWarfareResistanceBonus -31.8, power 313.73
Tips and Advice
- The key to running sites is good flying and target prioritisation
- Be aware of Triglavian NPC damage ramp. You might tank fine now, but that can change
- Partial HP battleships need to die quickly, they will rep up over time.
- Killing a Vila ship will disconnect it’s drones, you don’t need to kill them individually.
- Fly into a Deviant Automata Suppressor or blue cloud if you’re having trouble with small frigates
- The Deviant Automata Suppressor can firewall your light missiles.
- Faction drones with extra HP can be worth it, T2’s are cheaper and work fine if you are careful, though.
- Firestorm filaments usually mean much tougher Triglavian tanks, this helps them ramp up better against you!
- Grabbing the extra loot cans other than the Biocombinative Cache often isn’t worth it with an afterburner fit. They yield only a few million ISK.
- Generally, you should fly as if it’s PvP, use range and transversal to your advantage whenever possible.
Resources
Kaleesh’s Abyssal Cheatsheet
All Abyssal NPC Stats
/u/turb0n3rd’s T5 Guide
/u/SuigintouKurotenshi’s T5 Runner
EVE Uni Abyss Page
Fonsui’s Fits and the Google Sheet
Fonsui’s NPC Stats Google Sheet
Torvald Uruz’s T5 Guide
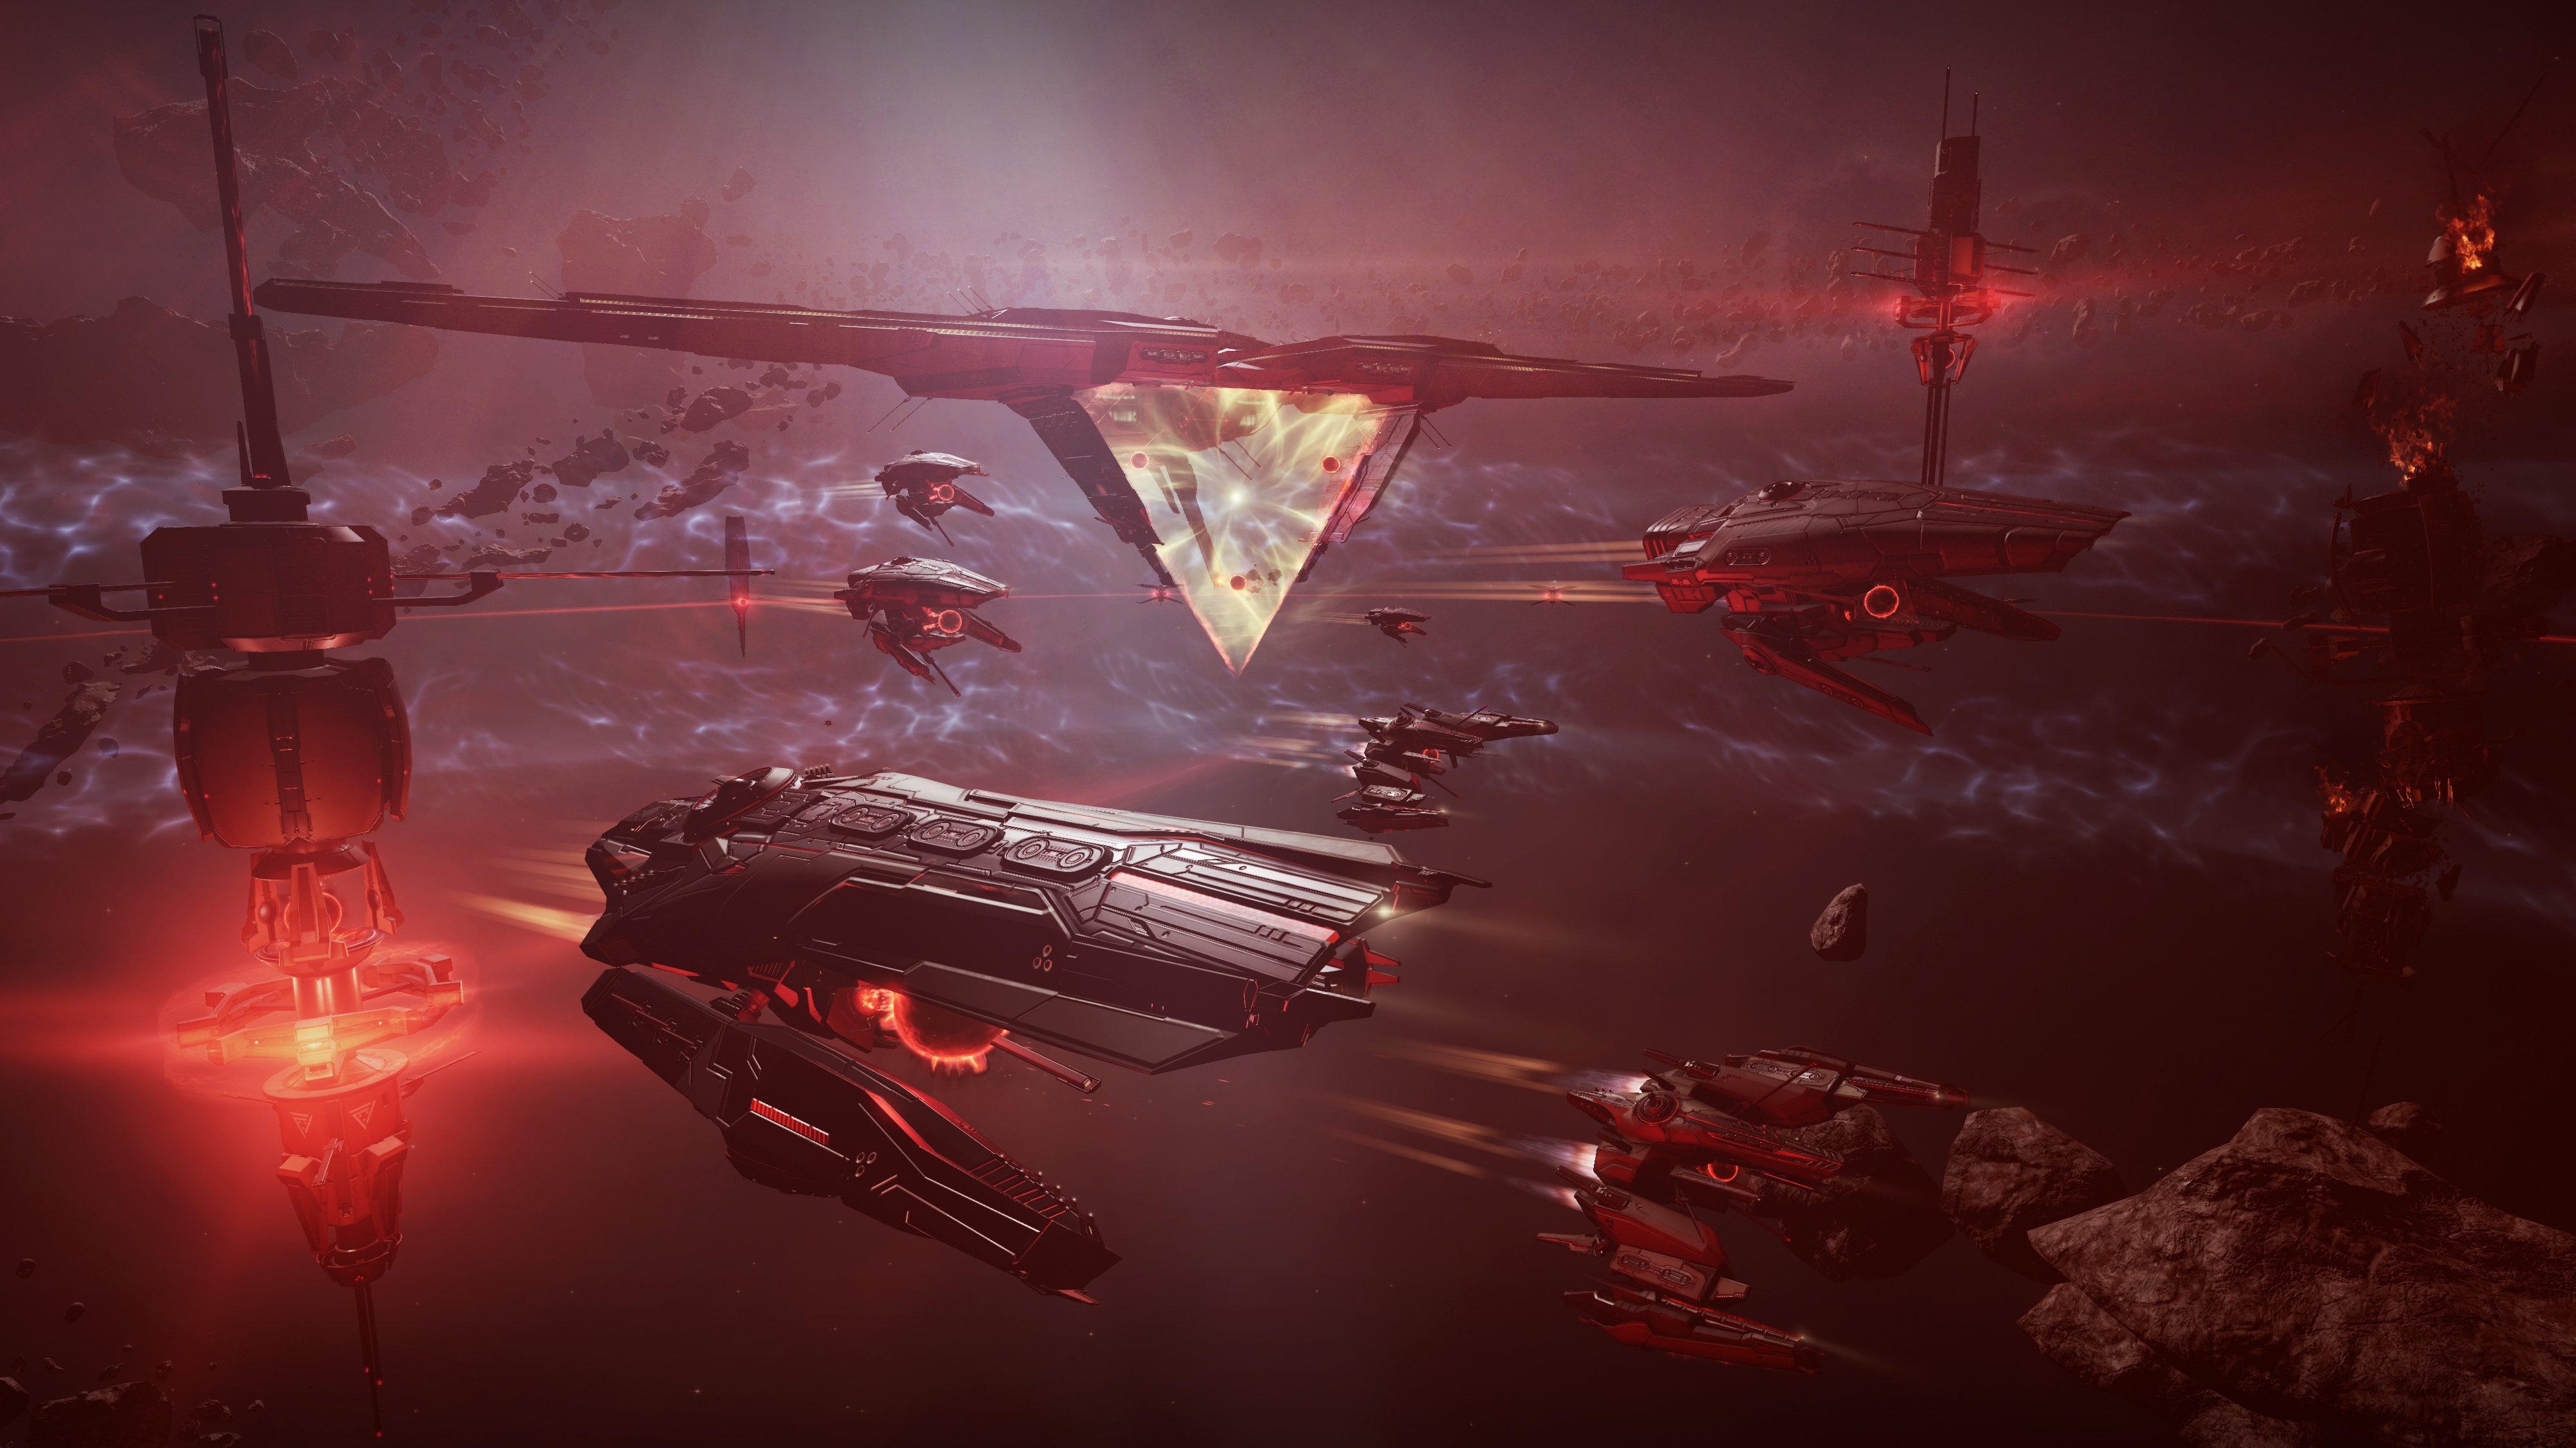
Abyssal Frigates
Ever since their introduction, I find that the frigate sites are my preferred option for running abyssals. You usually means you do have to hunt down two victims friends to help out, but that’s all worth it in the end with a chunkier 3x sized loot pot. Dying together is better anyway since you can blame someone else for all your problems.
With these sites, you’ve got two schools of thought and a good few options out there. Eventually, though, it all boils down to whether you’re going to kite or sig tank on an afterburner. I’m a fan of kiting myself, but I’m a cheap bastard and I like going zoom.
Going Fast
What I would consider as the ‘best’ option for abyssal frigates is to go with the 1999 approach of dressing in black and pretending to be Neo. You’re going to want (only!) Dark Filaments and a set of Hawks. Bonus points for skins that imitate clothing from The Matrix. Realistically any three high damage, long-range ships should do the job, but Hawks have the benefit of missiles, easy fitting, and high damage.
[Hawk, Abyssal - Dancing makes me whole]

Crosslink Compact Ballistic Control System
Crosslink Compact Ballistic Control System

5MN Y-T8 Compact Microwarpdrive
Astro-Inertial Compact Missile Guidance Computer, Missile Range Script
Small 'Siesta' Capacitor Booster, Navy Cap Booster 75
Astro-Inertial Compact Missile Guidance Computer, Missile Range Script
Small Clarity Ward Enduring Shield Booster

Light Missile Launcher II
Light Missile Launcher II
Auto Targeting System I
Light Missile Launcher II
Light Missile Launcher II

Small Warhead Calefaction Catalyst II
Small Polycarbon Engine Housing I


Zainou 'Gypsy' CPU Management EE-603
Eifyr and Co. 'Rogue' Evasive Maneuvering EM-701
Zainou 'Deadeye' Guided Missile Precision GP-801
Zainou 'Snapshot' Light Missiles LM-901


Scourge Fury Light Missile x4000
Navy Cap Booster 75 x35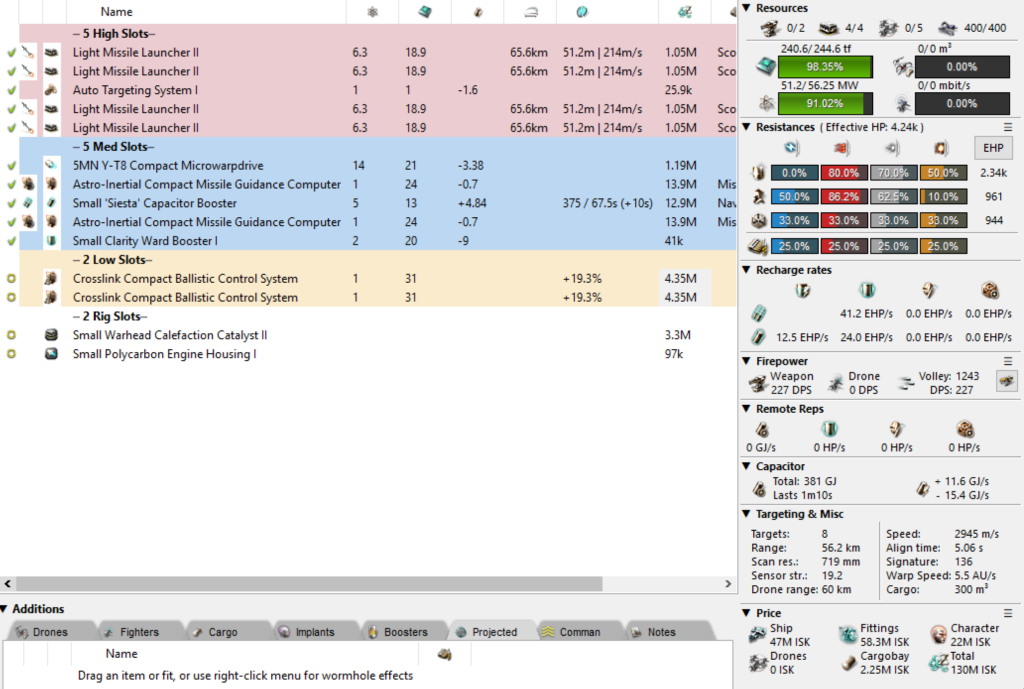
The trick is to use range scripts and simply orbit the exit gate at roughly 15-25km depending on arena size and collidable objects. As long as you keep moving then nothing should hit you at all. Once this orbit is set up you have to delete the scrams and webs immediately. The only time I’ve ever died in there has been because of a sneaky Spearfish or Upholder digging their claws in. Fortunately for you, dear reader, that has taught me that the way to survive this is to switch orbit to whomever is tackled. Staying on the gate will cause you to drift out of missile/lock range and when a Hawk is scrammed you need all the heated DPS you can muster to free them.
As with the cruisers discussed before, you’re going to want a list of priority targets. For the Hawk that goes Scrams > Webs > Remote Reps > Partial HP Ships > Neuts > All Others. You can refer to the cheatsheet for particular names, repeating popular resources is not the reason this guide is here! This fit can do T4’s easily and T5’s, while spooky, can work too. I do recommend trying out the T5 once you’re used to it, a single site is probably enough to replace all three Hawks and it’s more exciting than Nestor krabbing.
Not Going Fast
For a more traditional approach to PvE it’s entirely possible to outfit a trio of Assault Frigates with a reasonable tank. The benefit here is that you know you can actually take punishment like a BDSM enthusiast. Of course, that comes with the downside of often needing a healthy amount of bling for each ship. Despite this, there is a charming little Youtuber who has shown that it’s actually possible to use a solo alpha Kestrel to run sites. It’s a fun little video and his production quality is great.
Of course, most of my readers are going to be after the big money. Luckily my friends in Villore Accords [GMVA] are big advocates for a particularly nice Retribution fit. Rather than copy theirs exactly, here’s my take on the same concept:
[Retribution, T5 Electrical]

Corpii C-Type Small Armor Repairer
Corpii A-Type Adaptive Nano Plating
EFFA Compact Assault Damage Control
Extruded Compact Heat Sink
Extruded Compact Heat Sink

Thukker Small Cap Battery
Coreli A-Type 1MN Afterburner

Small Focused Beam Laser II
Small Focused Beam Laser II
Small Focused Beam Laser II
Small Focused Beam Laser II
Coreli A-Type Small Remote Armor Repairer

Small Anti-Thermal Pump II
Small Anti-EM Pump II


Zainou 'Gypsy' CPU Management EE-602
Eifyr and Co. 'Gunslinger' Motion Prediction MR-701
Inherent Implants 'Noble' Mechanic MC-801
Eifyr and Co. 'Gunslinger' Surgical Strike SS-901
Inherent Implants 'Noble' Hull Upgrades HG-1001


Aurora S x4
Gleam S x4
Imperial Navy Multifrequency S x4
Imperial Navy Standard S x4
Imperial Navy Xray S x4
Nanite Repair Paste x50
The idea is that you anchor up 5-10km from someone and keep range from the biggest neuting and webbing threats, shooting them with Aurora. Once the main threats are down you can switch to Multifrequency and head in close to maximise damage. Try not to fly into sig radius (blue) clouds and don’t hit any rocks! It should work out well enough providing that everyone pays attention and gets reps on quickly. Do note that these Retris will only run T5 Electrical Filaments (and below). At the time of writing that will set you back about 90m ISK before you even enter!
Tips and Advice
- With a team of three, it’s worth it to grab the extra bits of loot on the edges if you aren’t trying to blitz sites.
- Turn your MWD off before entering a new room in a Hawk. If you leave it on then you’ll be hurtling towards potential scrams at 4km/s.
- Create a channel and lay out your target list in the MOTD for all to see without needing a cheat sheet.
- Watch to make sure that you don’t fling out of the arena, particular in Hawks.
- Avoid blue clouds when sig tanking or you’ll be hit like a truck.
- Stay near to whoever gets tackled, you need to kill it immediately.
Resources
Kaleesh’s Abyssal Cheatsheet
Reload’s Guide Fast Hawks
Abyssal Trios by /u/HenriFrancais
Good article, but abyssal sites aren’t my thing. Thank You though, these are great compilations of the info needed
I have never done Abyssal and I am looking to get into. I see everyone praises Gila, so I figured I stop theorizing too much and just invest upfront in a good ship. However, I don’t have RLML skills and I am not really looking to invest time in them right now. I have almost lvl5 skills for HAMs. Could your ‘safer fit’ Gila work but with HAMs?
Also, I would first try Abyssal on the test server or watch bunch of videos just to be sure how to do it correctly. Don’t want to wreck 400m in one run.
Gila with HAMs with some modifications.
https://imgur.com/CFXmGqy
Seems alright for the most part. I would recommend putting the Power Diagnostic back on. That increases your shield and cap regen which you want both of on that ship. If you’re just blitzing T3’s then 3x DDA will probably be fine, though.
The point of the RLMLs is that they help kill the small stuff much better. If you eventually train the skills then I would suggest putting them back on when possible 🙂
I’ve heard that MWD Frigates are no longer very viable as of 2021. Is that true or will the MWD solo hawk still do the trick?
Still possible, just harder due to the Tachyon clouds. They will make you (and enemies) go super fast so it’s more about manual piloting than it is about simple lazy orbiting.
That said, I don’t often do abyssals and haven’t done them in a while…
Does this look viable?
[Ishtar, Abyss Running]
Imperial Navy Drone Damage Amplifier
Imperial Navy Drone Damage Amplifier
Imperial Navy Drone Damage Amplifier
Imperial Navy Omnidirectional Tracking Enhancer
Assault Damage Control II
Caldari Navy Power Diagnostic System
Gist X-Type X-Large Shield Booster
Gistum B-Type Multispectrum Shield Hardener
Thukker Large Cap Battery
Corelum B-Type 50MN Microwarpdrive
Domination 200mm Autocannon, Hail S
Domination 200mm Autocannon, Hail S
Domination 200mm Autocannon, Hail S
Domination 200mm Autocannon, Hail S
Medium EM Shield Reinforcer II
Medium Capacitor Control Circuit II
‘Augmented’ Berserker x5
Berserker II x5
Republic Fleet Berserker x5
High-grade Crystal Alpha
High-grade Crystal Beta
High-grade Crystal Gamma
High-grade Crystal Delta
High-grade Crystal Epsilon
High-grade Crystal Omega
Overmind ‘Goliath’ Drone Tuner T25-10S
Inherent Implants ‘Squire’ Capacitor Management EM-804
Zainou ‘Gnome’ Shield Operation SP-903
Improved Blue Pill Booster
I’m sure it will be fine as long as you kite and don’t take too much EM/Expl damage. Take care of your own drones and rush through putting out lots of DPS so that you don’t run out of time.
It’s also obscenely expensive at 4.5b ISK nearly. Just get a Marauder and do C5 sites for much more ISK per hour
The Ikitursa murders T5 and T6 sites. There’s a reason one costs almost as much as a rattlesnake. They’re pocket battleships.